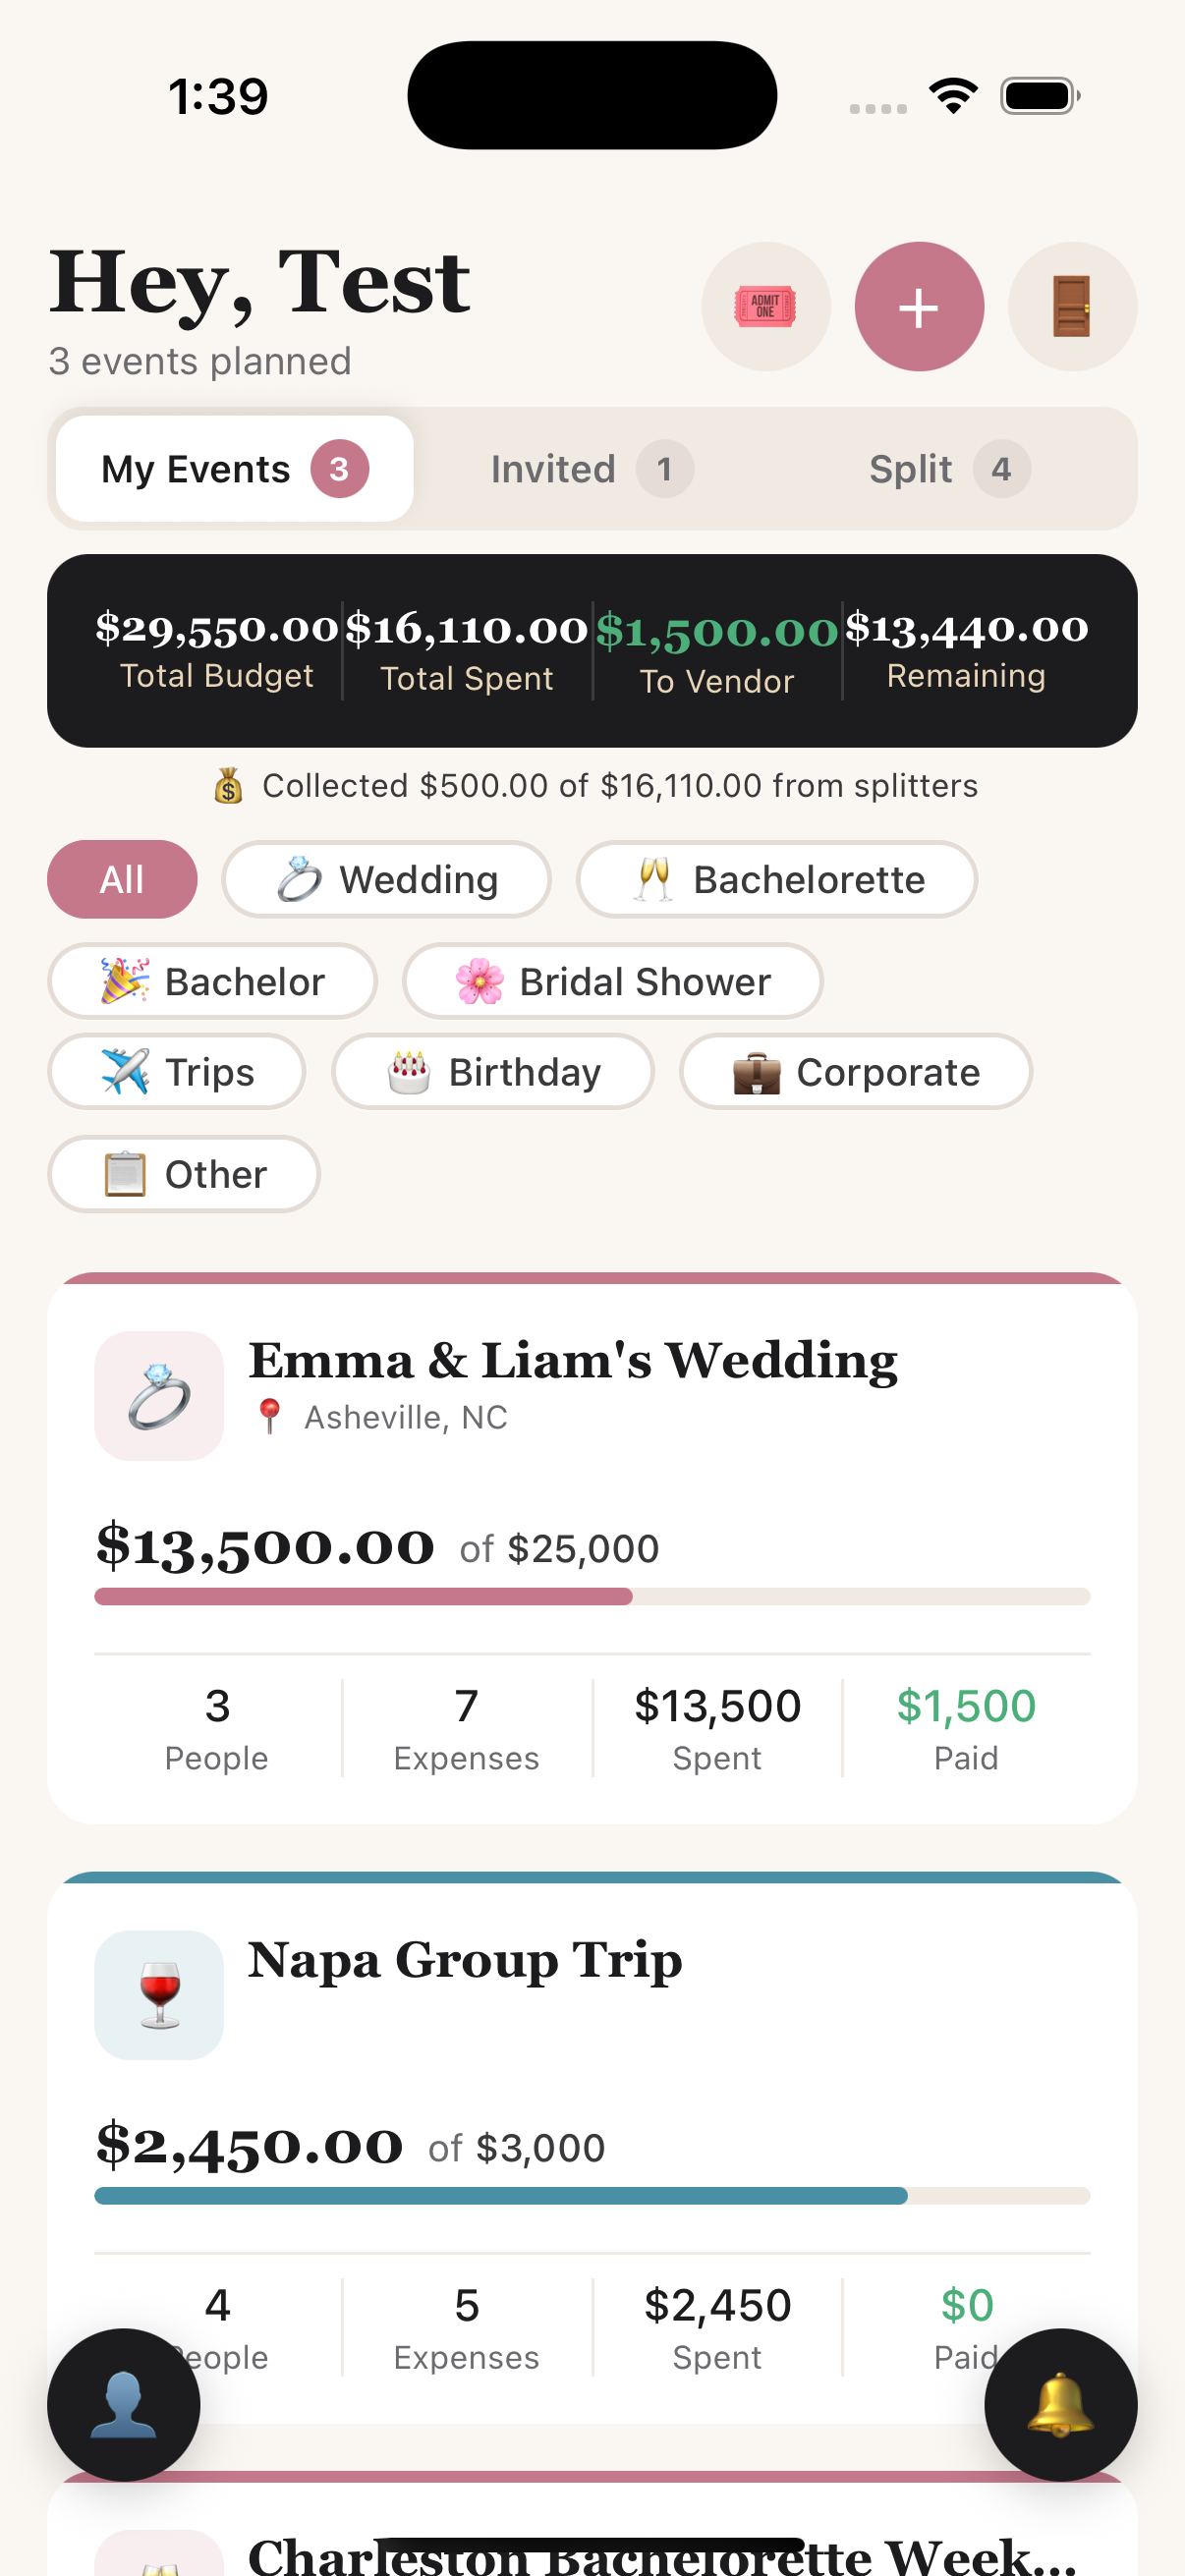
3
📚
Feature Reference
The event tabs
| Tab | What it's for |
|---|
| Overview | Budget headline, to-vendor vs. collected, per-person split, category breakdown, linked events. |
| Expenses | Every line item with its status; start from a template; bundled items nest under their parent. |
| People | Attendees and roles; who's splitting; add or import people. |
| Split | Your own share, plus View Full Breakdown → Settle Up: the fewest transfers to square everyone up, per-person cards & Payment History. Pay buttons appear on your own debt — see Step 8. |
| Headcount | Only on events with a guest list and a venue. Replies (and a breakdown per part of the day), the venue's minimum and maximum against the people on your list, what the heads cost, the guest RSVP link, and what to tell the caterer. |
Budgets & templates
A brand-new event's Expenses tab offers “✨ Start from a Wedding template” — or a Group Trip one, or whichever type you picked. You get a checklist of the line items that kind of event usually needs, each with a sensible starting amount you can edit. Untick anything that does not apply.
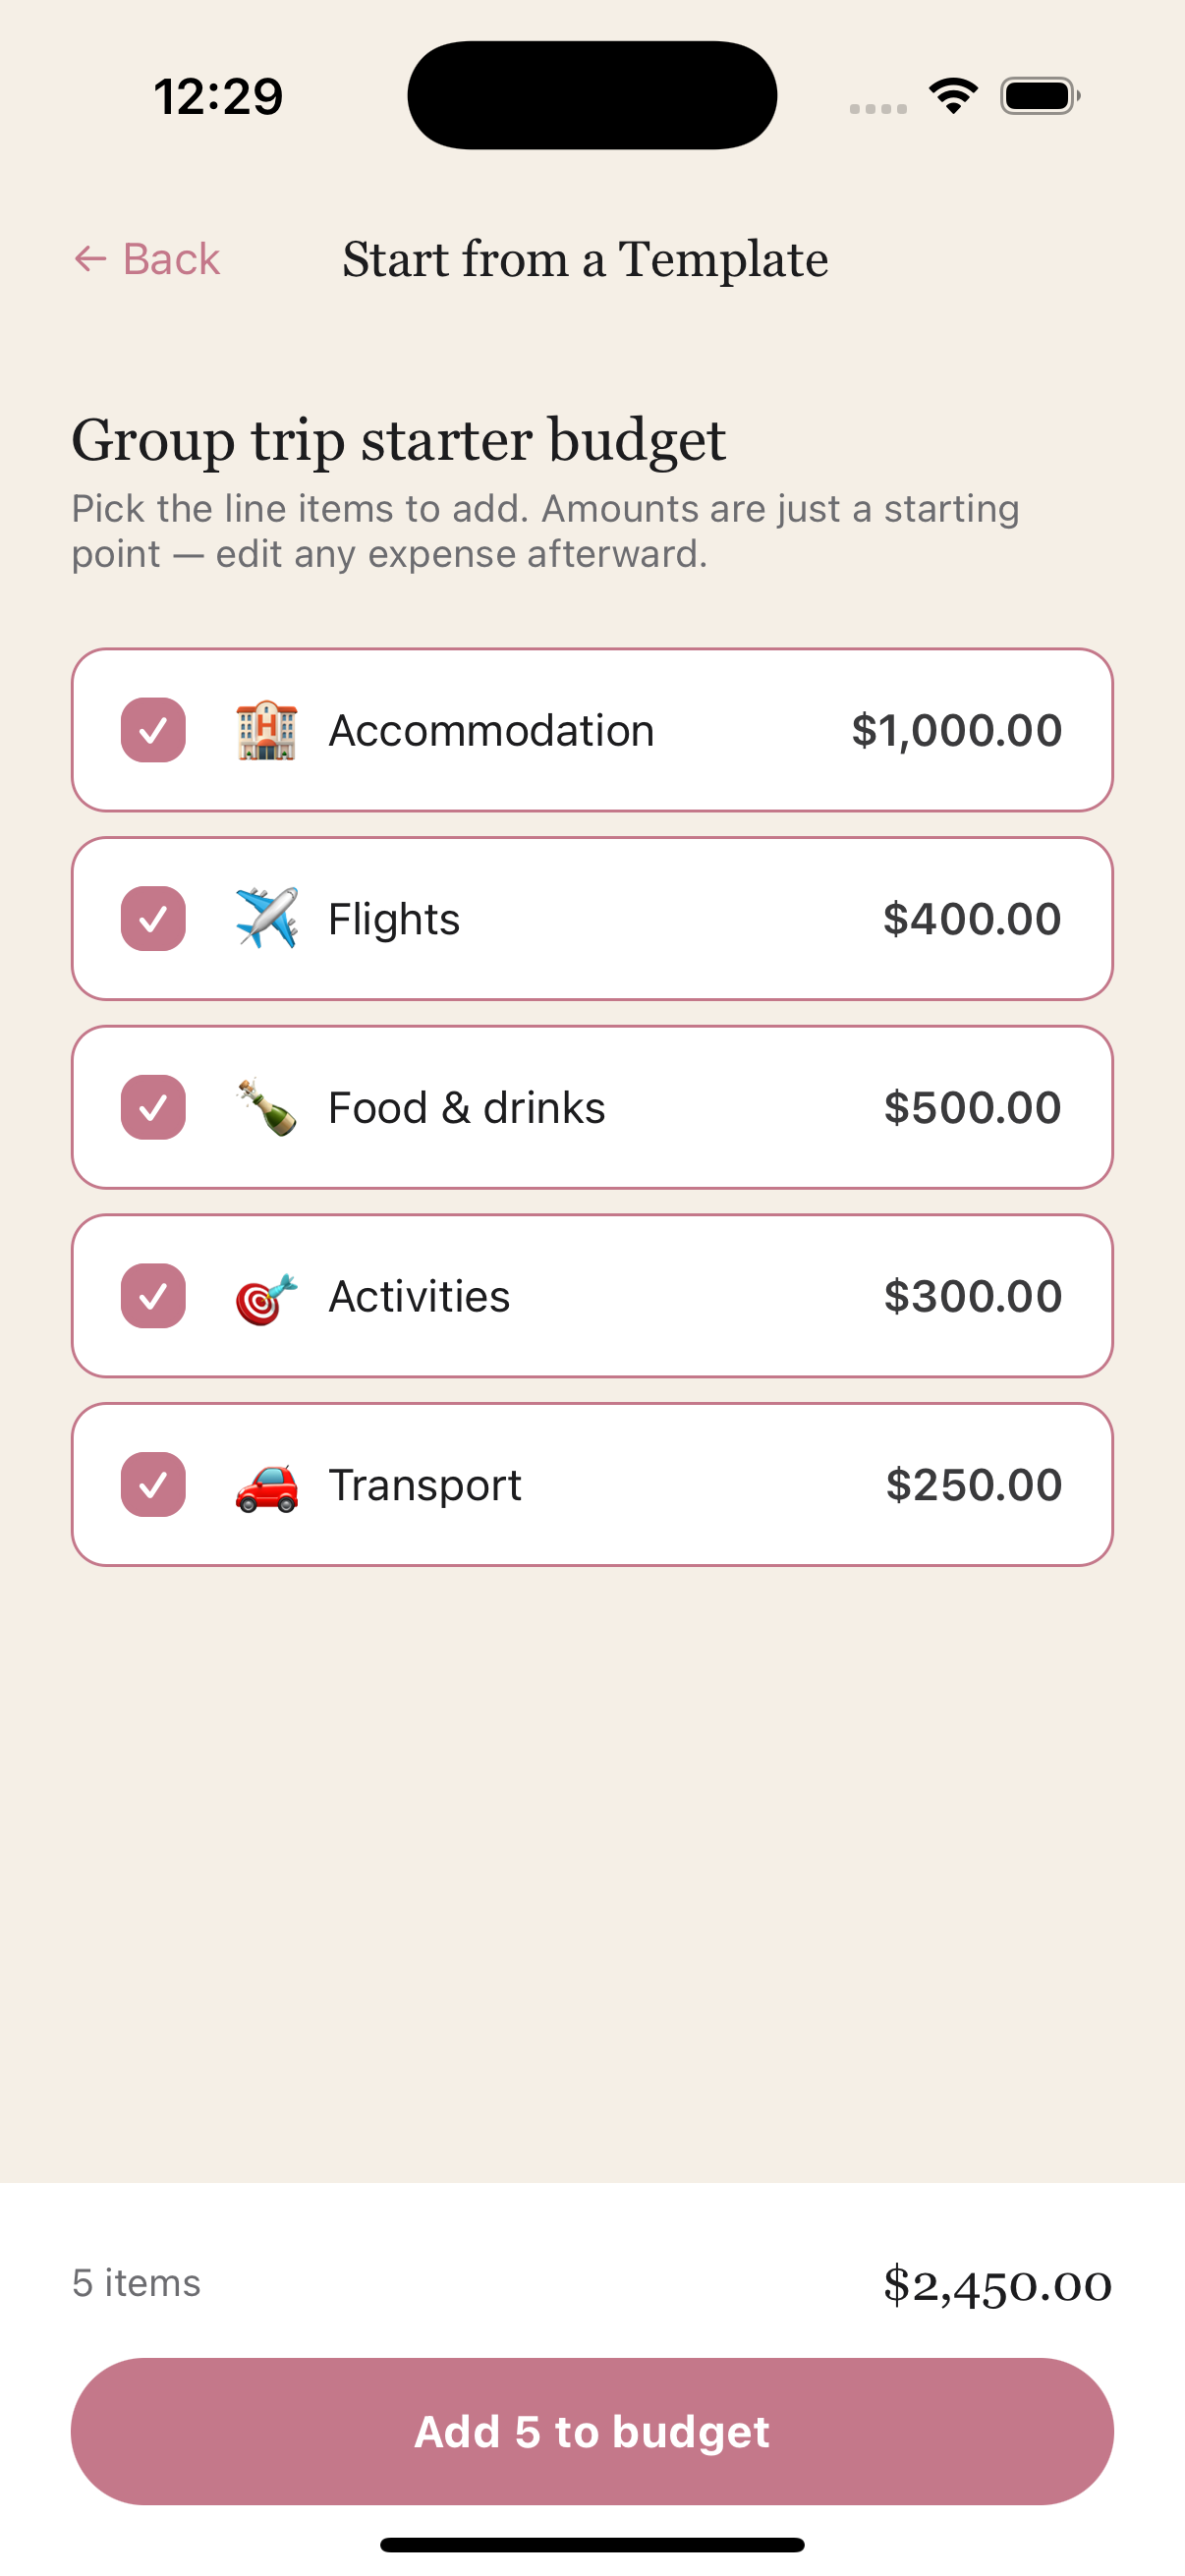
Pick the line items to add — untick anything you don't need
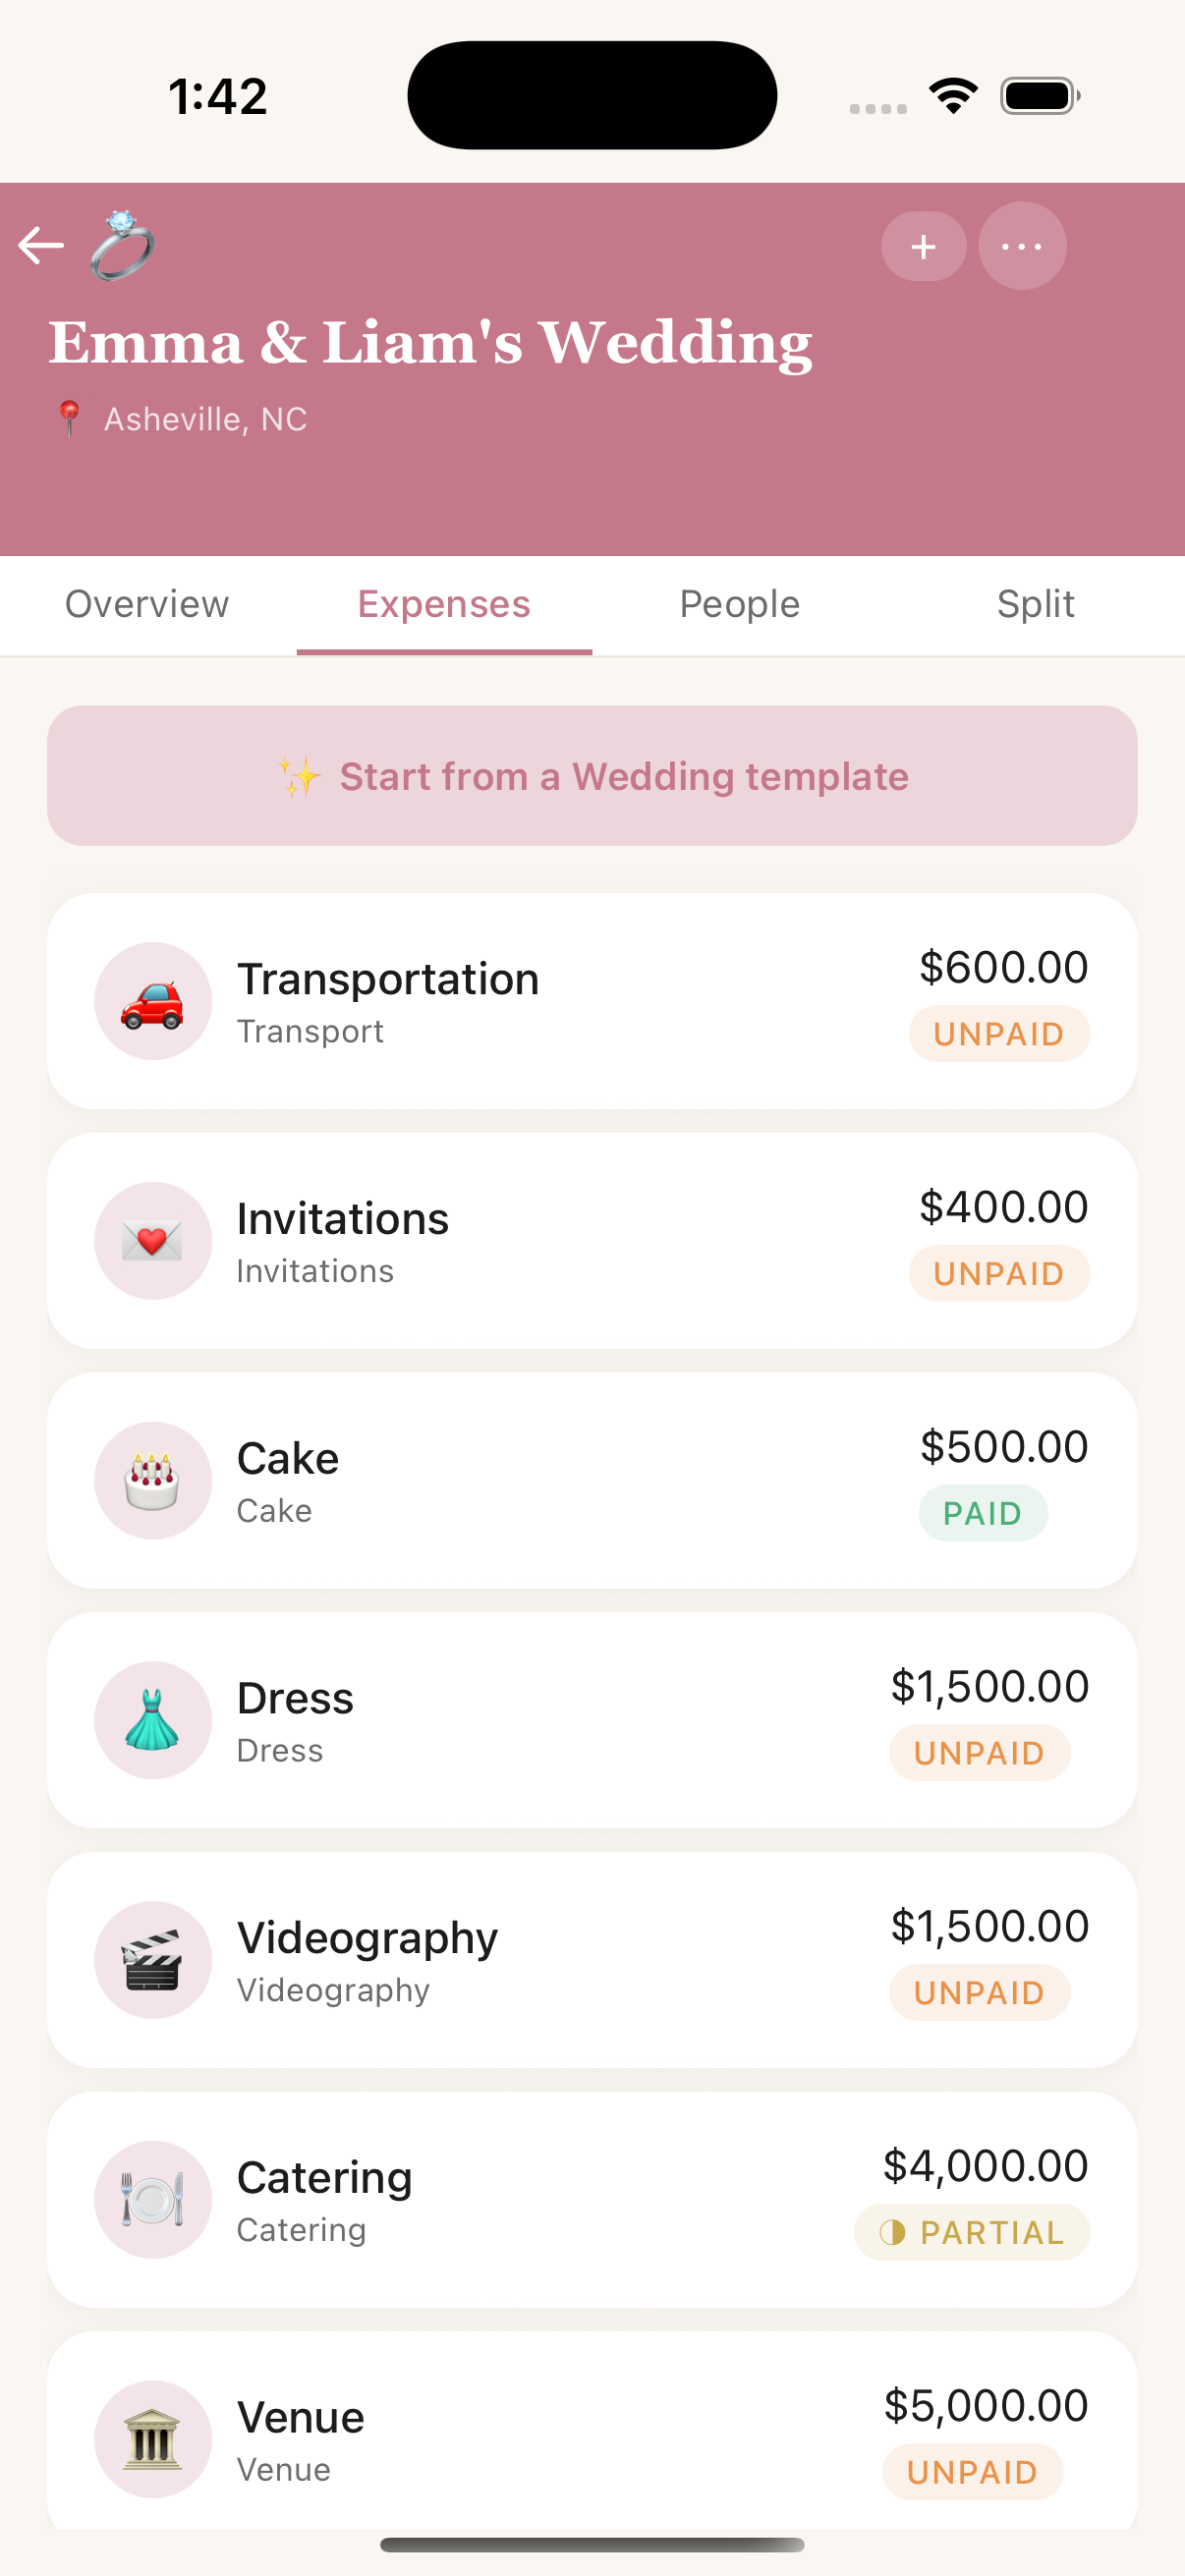
…and your Expenses tab fills in instantly
The Overview tab is the budget at a glance: planned against actual, what has gone to vendors against what you have collected, the per-person split, a category breakdown, and any linked events.
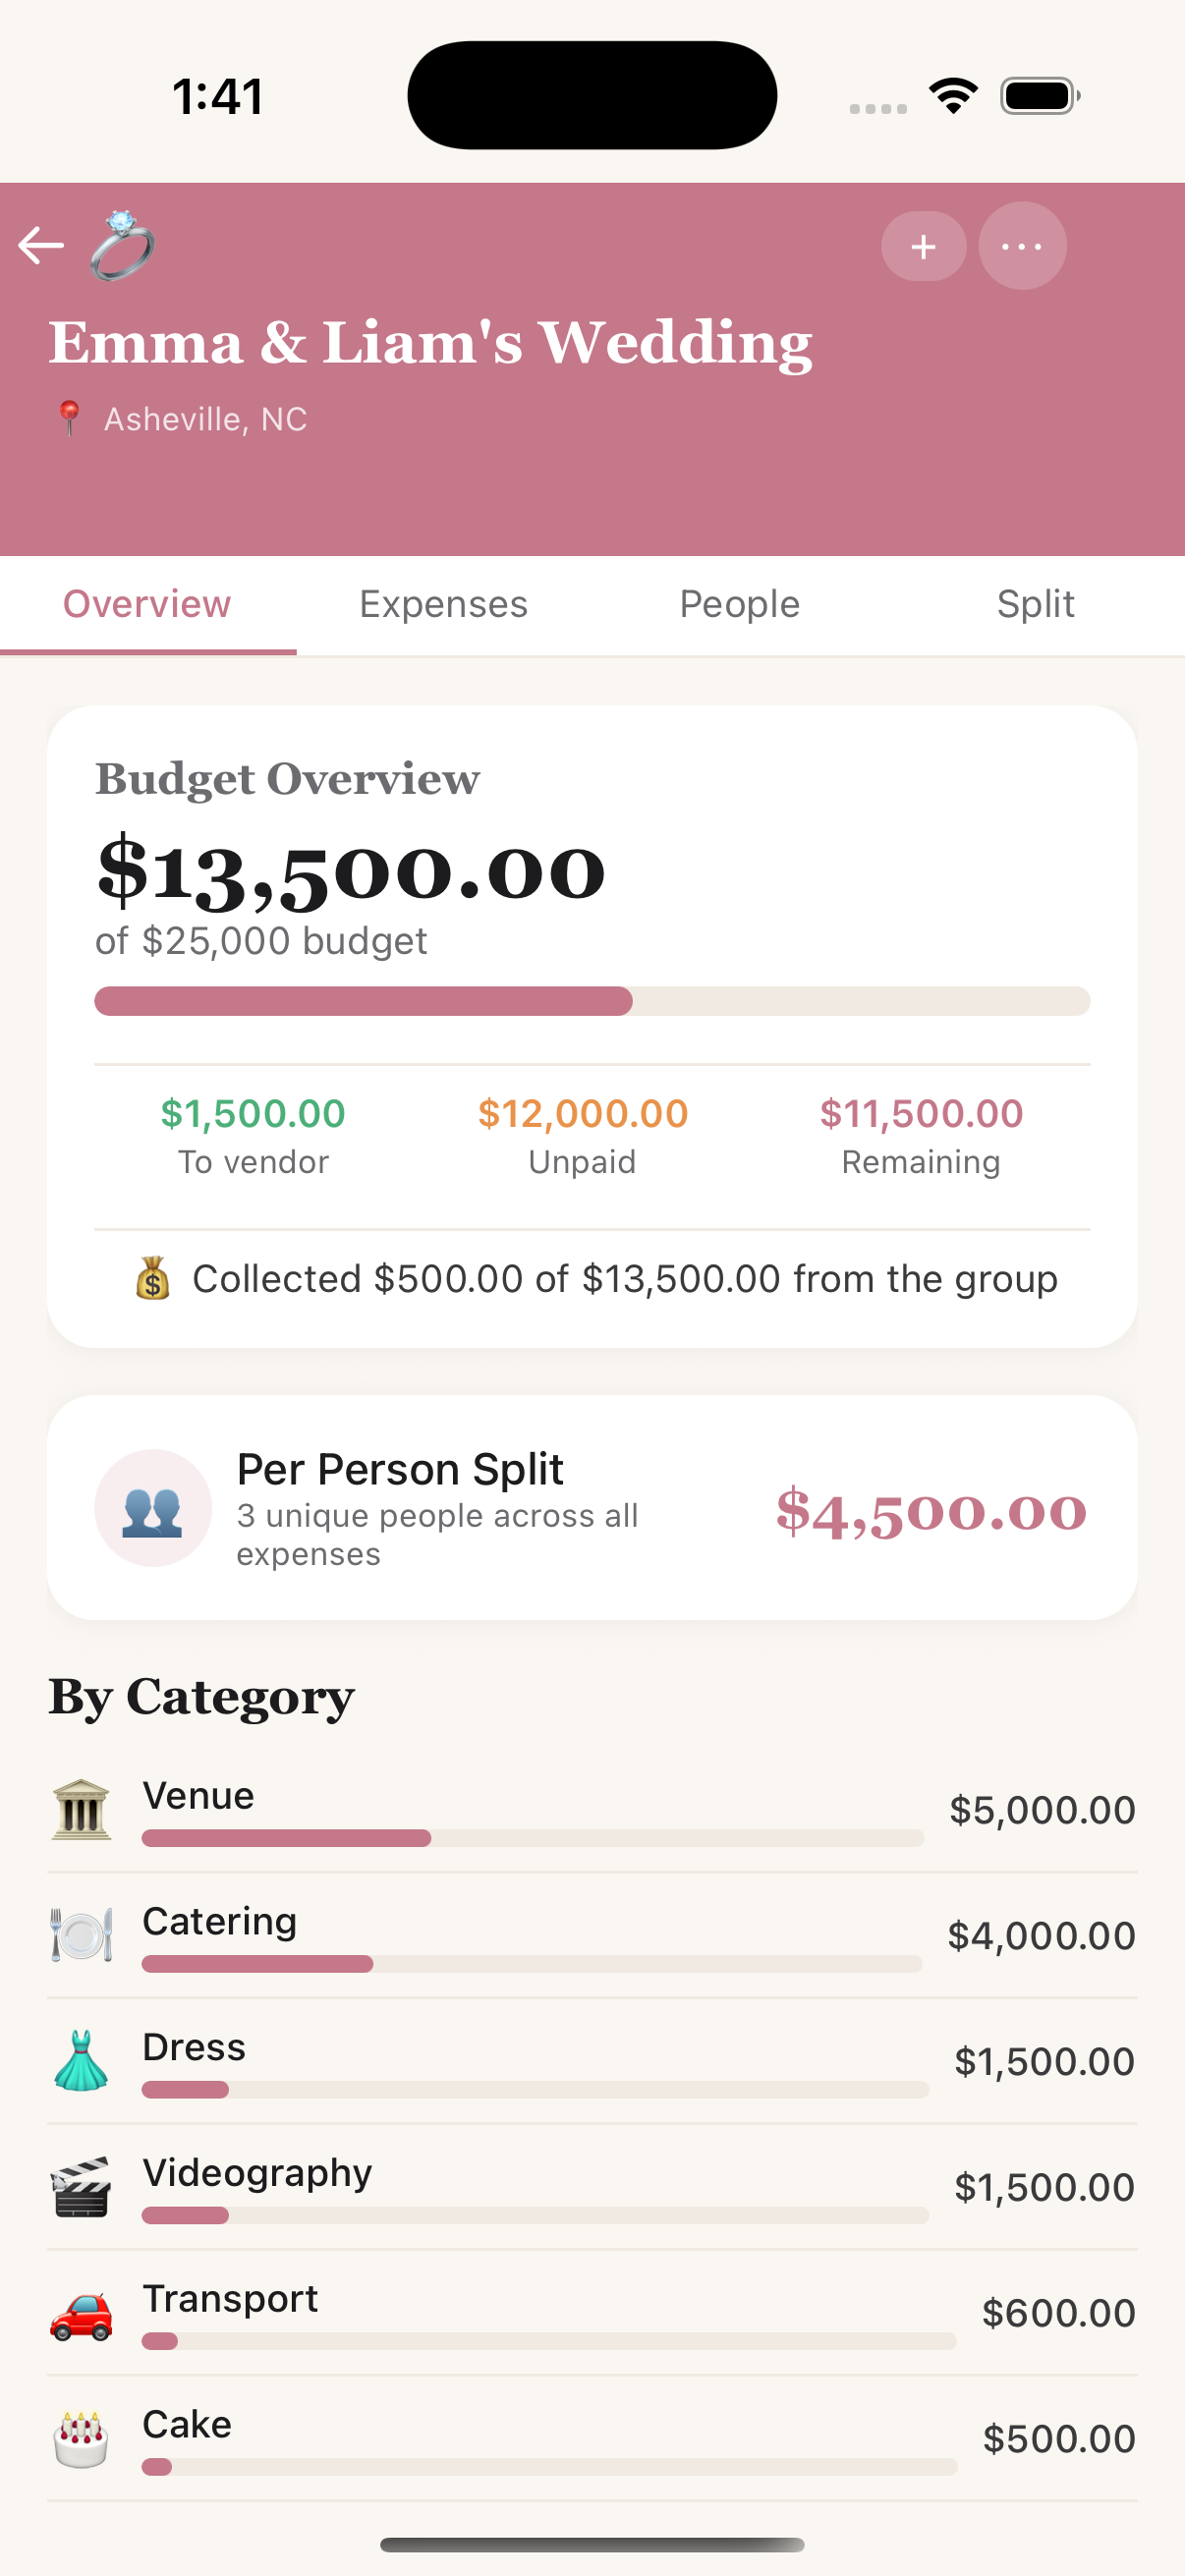
Overview — a wedding's budget at a glance
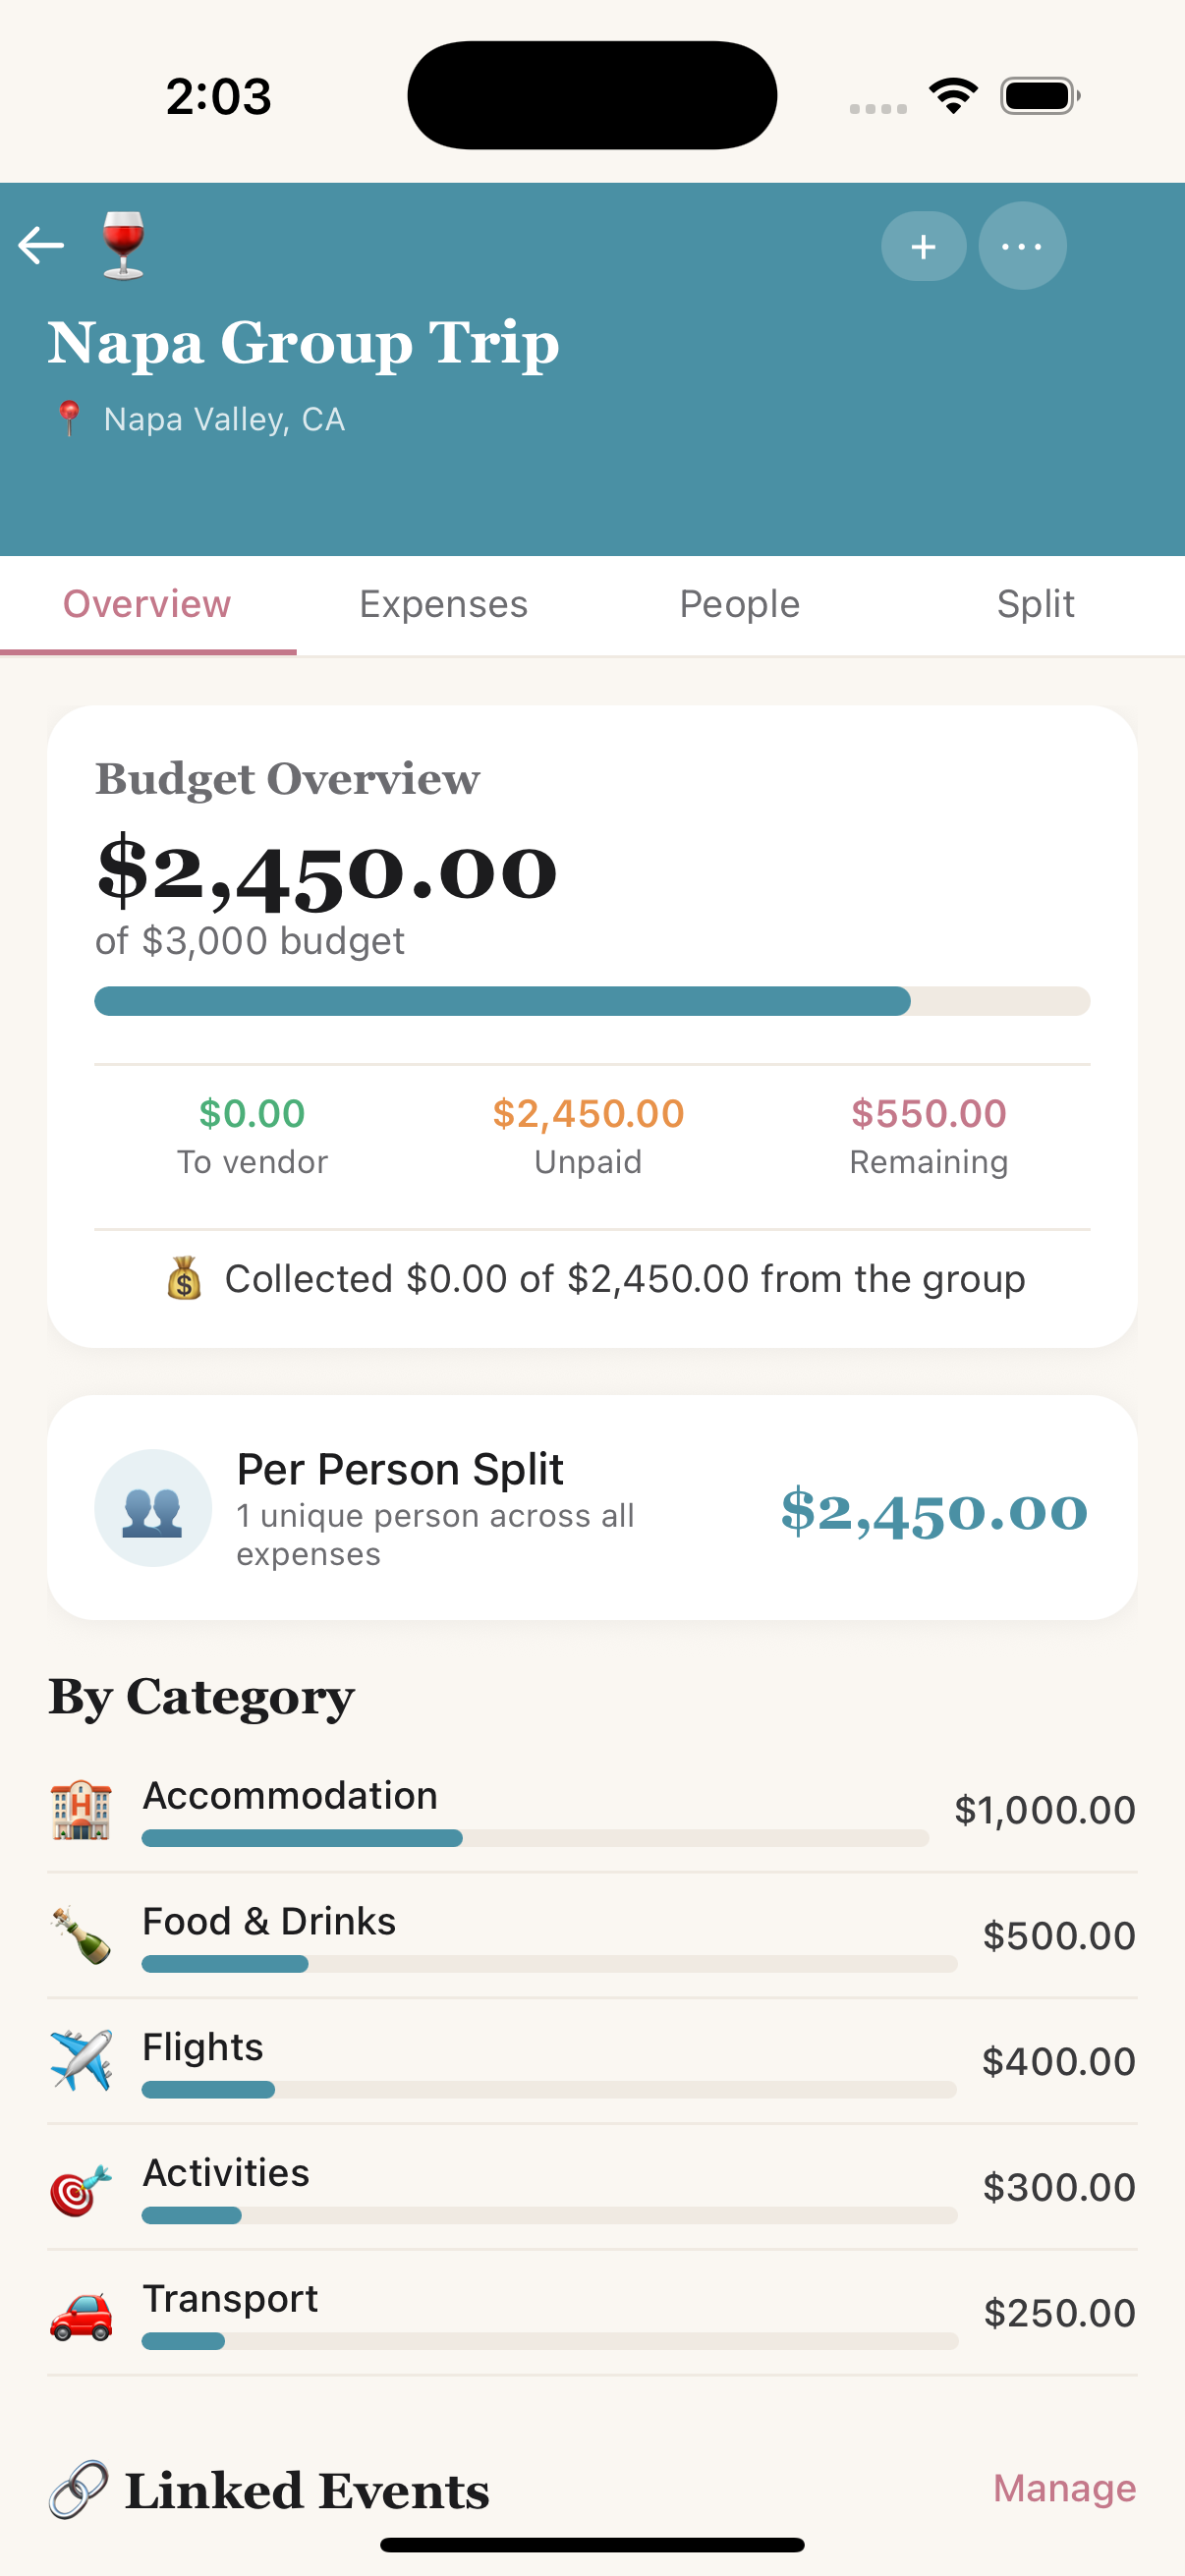
The same tabs on a group trip — travel categories instead
Included expenses — bundling a package
A venue price that already covers the DJ, the linens and the cake should not count them twice. Open the parent expense, choose Includes other expenses, and tick the line items it covers. They nest underneath it and drop out of every rollup.
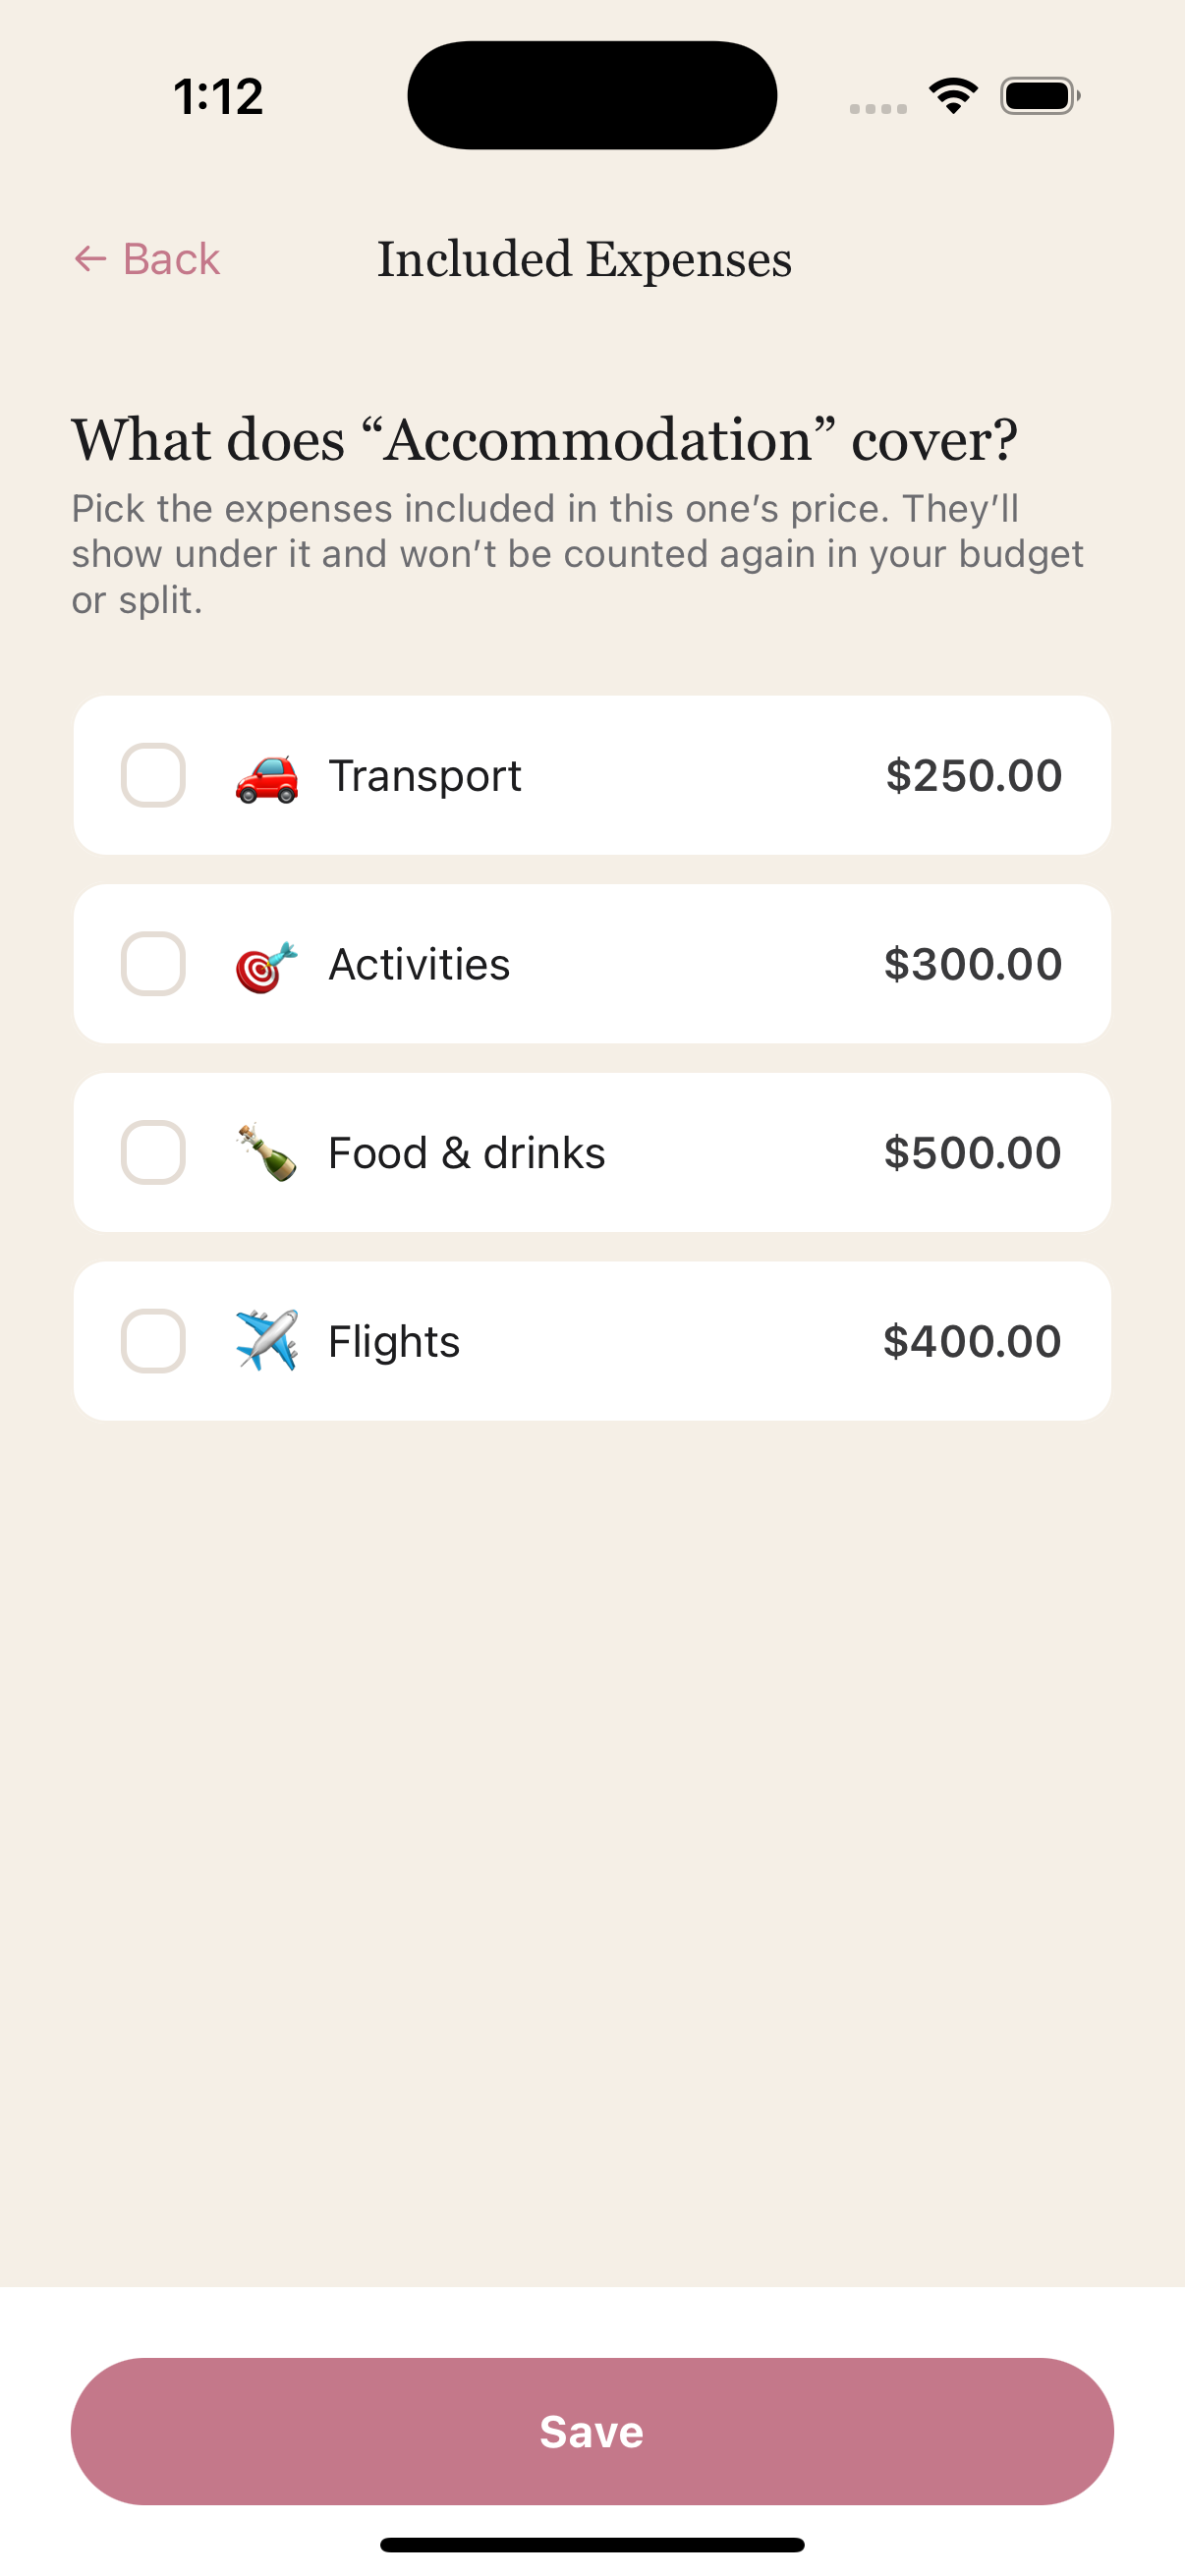
Tick what the package already covers
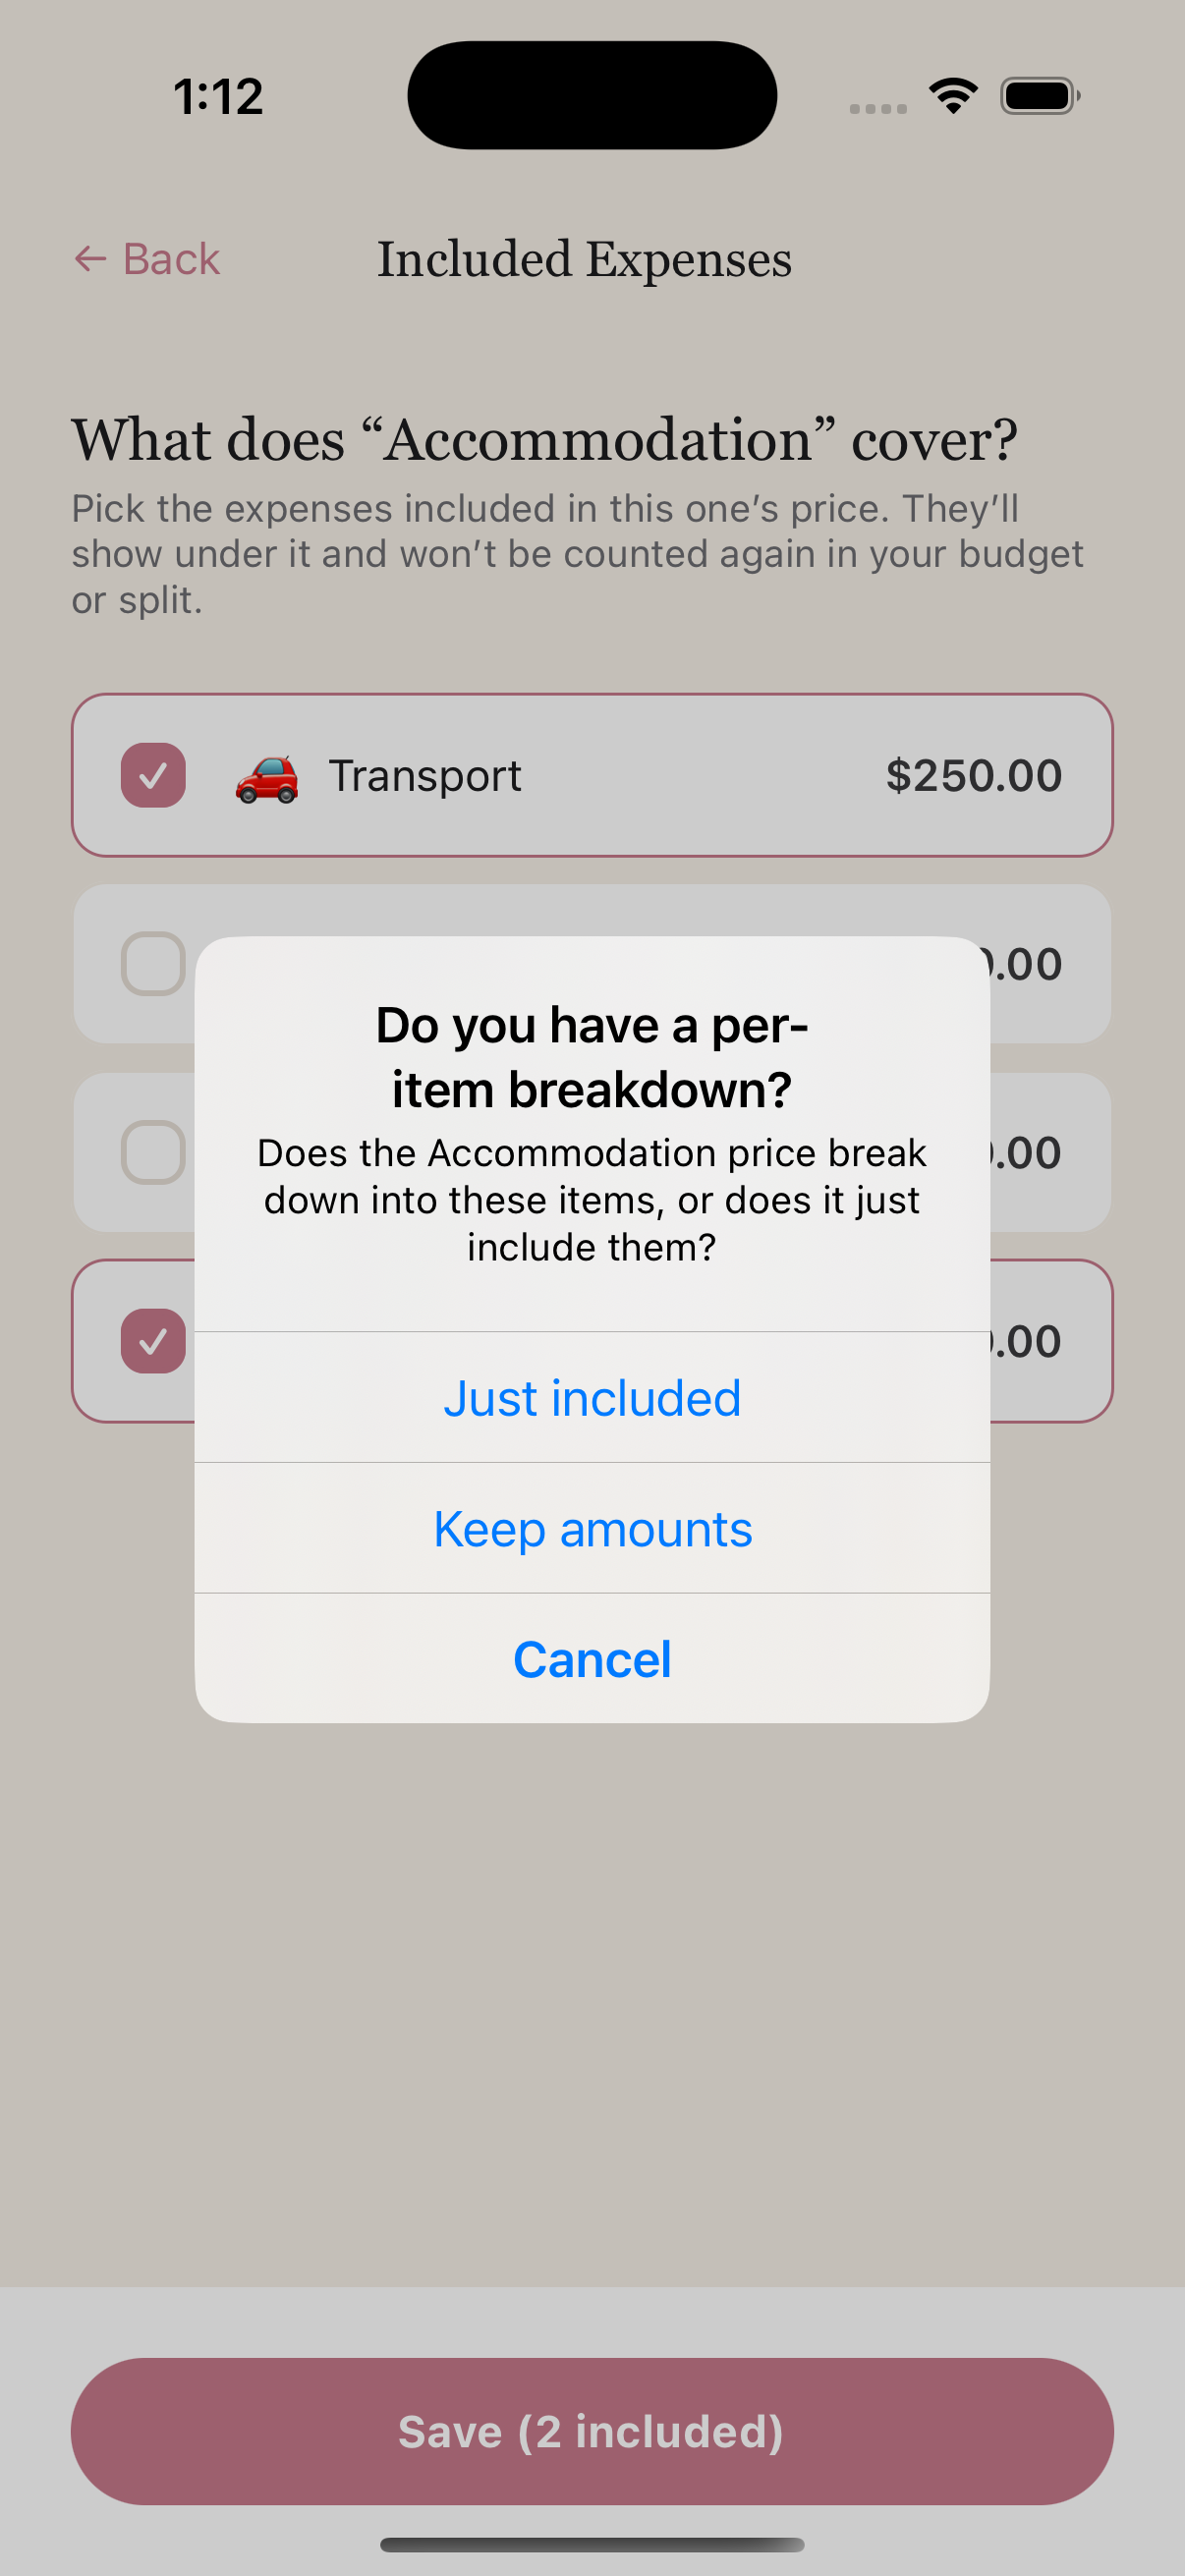
Keep the itemised detail if you have it
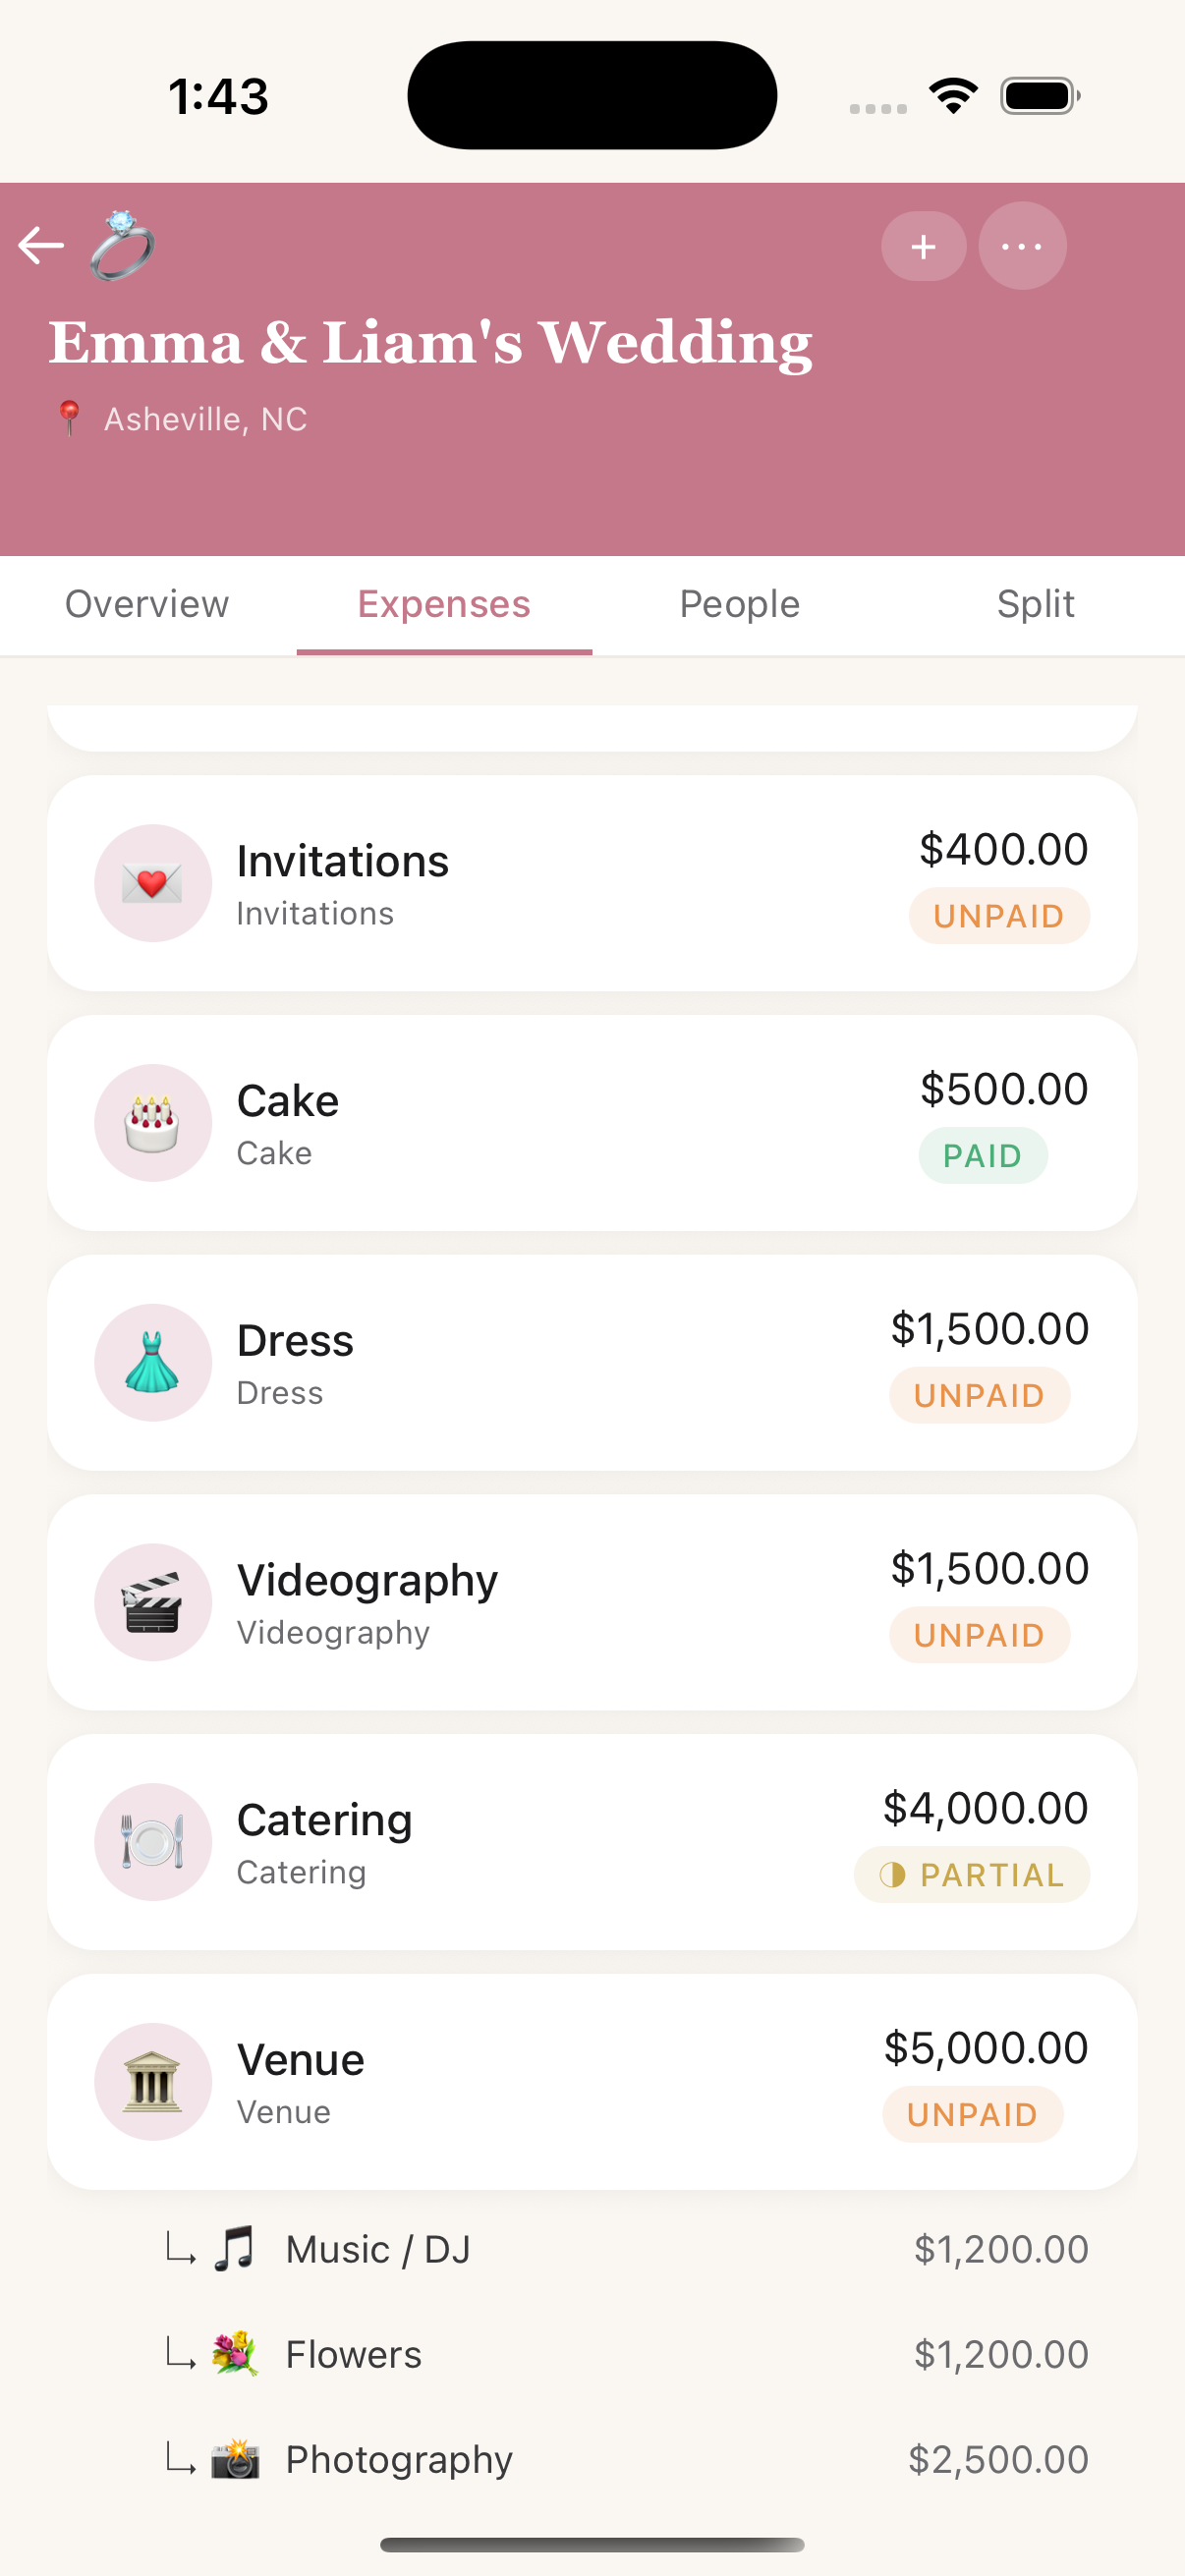
The venue, with what it includes nested under it
Splitting the cost
Every splitting attendee is pre-selected on a new expense; add or remove people per expense. When the shares are not equal, switch from Split equally to Custom split and set each person's share in $ or % — they have to add up to the total, and the app tells you if they do not. Change it later with ✏️ Edit split on the expense.
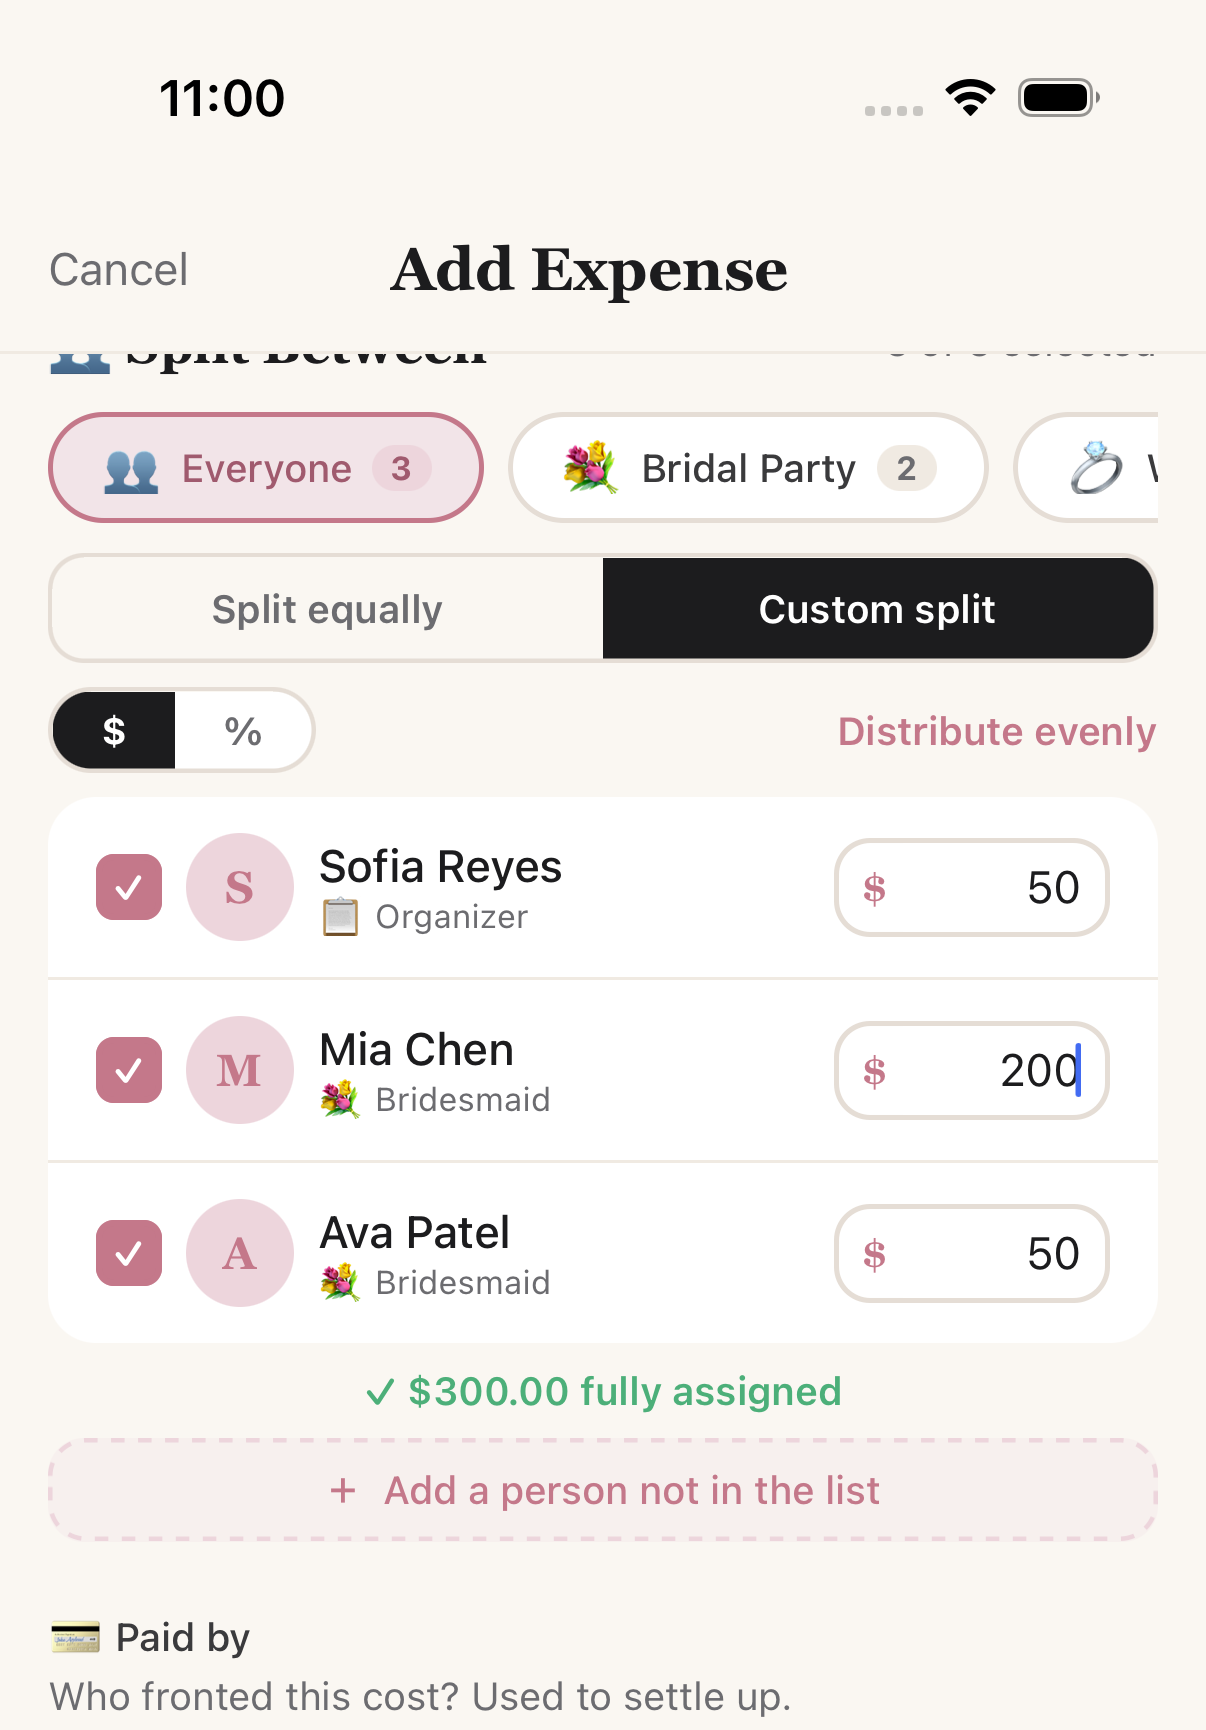
Custom split — set each person's share in $ or %
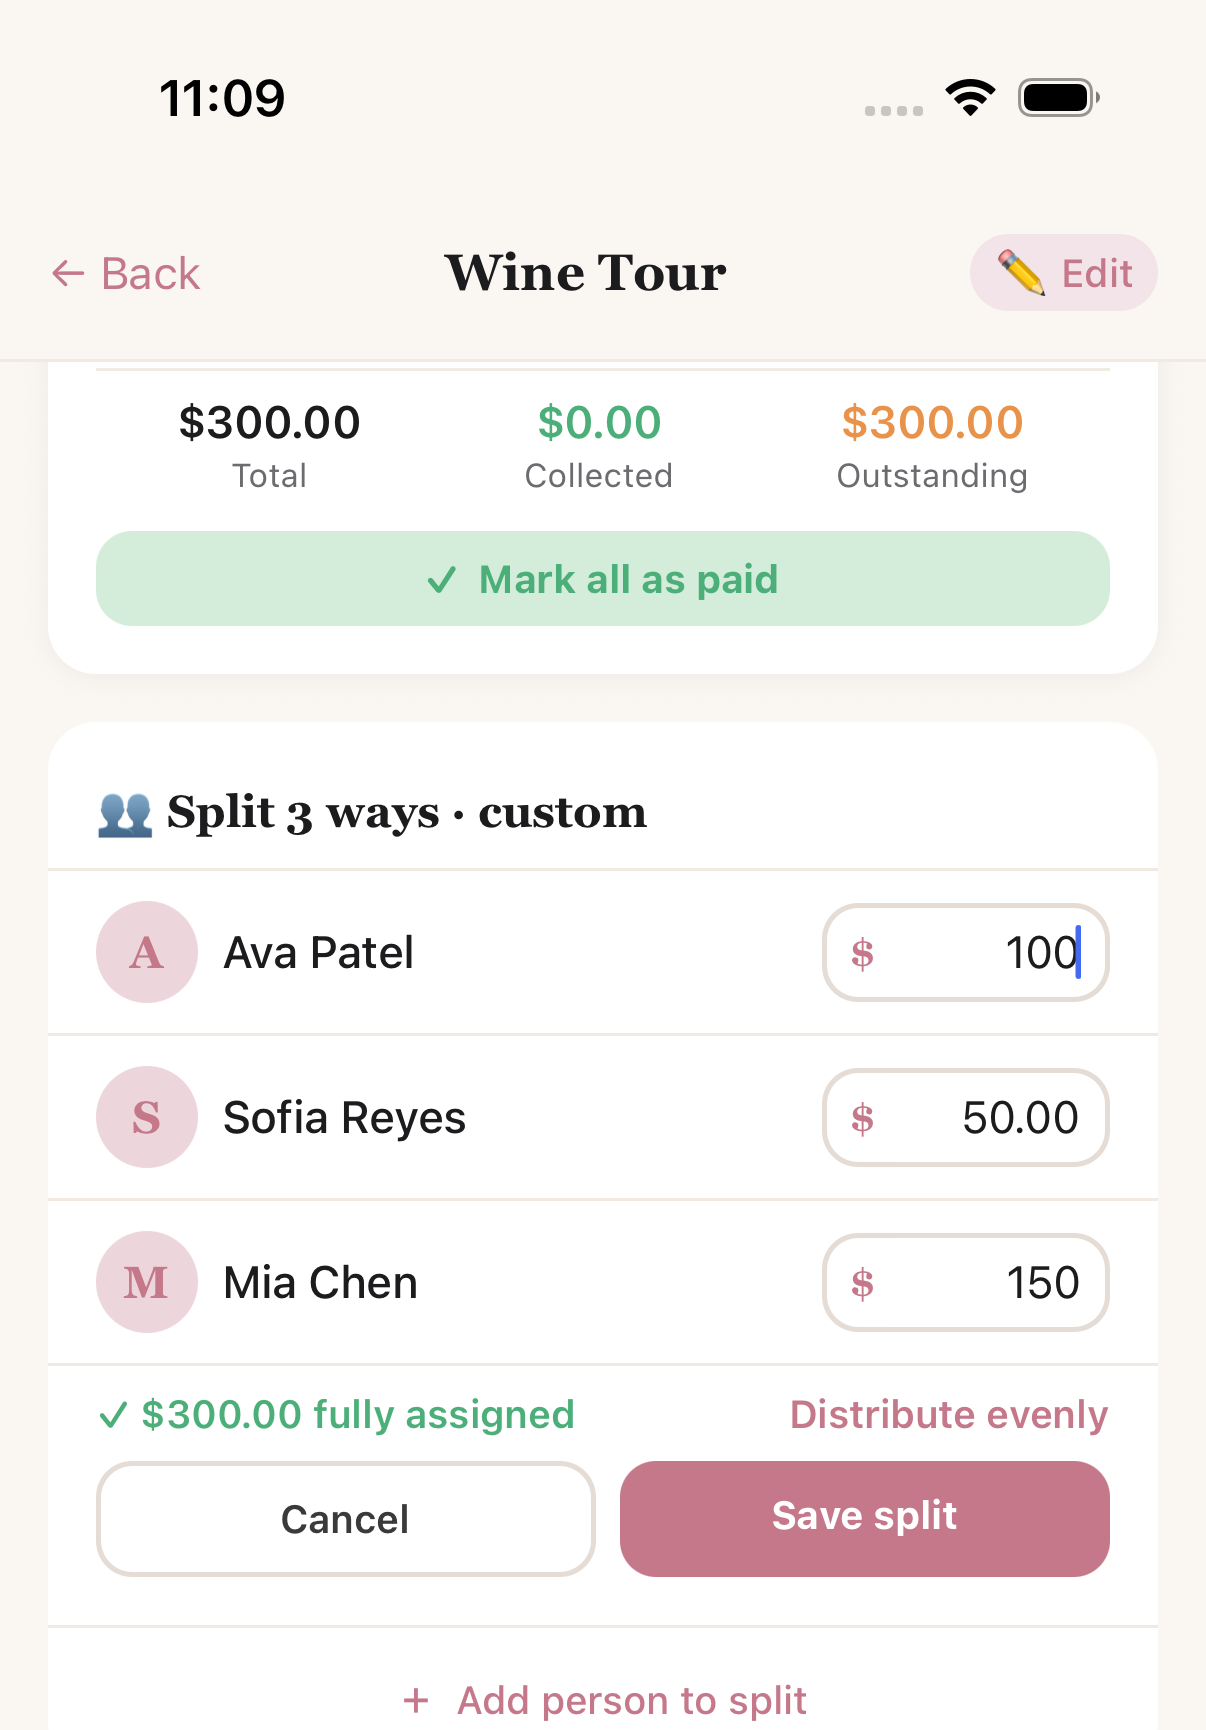
…and change it later from the expense
Even splits do not drop cents. $10.00 across three people is 3.34 + 3.33 + 3.33, not three lots of 3.33 — otherwise the payer is left short and the settlement cannot balance.
Your own share, on any event, is on the Split tab.
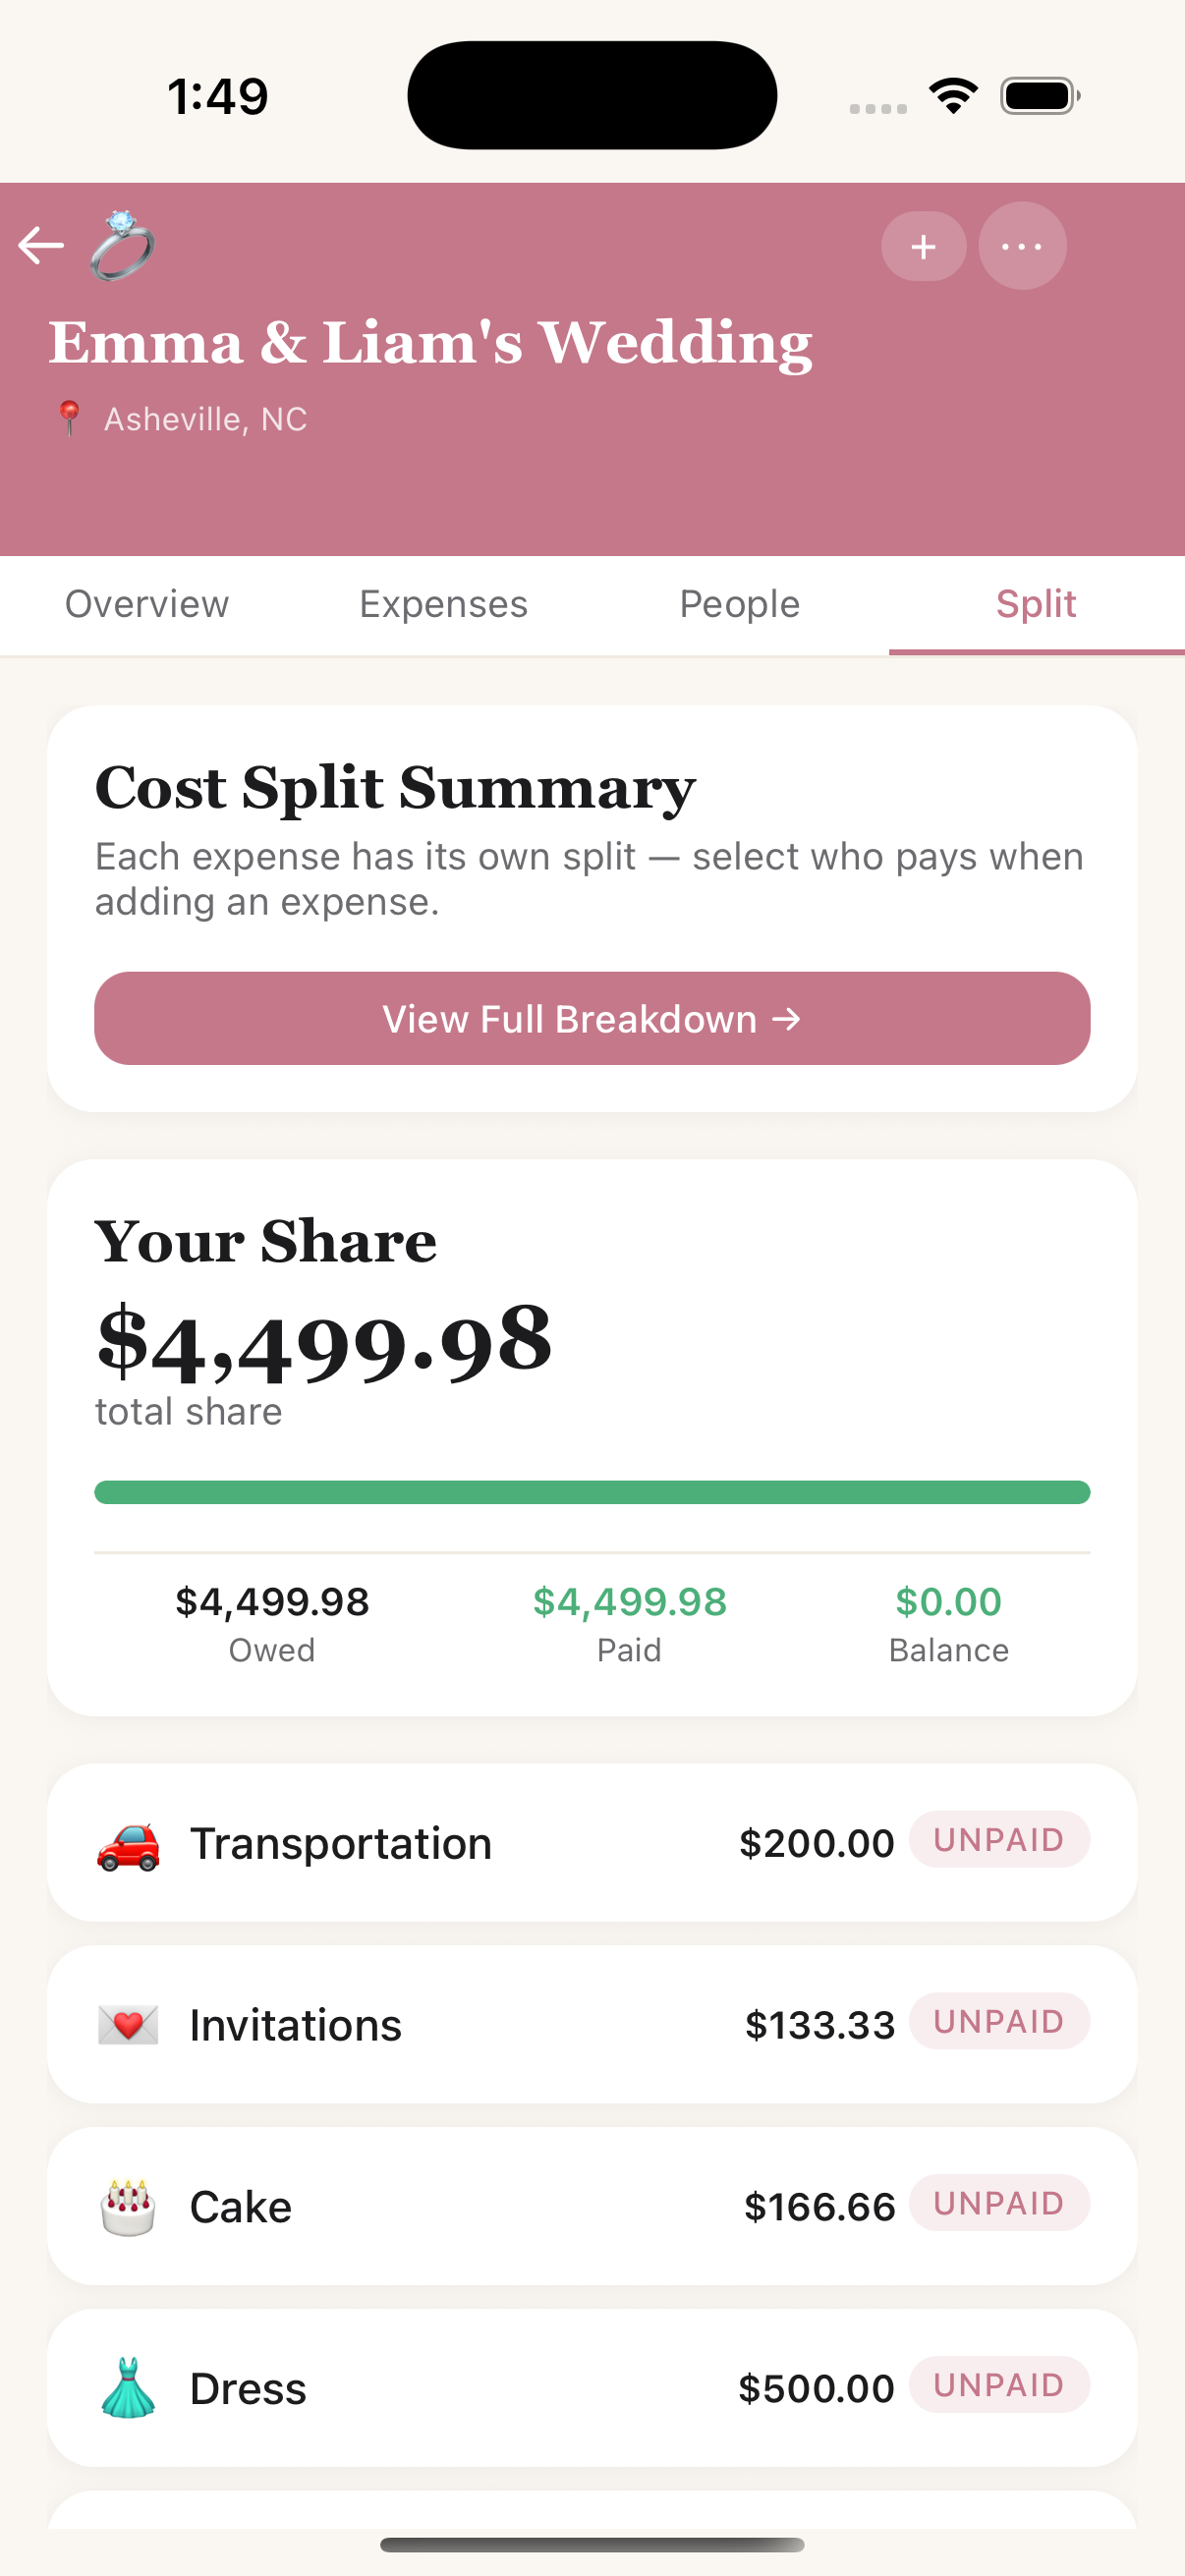
Split — what you owe, and what it is for
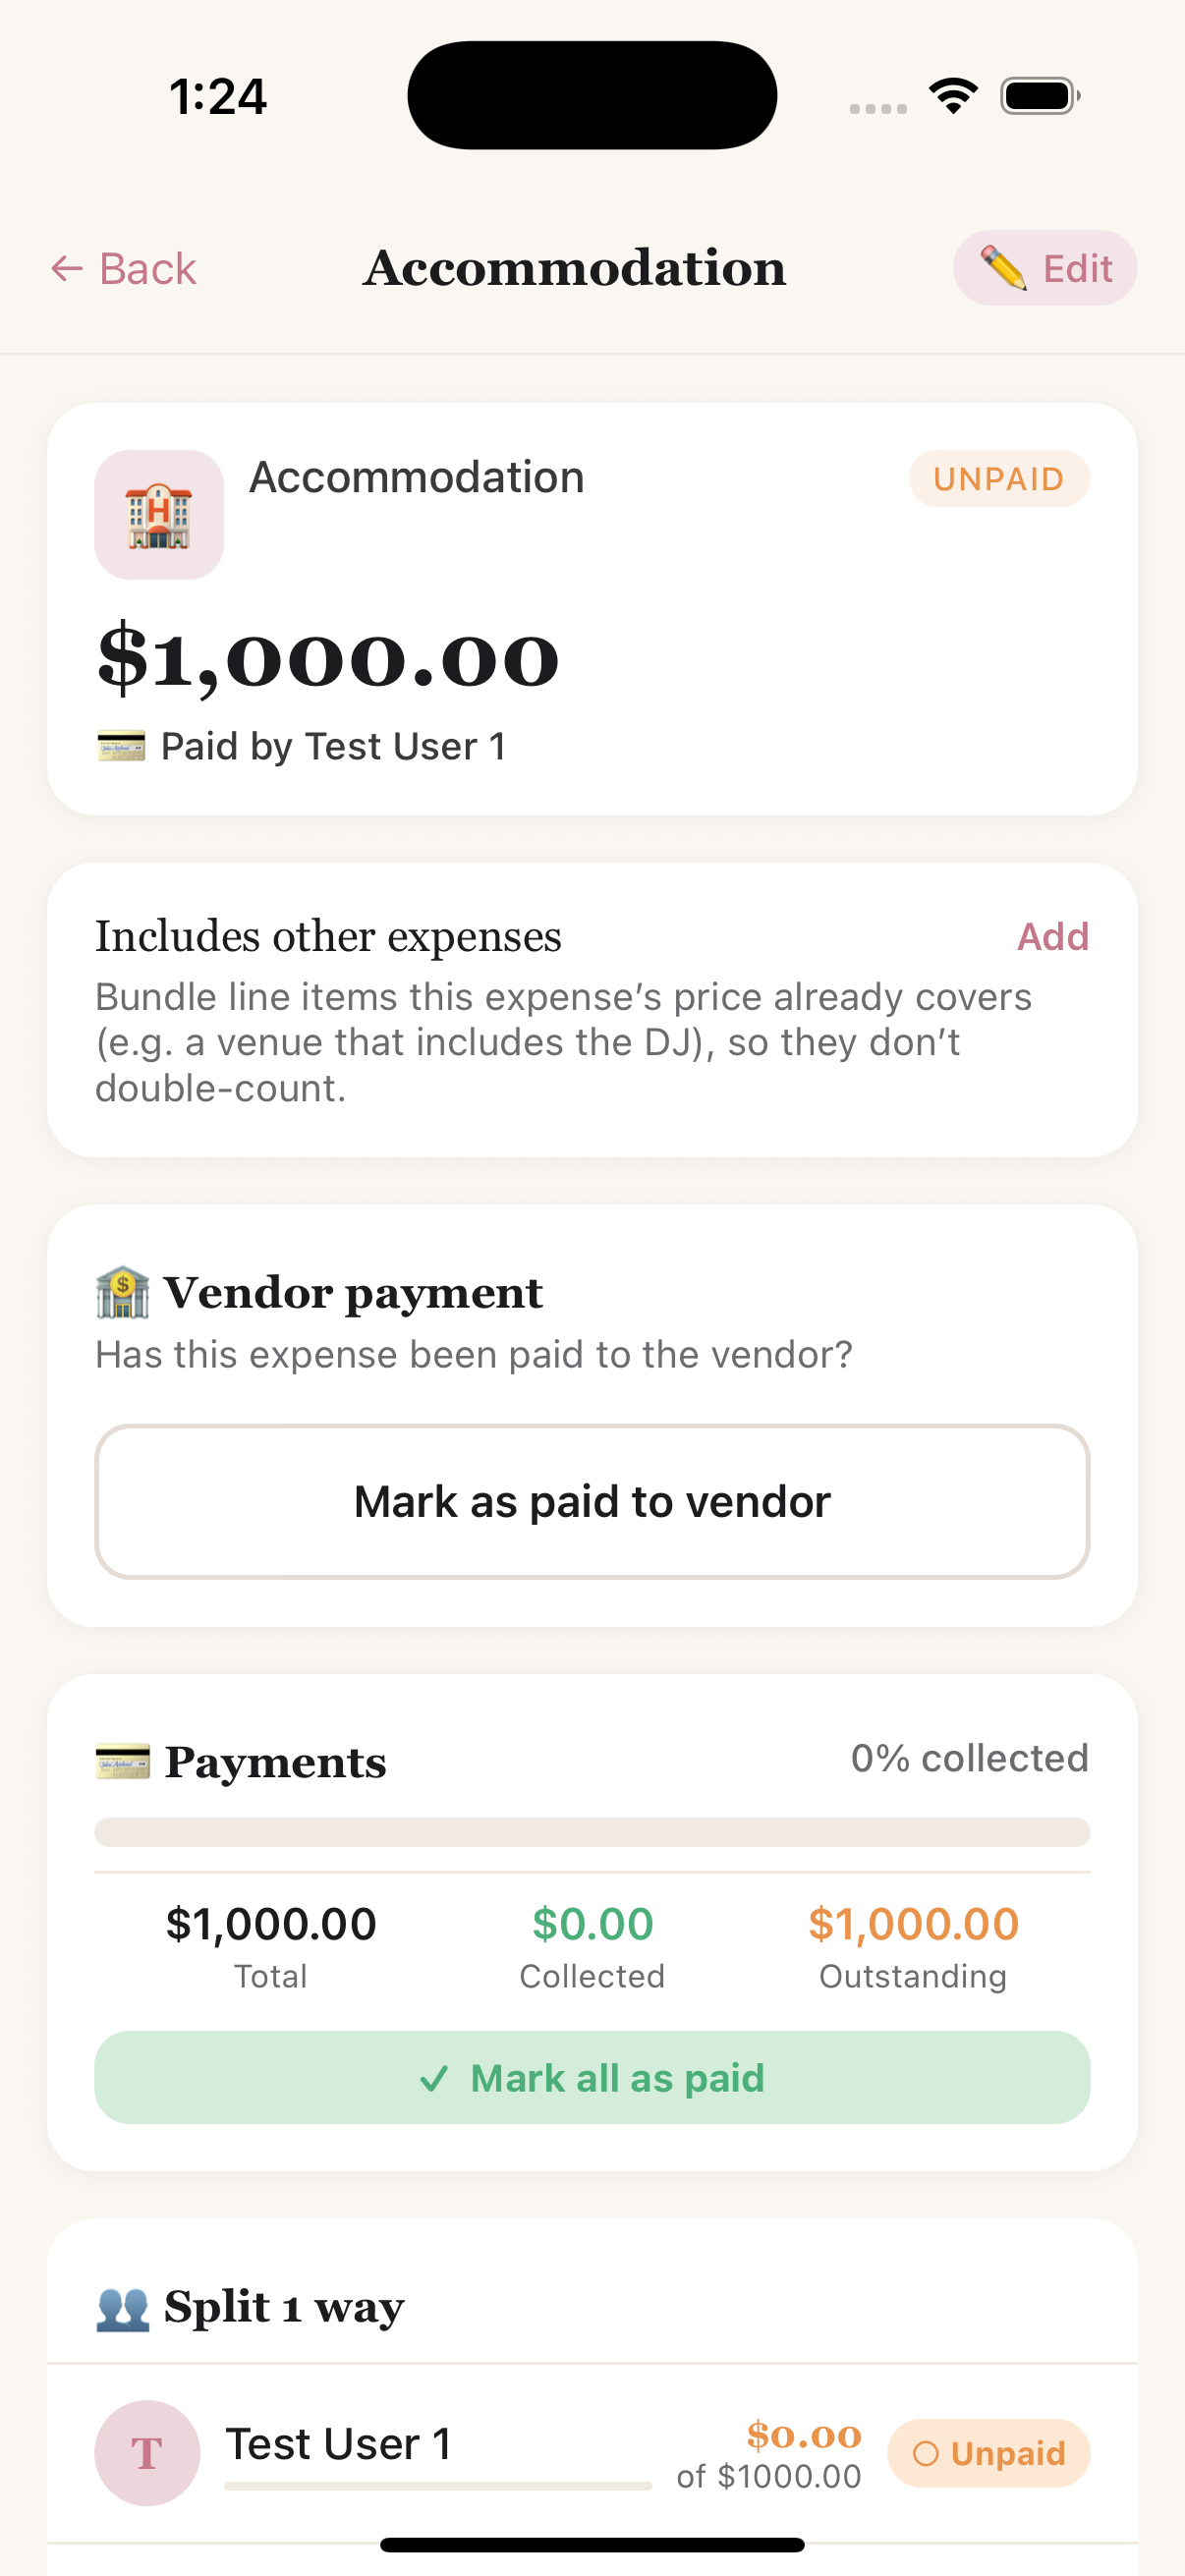
An expense — its split, what it includes, and vendor payment
Settling up
View Full Breakdown → Settle Up works out the fewest transfers that square everyone, rather than each person paying each other person. Partial payments are fine; a balance can be cleared in pieces. The Payments tab keeps the history for the event, and the home screen keeps it across all of them.
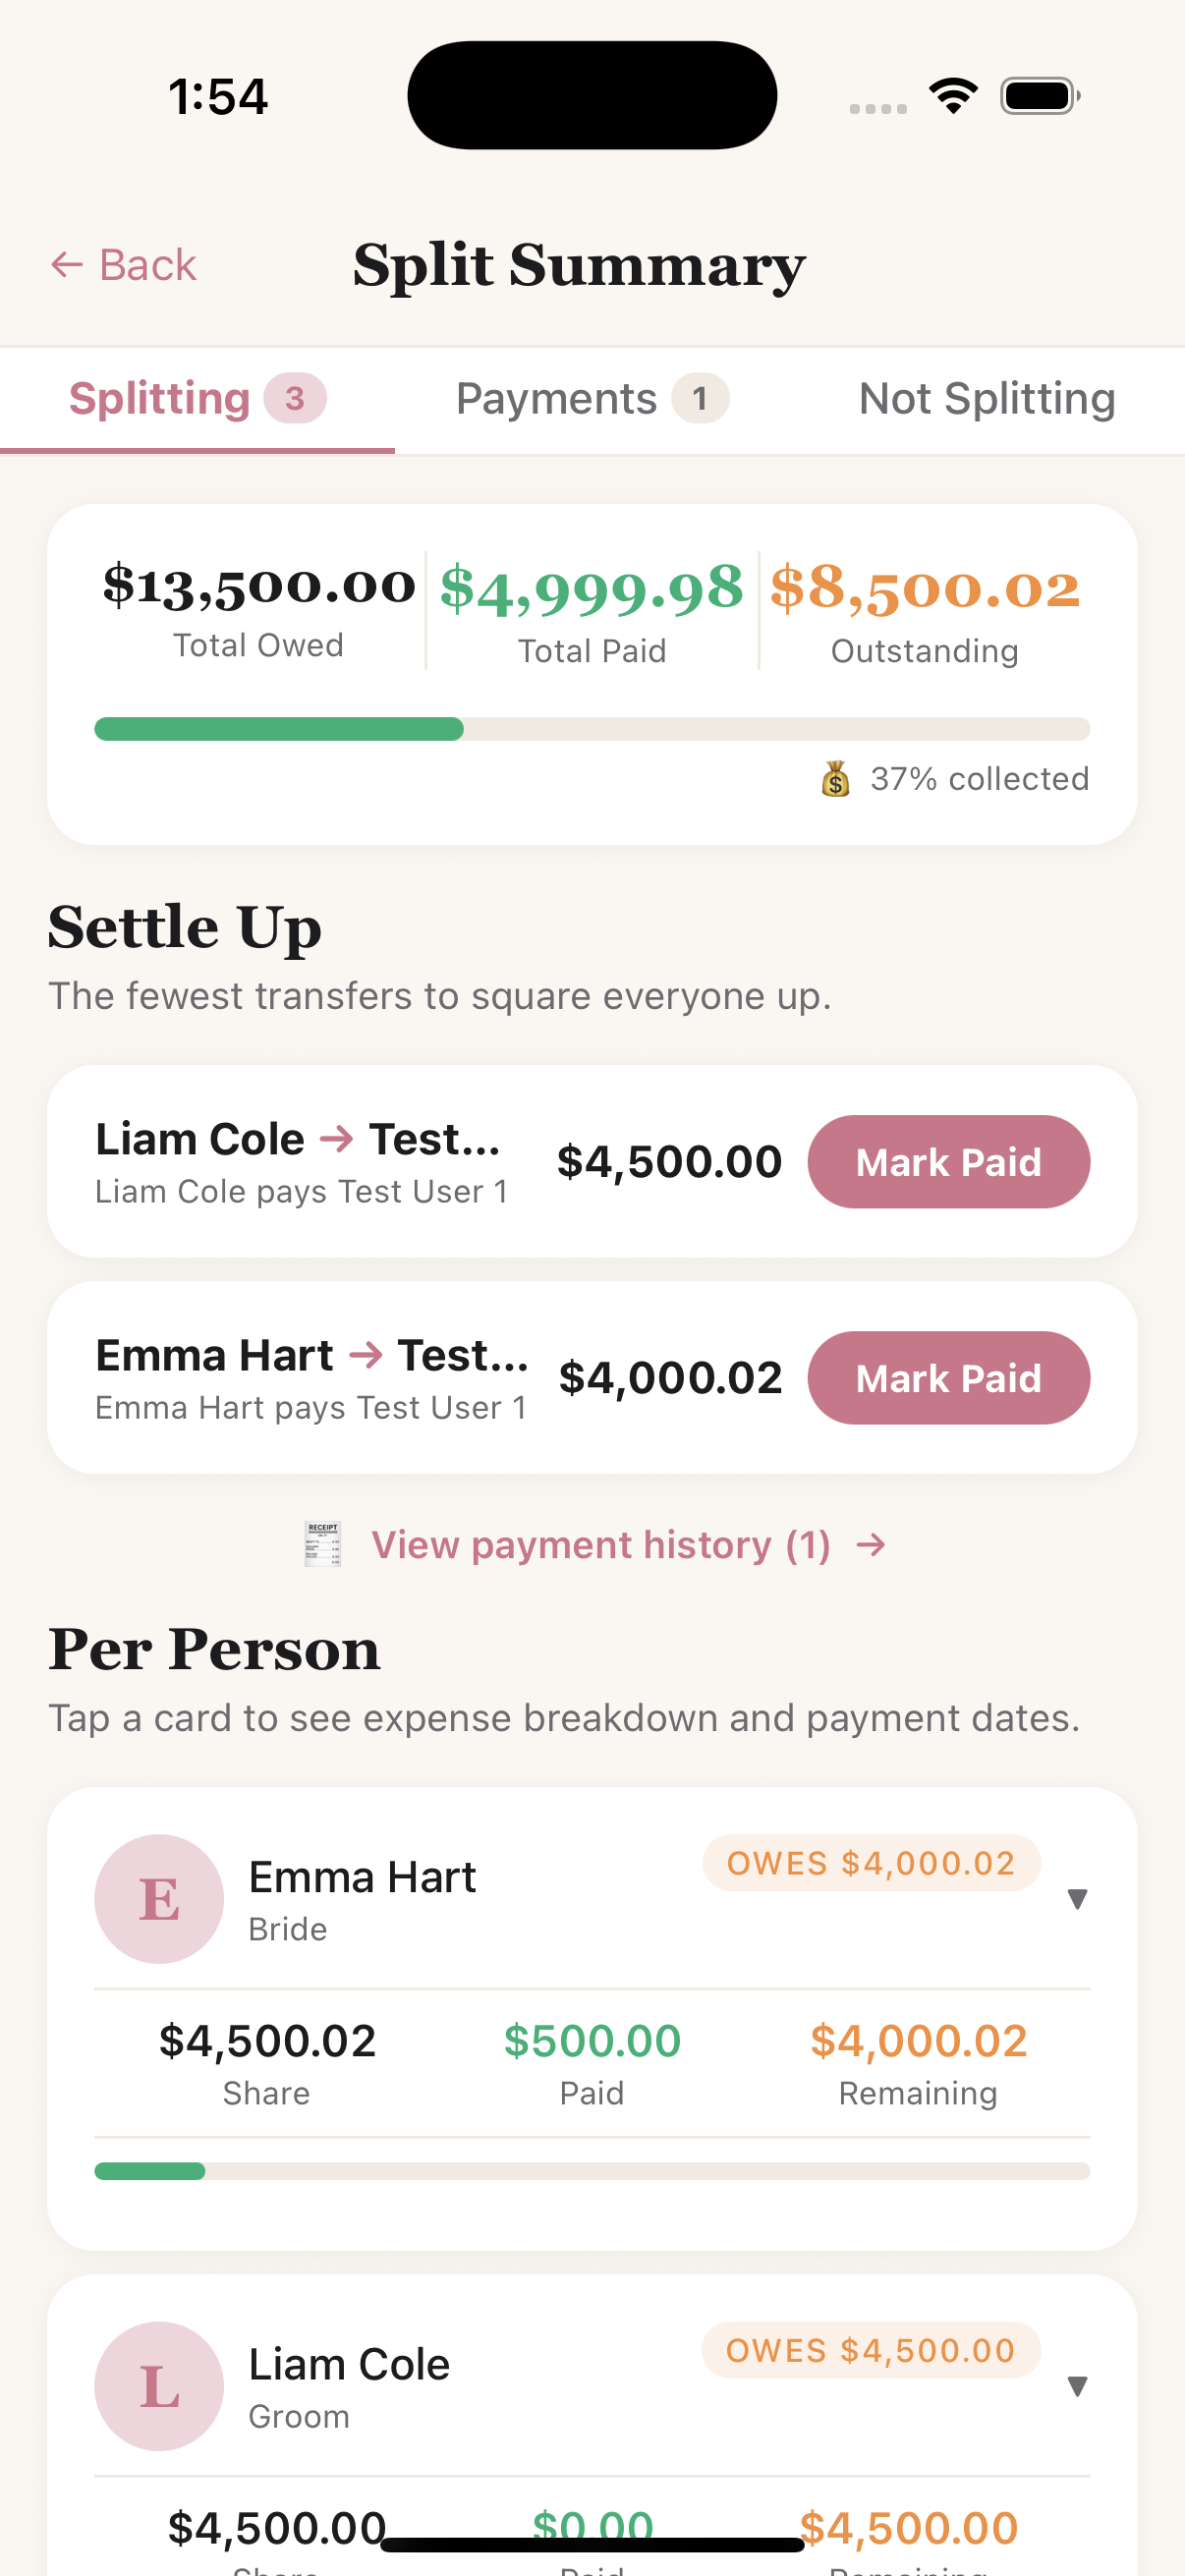
Settle Up — the shortest set of transfers
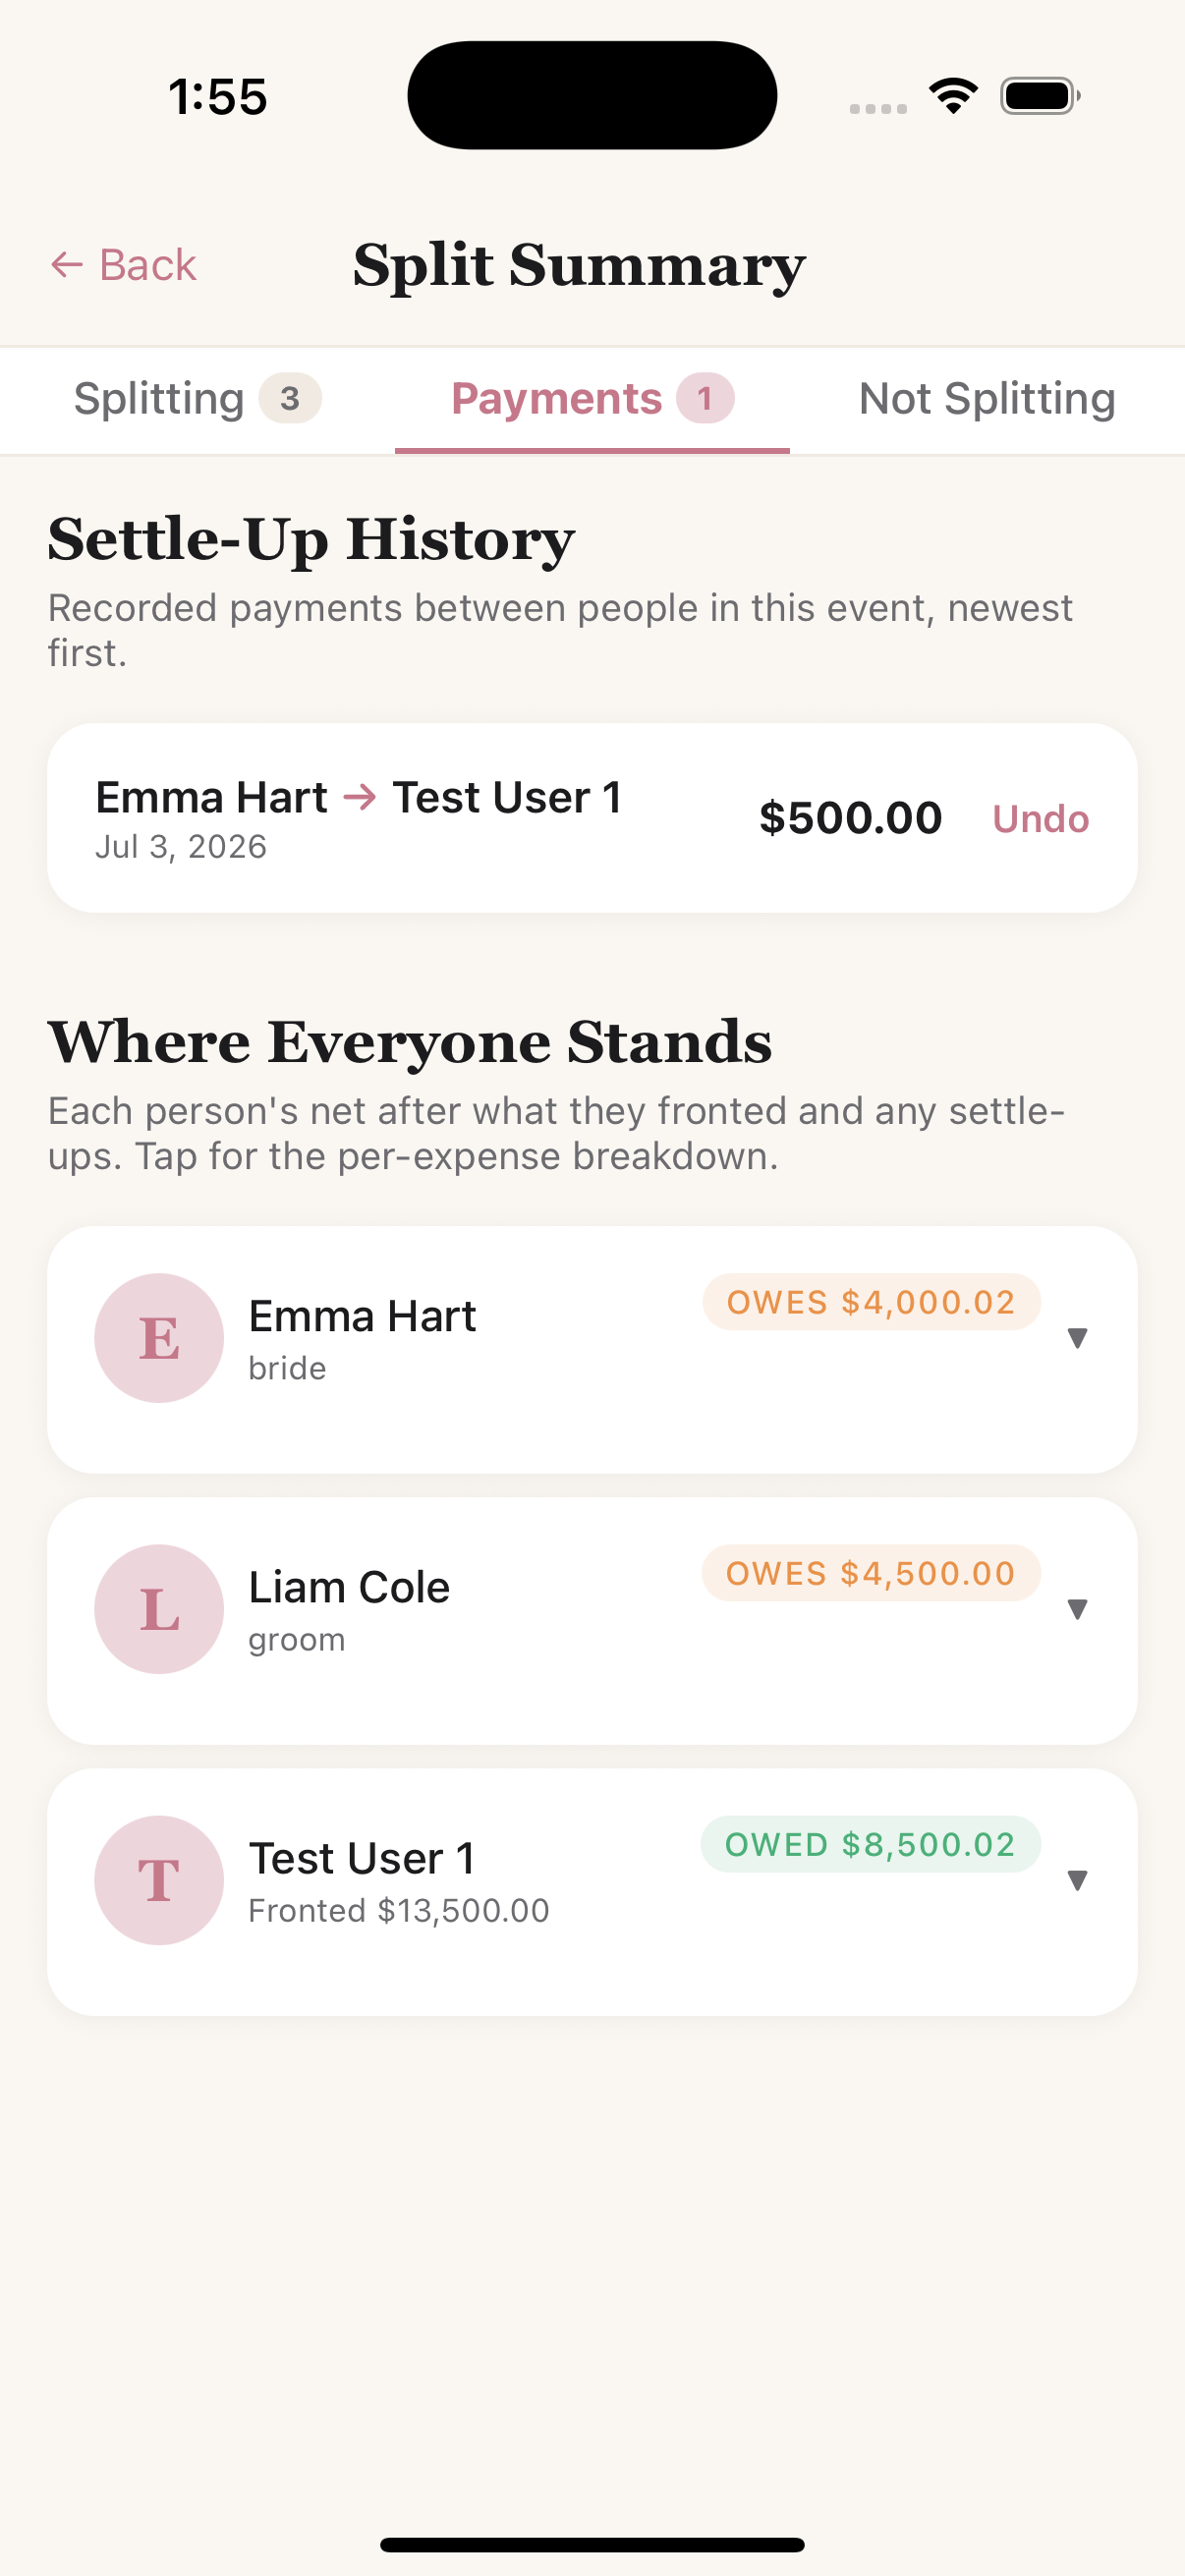
Payments — what has actually moved
Getting paid back
Hand off to an app they already use. Add your payment methods once — Profile → Payment methods takes a Venmo handle, Cash App cashtag and/or PayPal.Me name. Anyone who owes you then sees Pay with Venmo / Cash App / PayPal on their own transfer, opening that app with the exact amount and a note pre-filled. Those buttons only ever appear on a person's own debt. Afterwards they tap Tell [name] I've paid and you confirm it arrived.
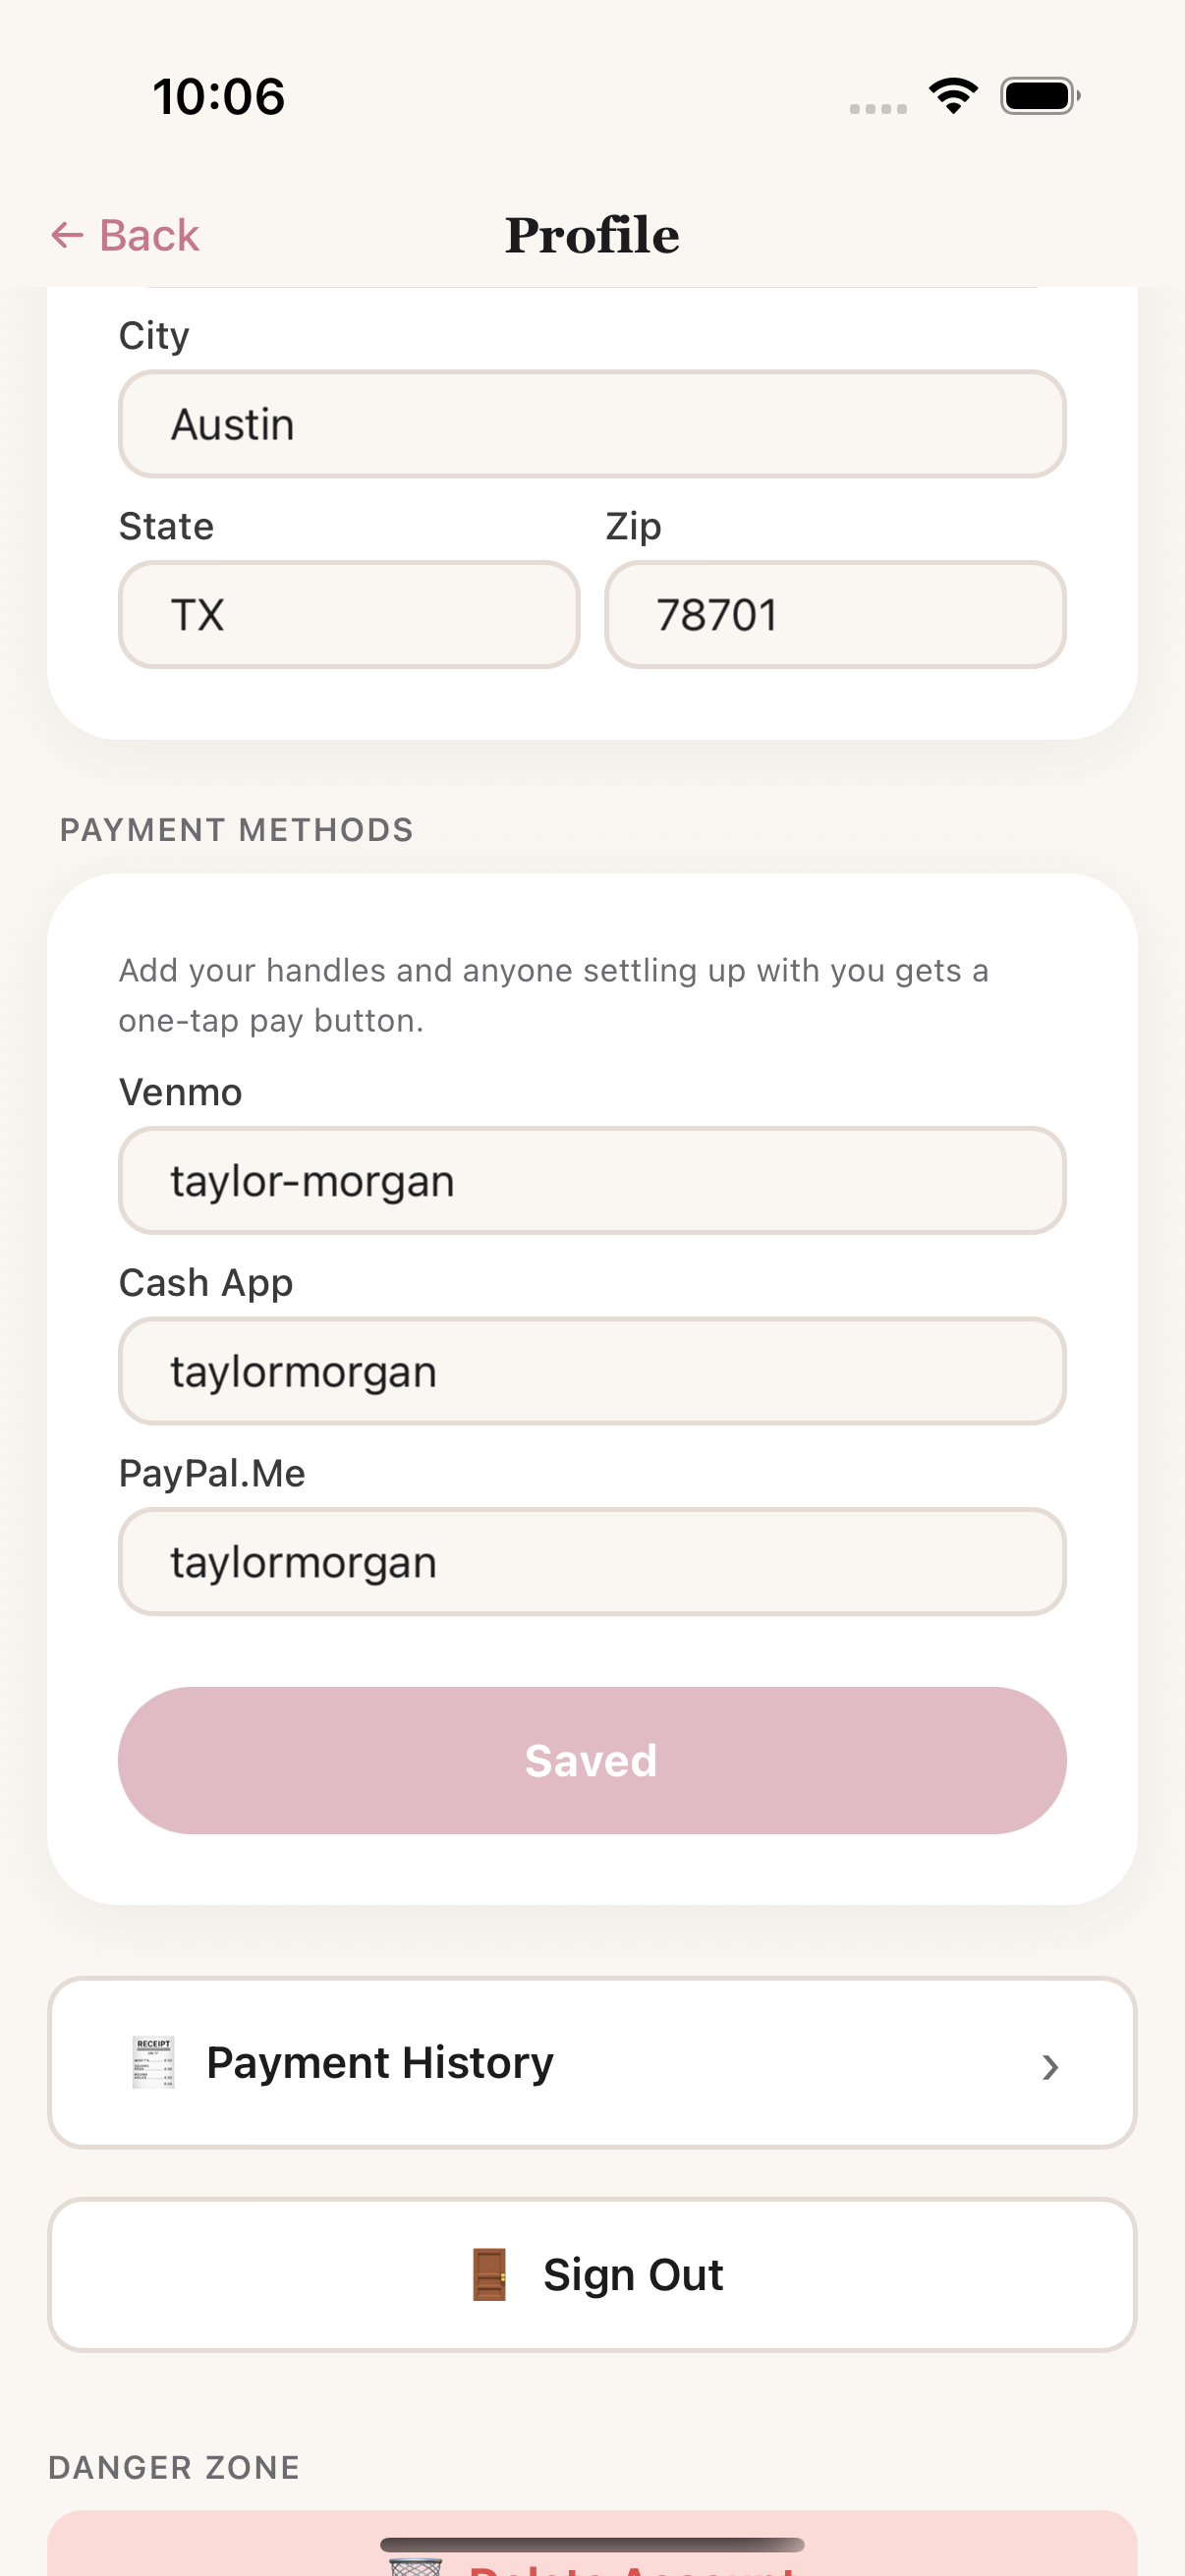
Profile — add your handles once
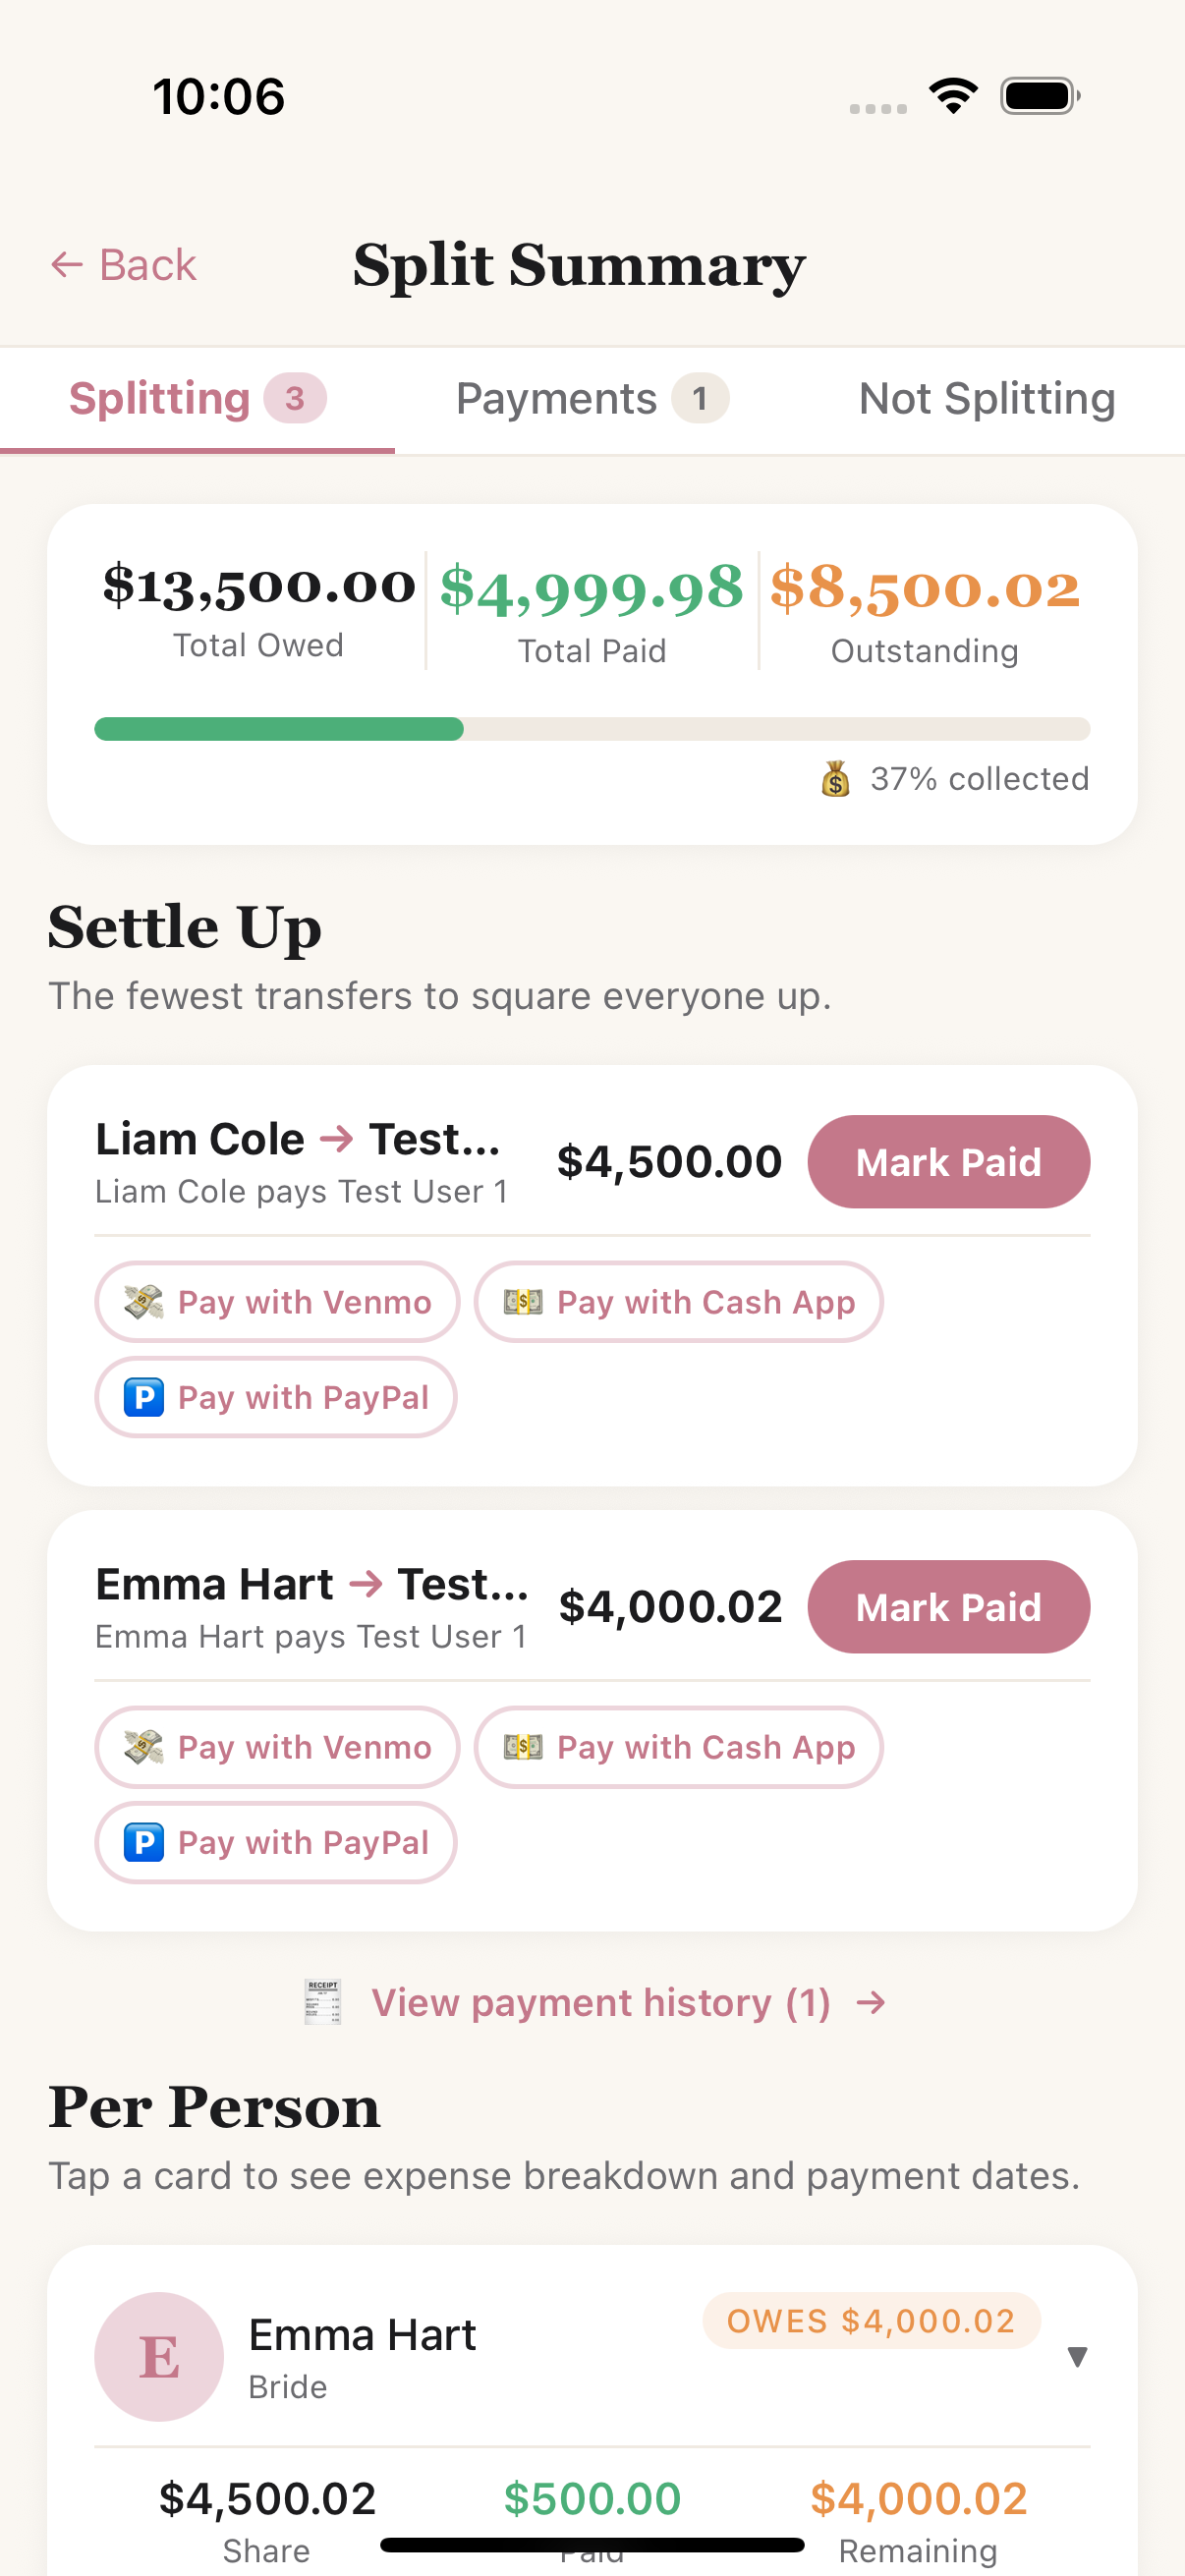
…and they appear on whoever owes you
Or take payment inside the app, and let it close itself. Set it up once at Profile → Get paid in the app → Set up payments, a secure Stripe page confirming who you are and where the money lands. After that, anyone settling with you sees Pay with Apple Pay or Credit Card (Google Pay on Android). They pay, it goes to your bank, and the transfer clears itself — no nudging, no “did you send it yet?”.
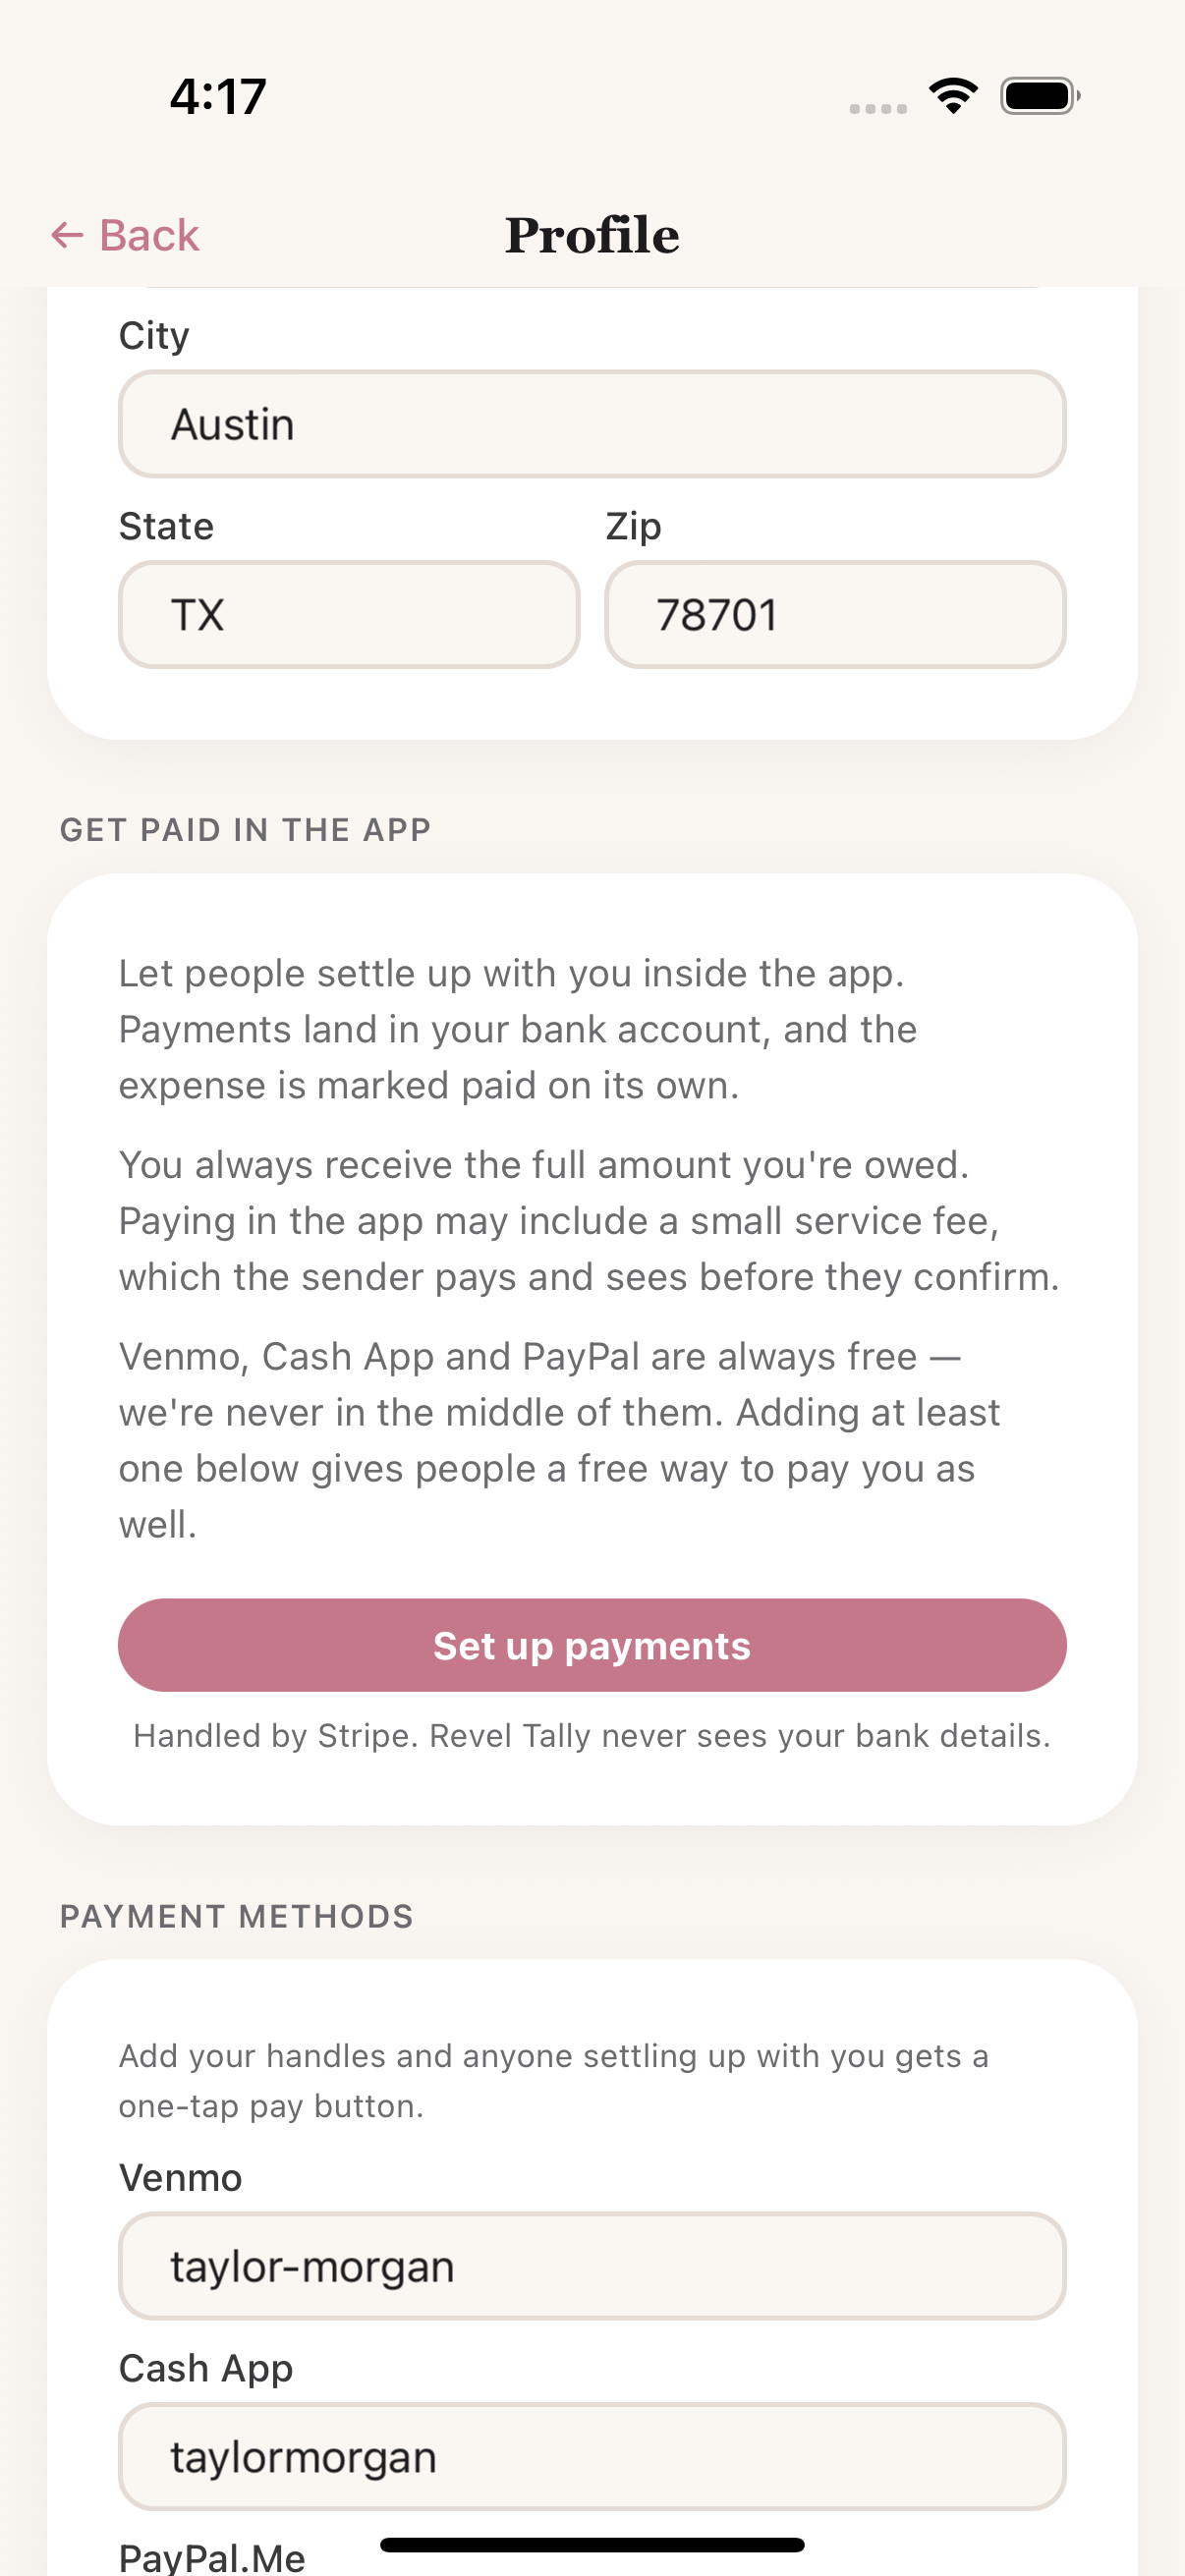
Set it up once — Stripe handles the rest
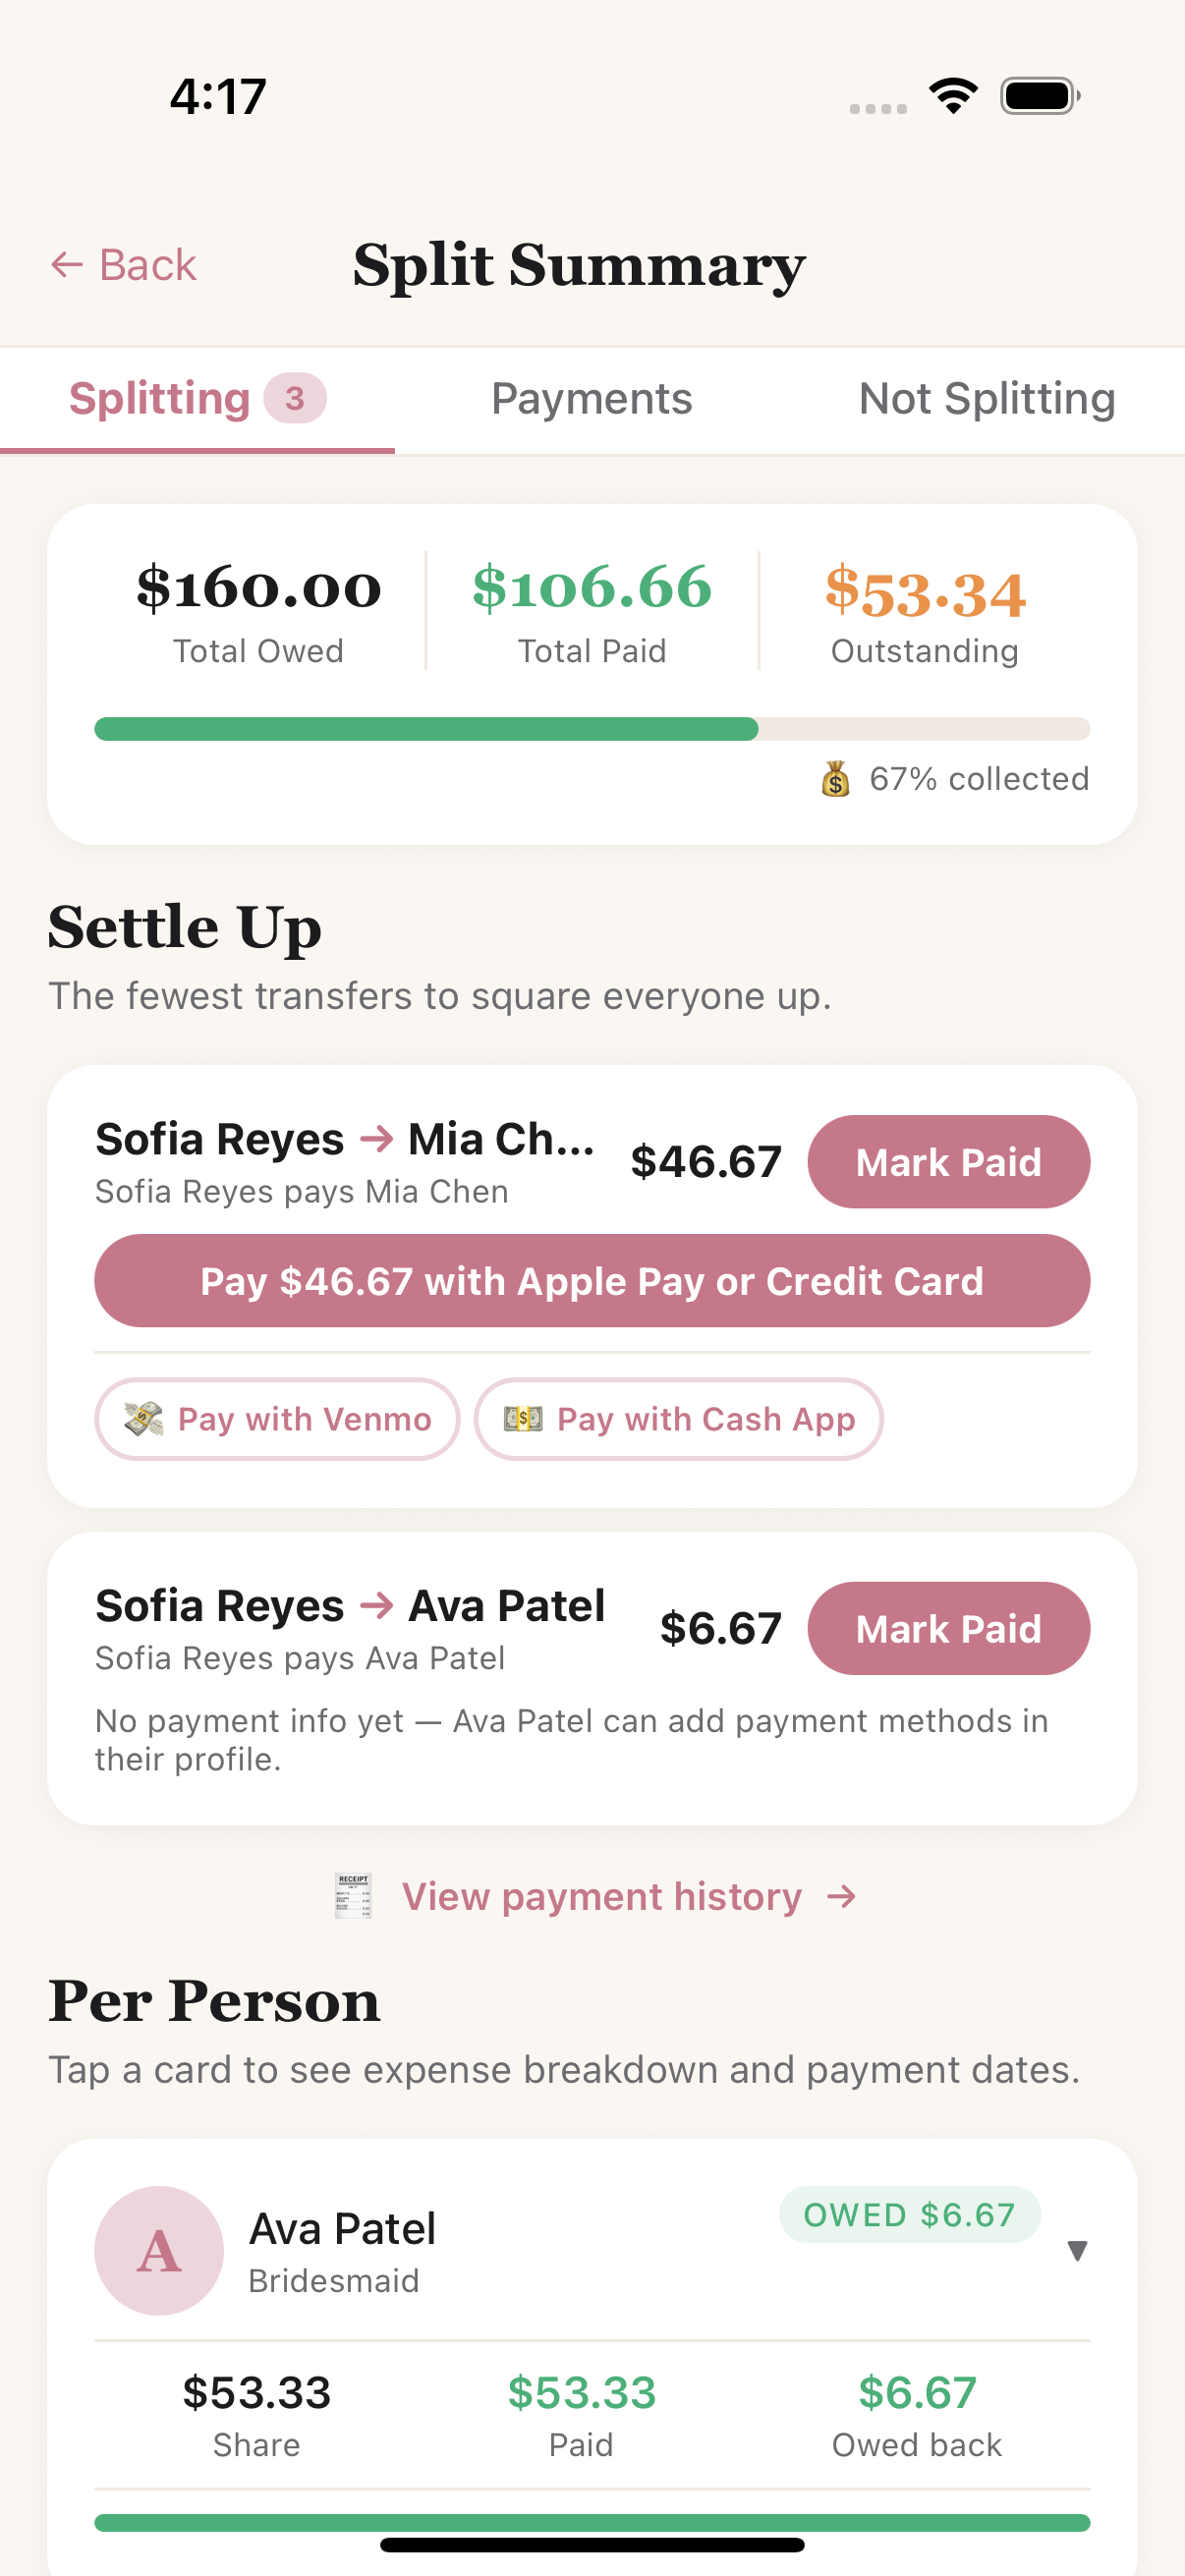
…and everyone settling up with you gets a Pay button
Revel Tally never sees your card or bank details, and never holds your money — Stripe handles payments, and funds go from the payer straight to the recipient. Venmo, Cash App and PayPal simply open those apps, so they are free and always will be.
People & the guest list
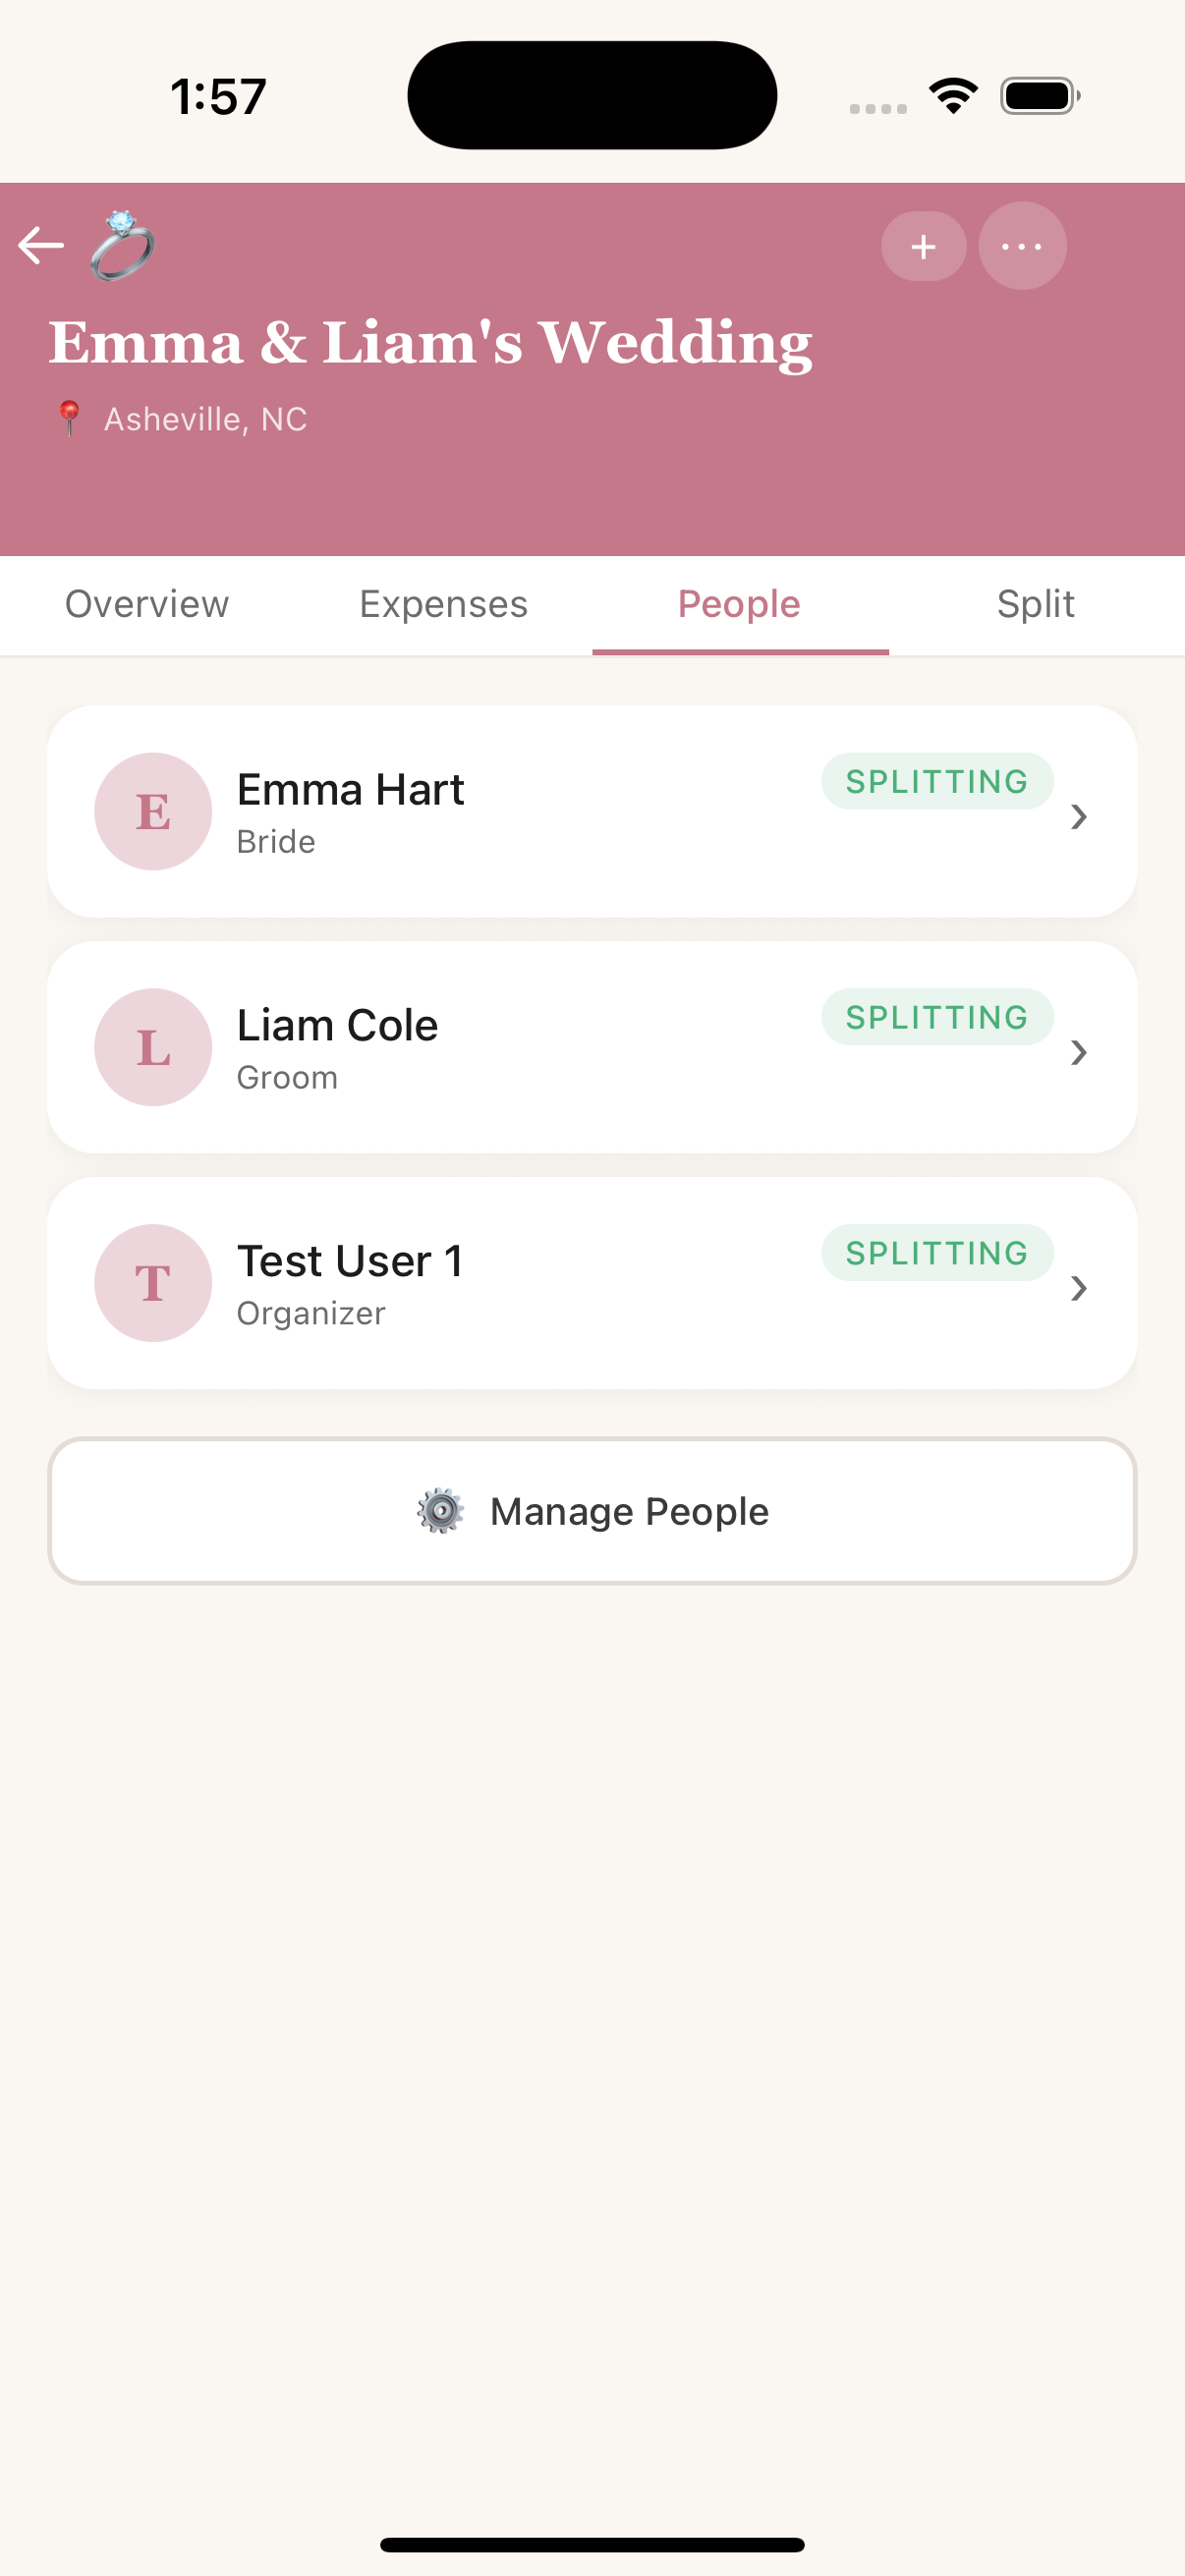
People — roles, party sizes and who is splitting
Expenses in depth
- Payment schedules — split a bill into a deposit + installments, each with its own due date and paid toggle (this drives the “to vendor” number).
- Included expenses — bundle line items under a parent so a package price never double-counts.
- Who's splitting — every splitting attendee is pre-selected; add or remove people per expense.
- Custom splits — switch an expense from Split equally to Custom split and set each person's share in $ or % (they must add up to the total). Adjust any time via ✏️ Edit split on the expense.
- Payment reminders — get nudged before a due date (in-app and push).
- Photos & vendor links — attach receipts and a website to any expense.
Import an existing budget from a spreadsheet
Already planned this in a spreadsheet? On the Expenses tab, tap ↑ Import from spreadsheet instead of starting over. Upload a .xlsx, .xls, or .csv file and Revel Tally brings in every line item — matching common column names (Item, Amount, Category, Vendor, Notes, Due Date, Paid) and even guessing the category from the vendor type (a "DJ" or "Photographer" line lands in the right bucket automatically). Imported expenses split evenly among whoever's currently marked as splitting, just like adding one by hand — adjust who's in or the split afterward on any expense.
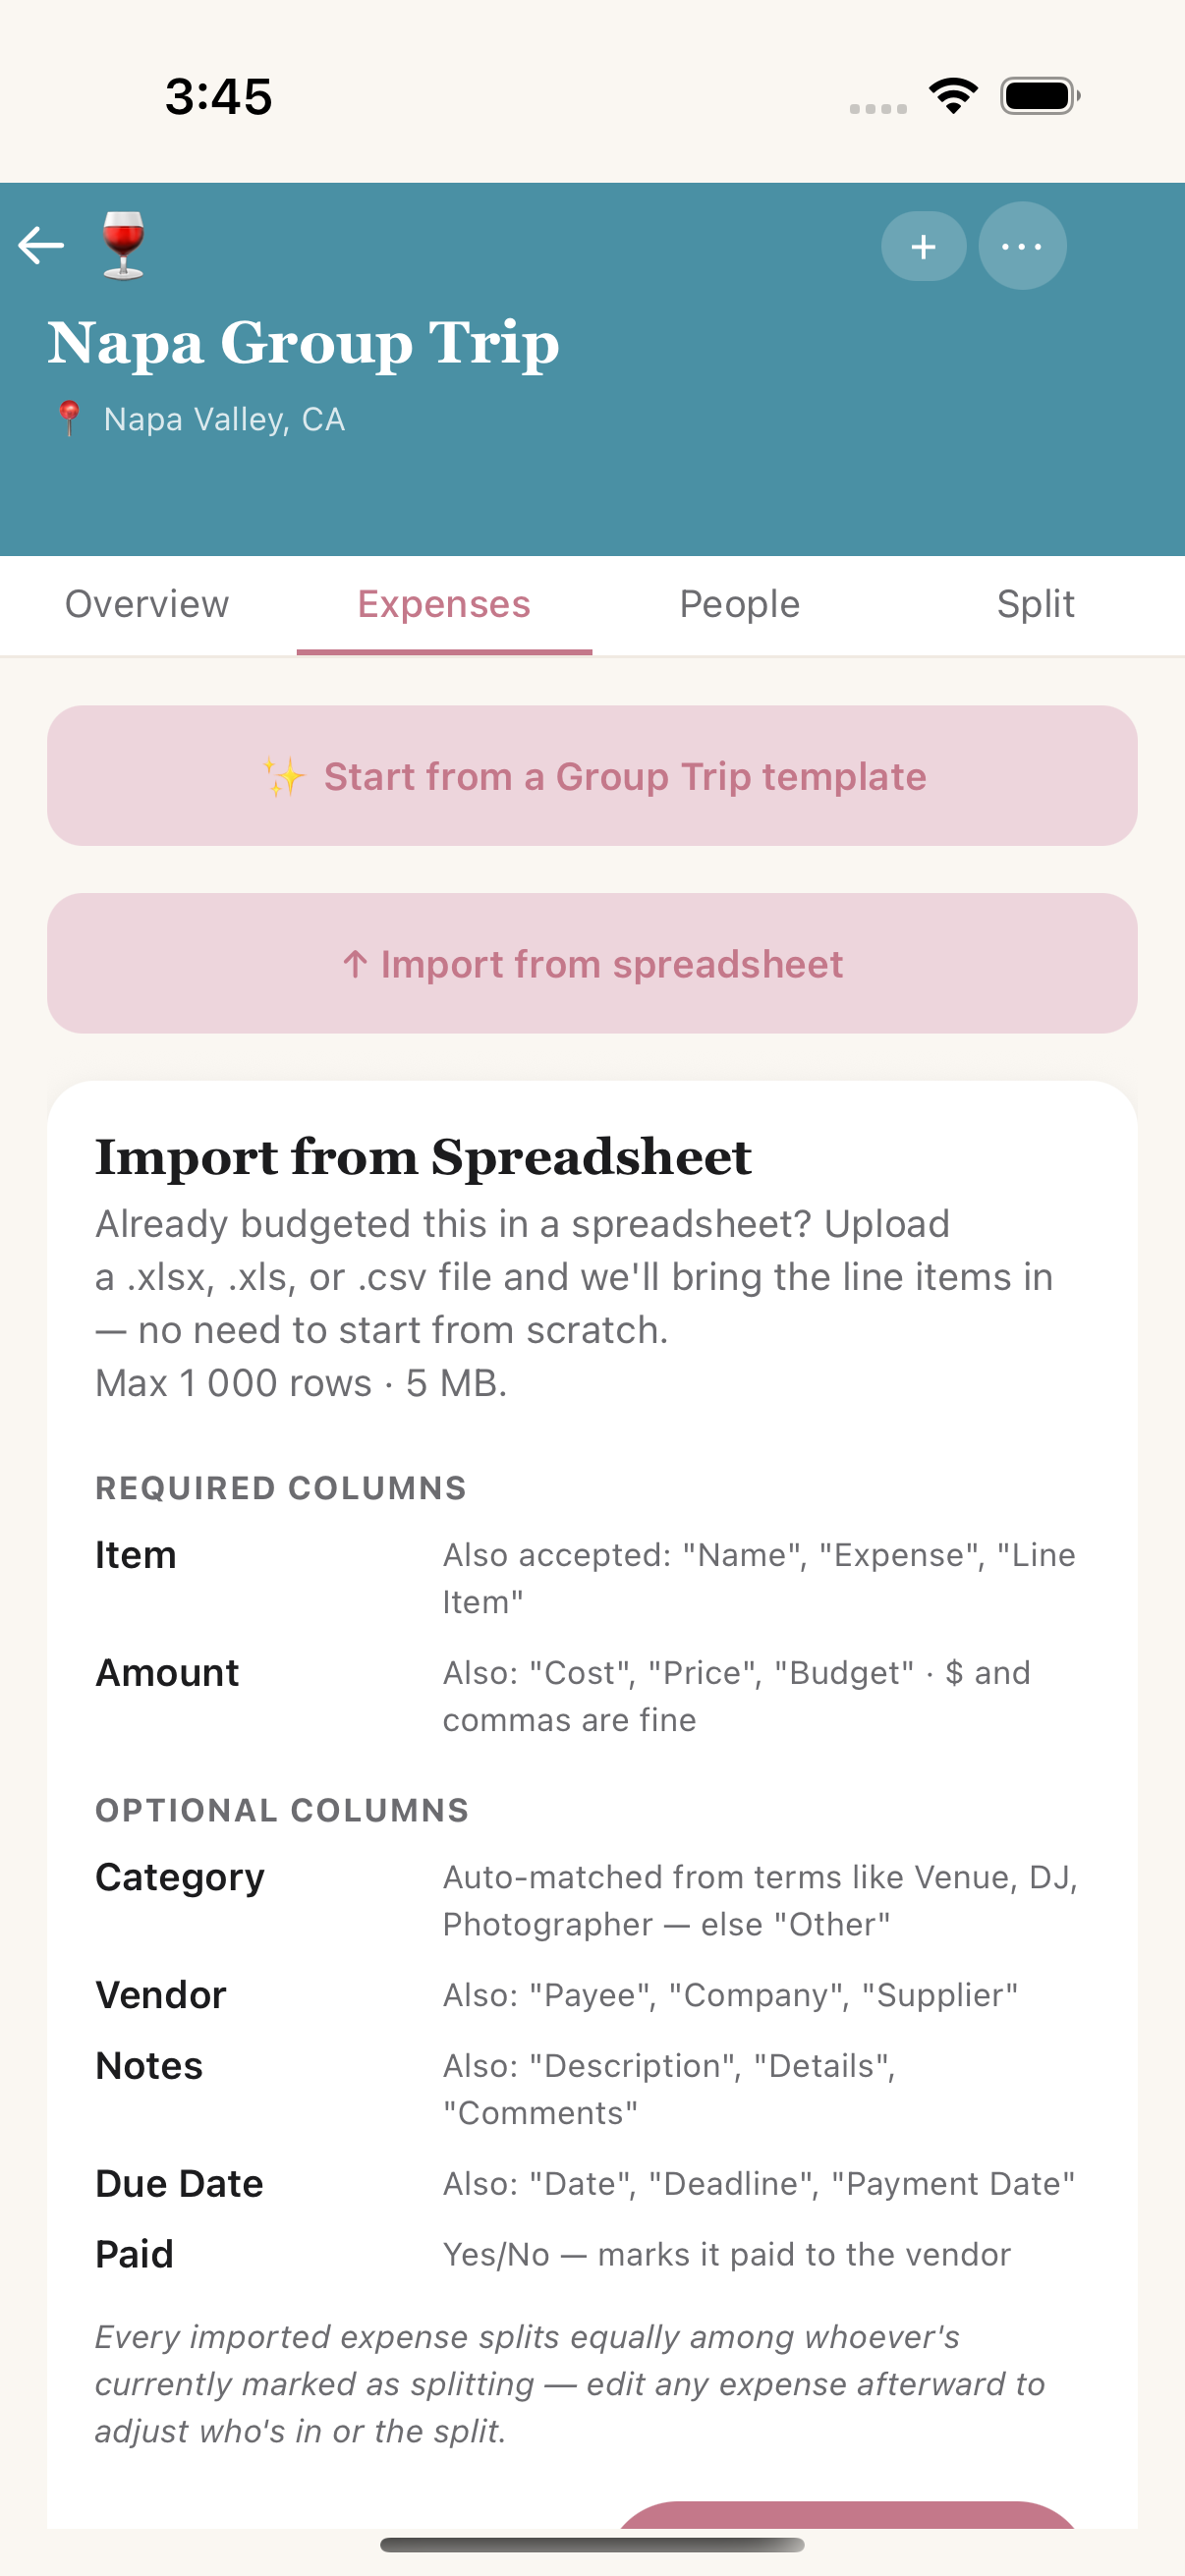
Bring in your existing budget instead of starting from scratch
Scan a receipt to auto-fill
Adding an expense from a paper (or emailed) receipt? Tap 📸 Scan a receipt to auto-fill at the top of Add Expense — take a photo or pick one from your library, and Revel Tally reads it and fills in the amount, a name, the vendor, the date, and a best-guess category for you. Everything stays editable, so glance it over and tweak anything before you save. It handles regular phone photos and screenshots alike.
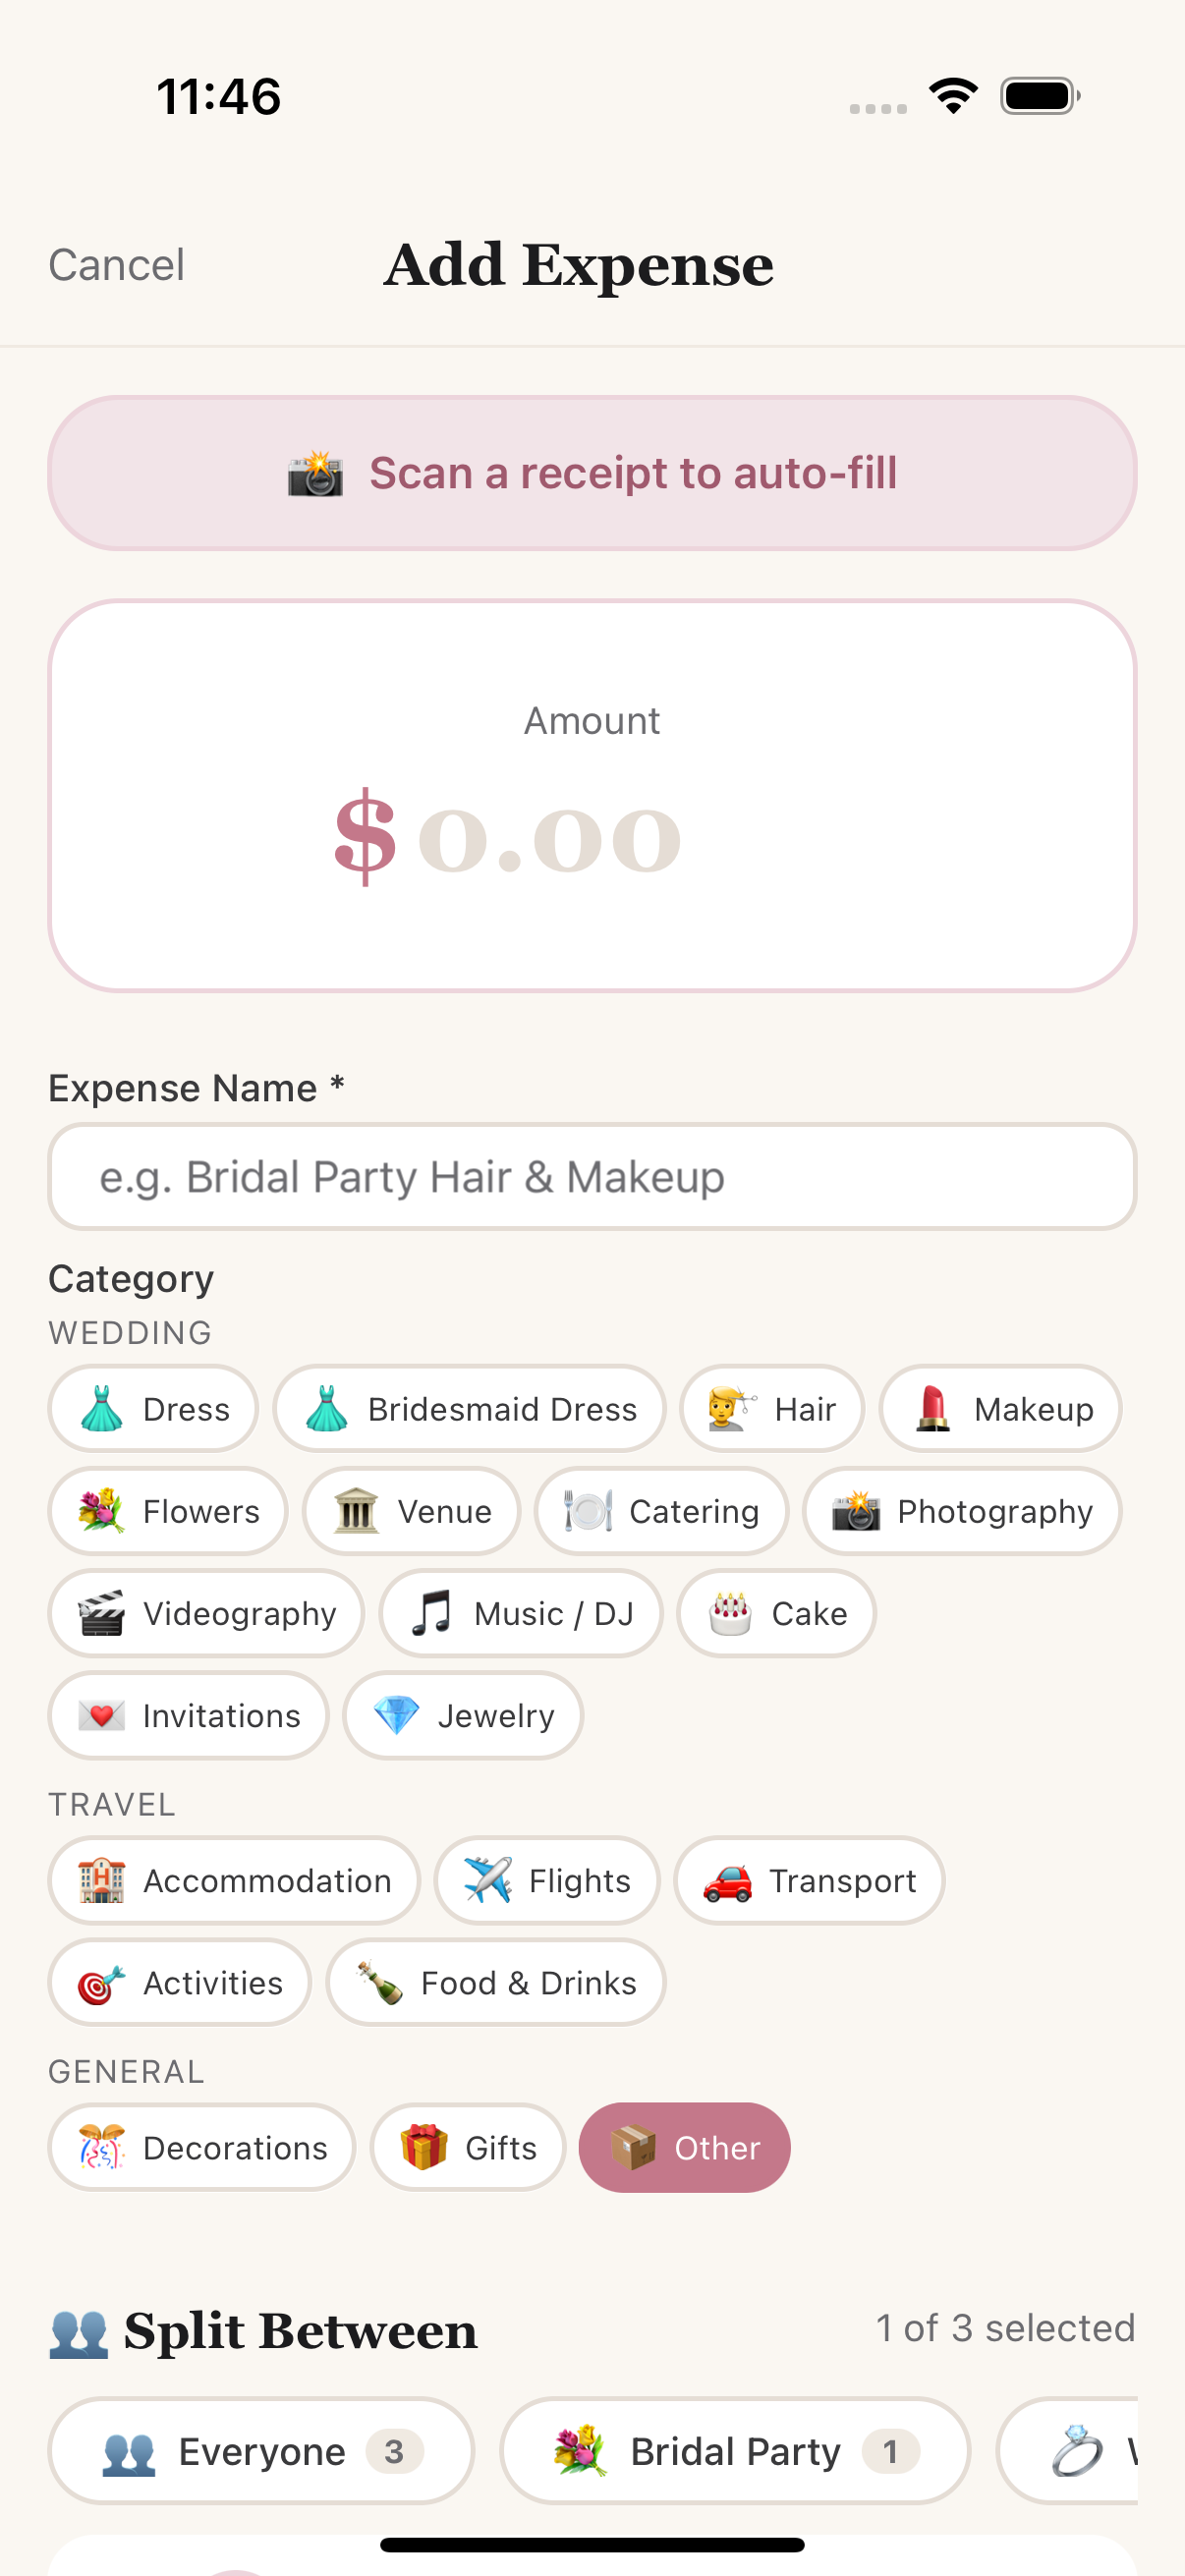
Add Expense — tap Scan a receipt and the details fill themselves in
Photos on expenses
Every expense has a 📷 Photos card — attach receipts, contracts, or inspiration shots with + Add. Photos are stored securely in the cloud, so they're visible to everyone in the event (not just the phone that added them) and survive reinstalls. Tap to preview; long-press or ✕ to remove — removed photos are deleted from storage too.
Your profile picture
Give your account a face: on Profile, tap the avatar (or its little 📷 badge) to pick a photo. It's cropped to a neat square automatically; tap again to choose a new photo or remove it.
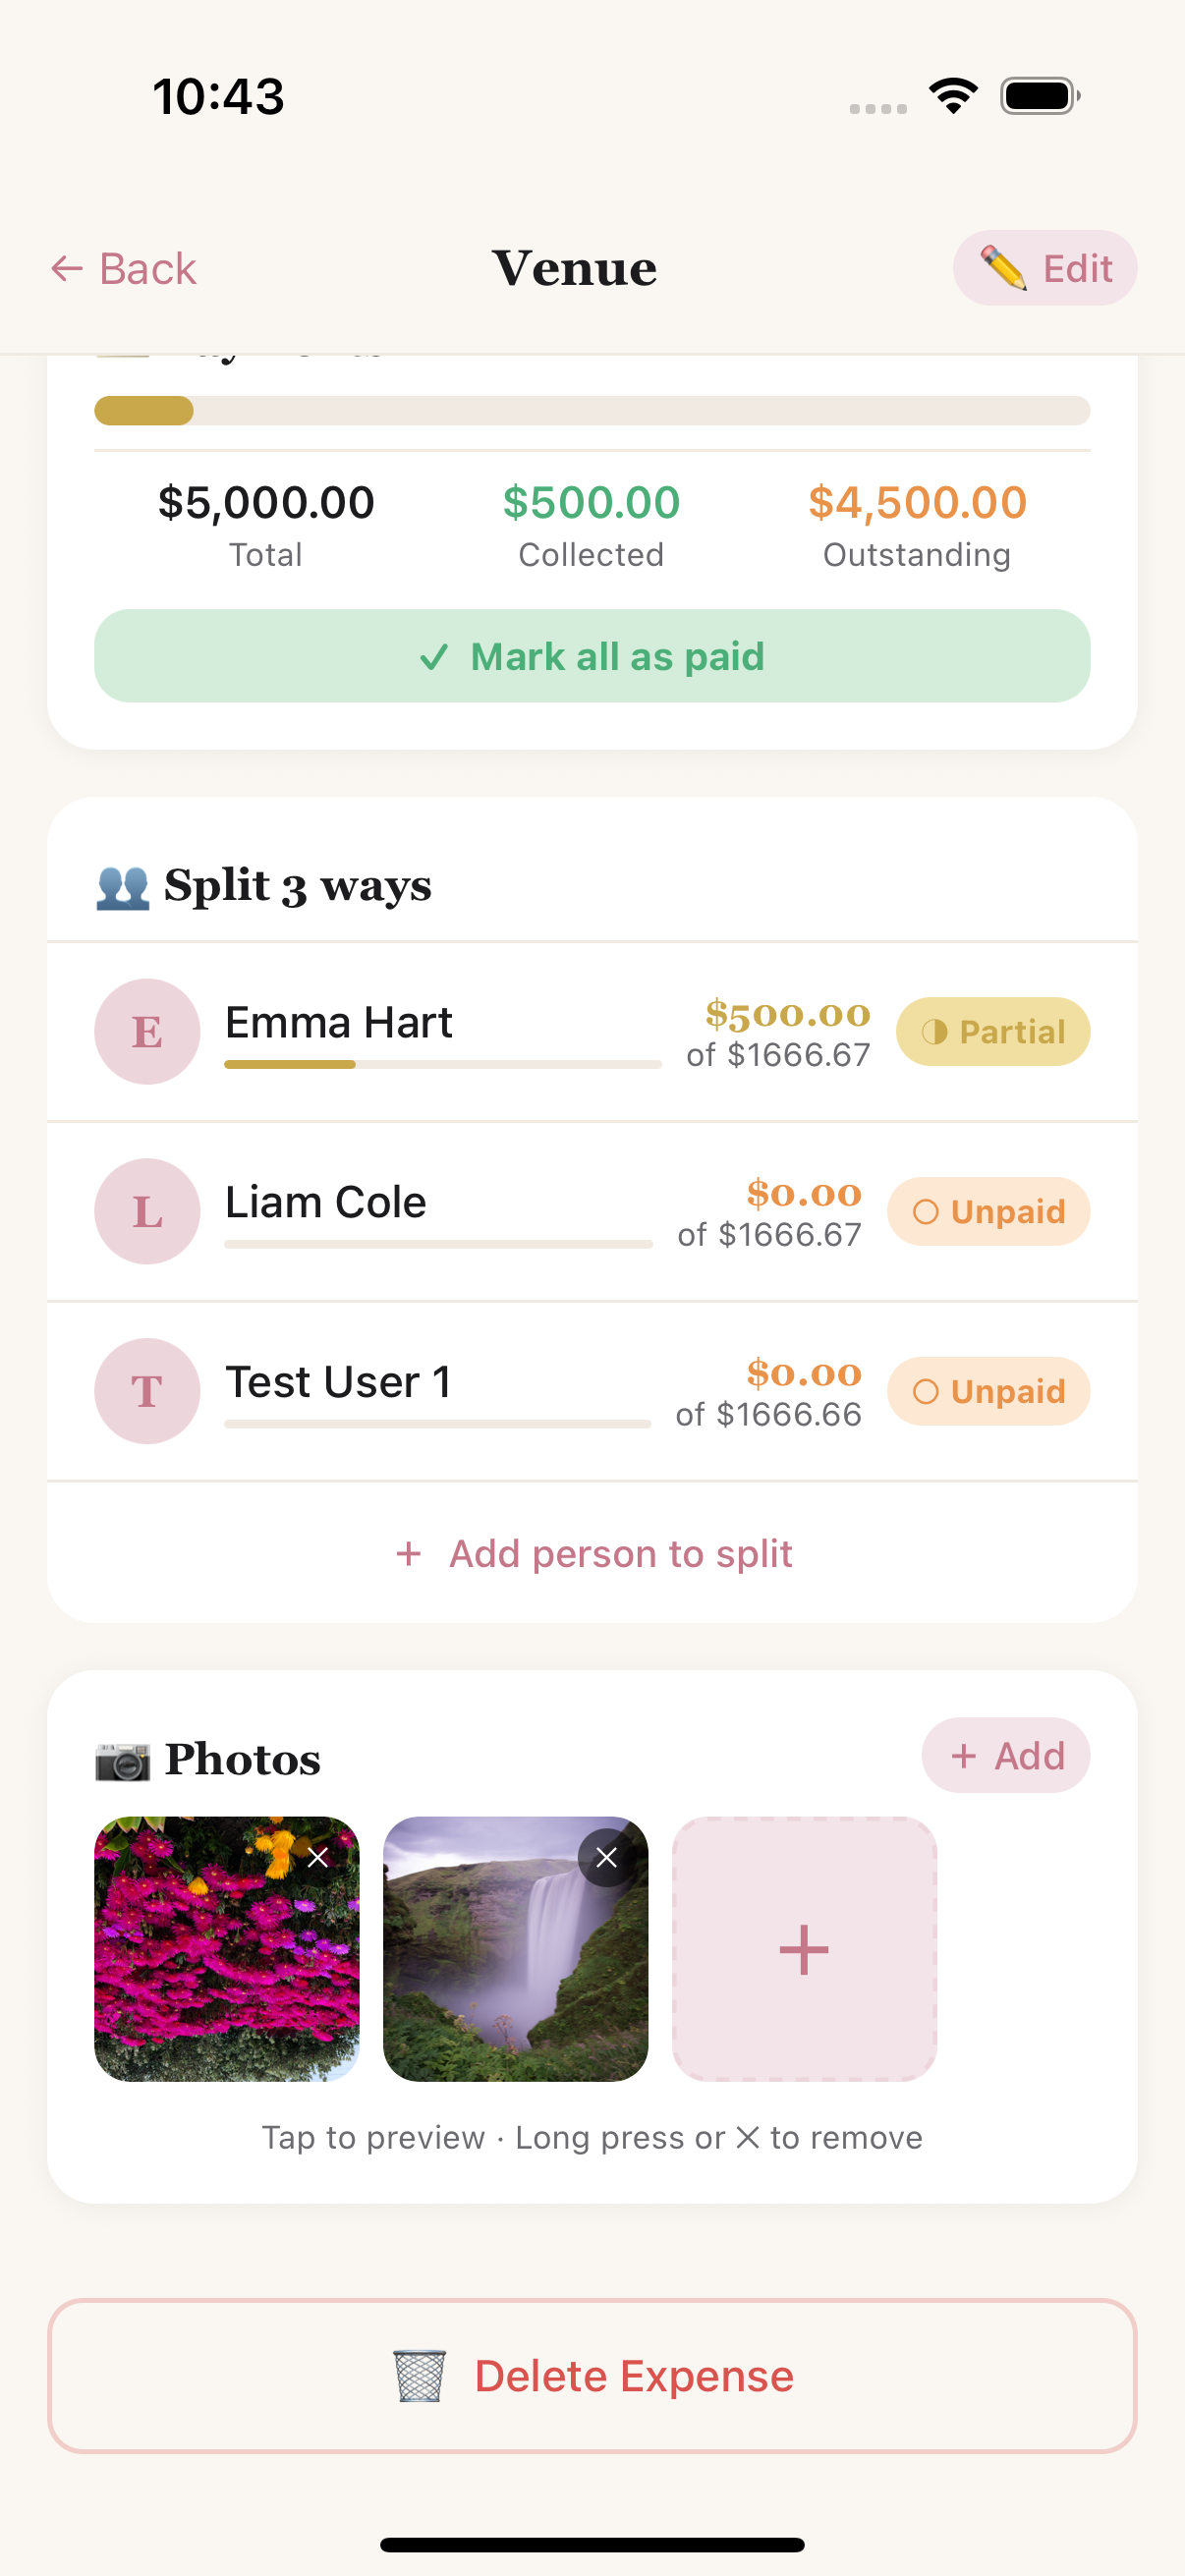
Venue expense — photos everyone in the event can see
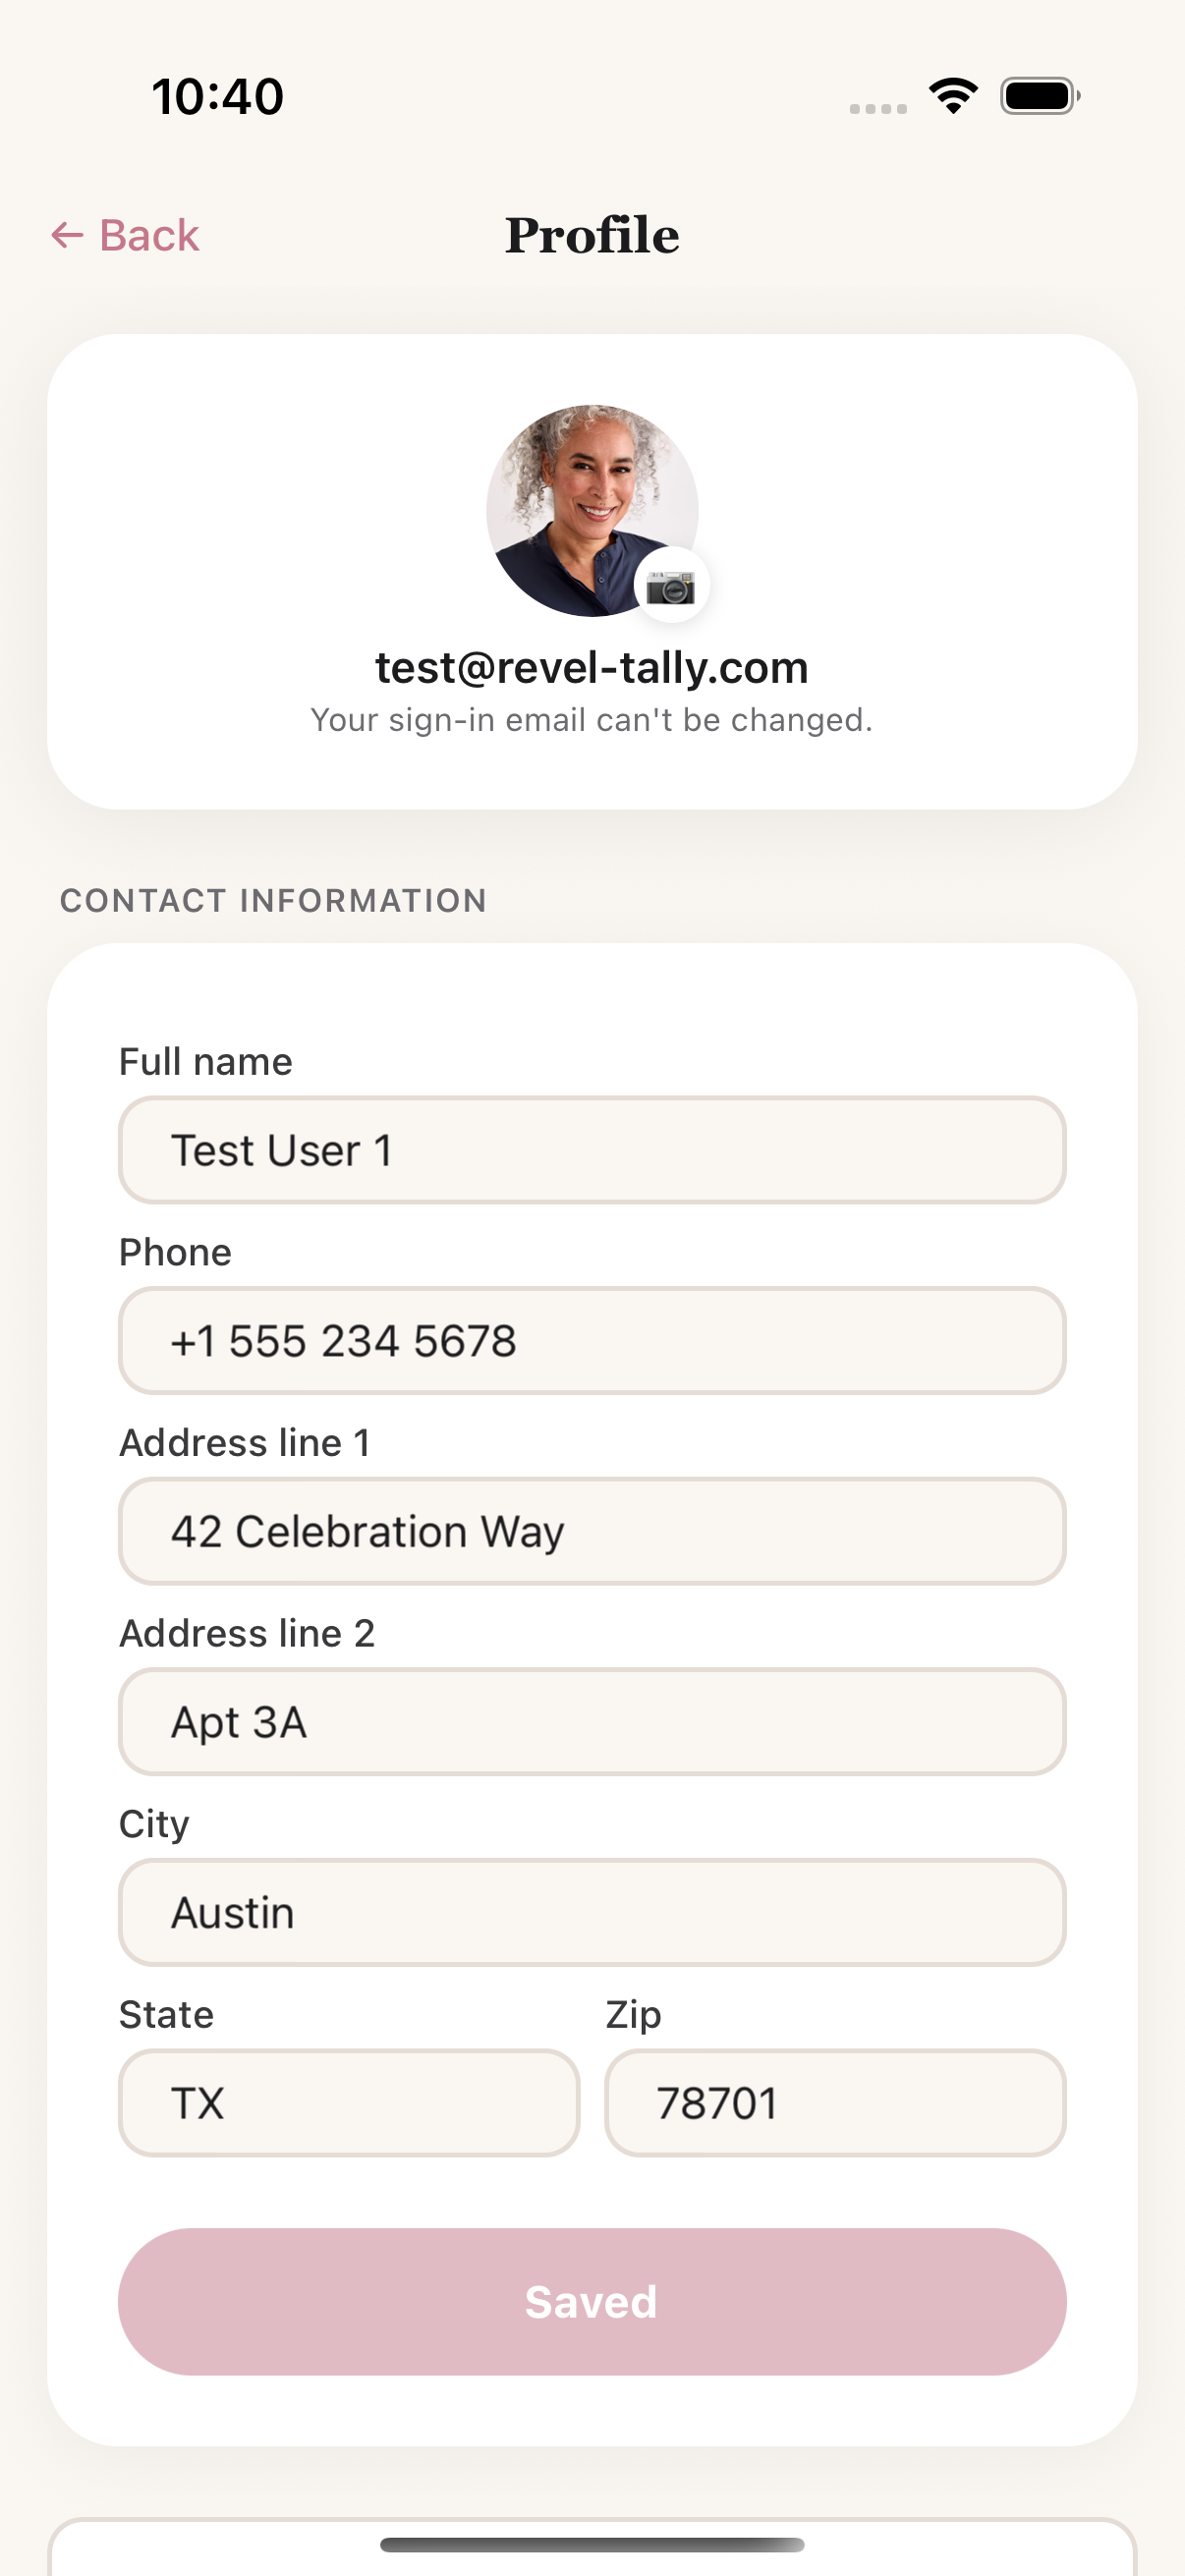
Profile — tap the avatar to set your picture
Comments on expenses
Every expense has a 💬 Comments thread so you can hash out the details right where the money lives — "shuttle or carpool?", "deposit's due Friday, can someone confirm?" Both the organizer and invited viewers can post, so it doubles as a lightweight activity feed for co-planners.
- Everyone in the loop — when someone comments, the event owner and anyone who's already replied get a push notification, so conversations don't get missed.
- Your own words, your call — long-press a comment you wrote to delete it (the event owner can remove any comment).
- Stays tidy — once a thread grows past a few comments it collapses to the latest three, with View earlier comments to expand and Show less to fold it back up.
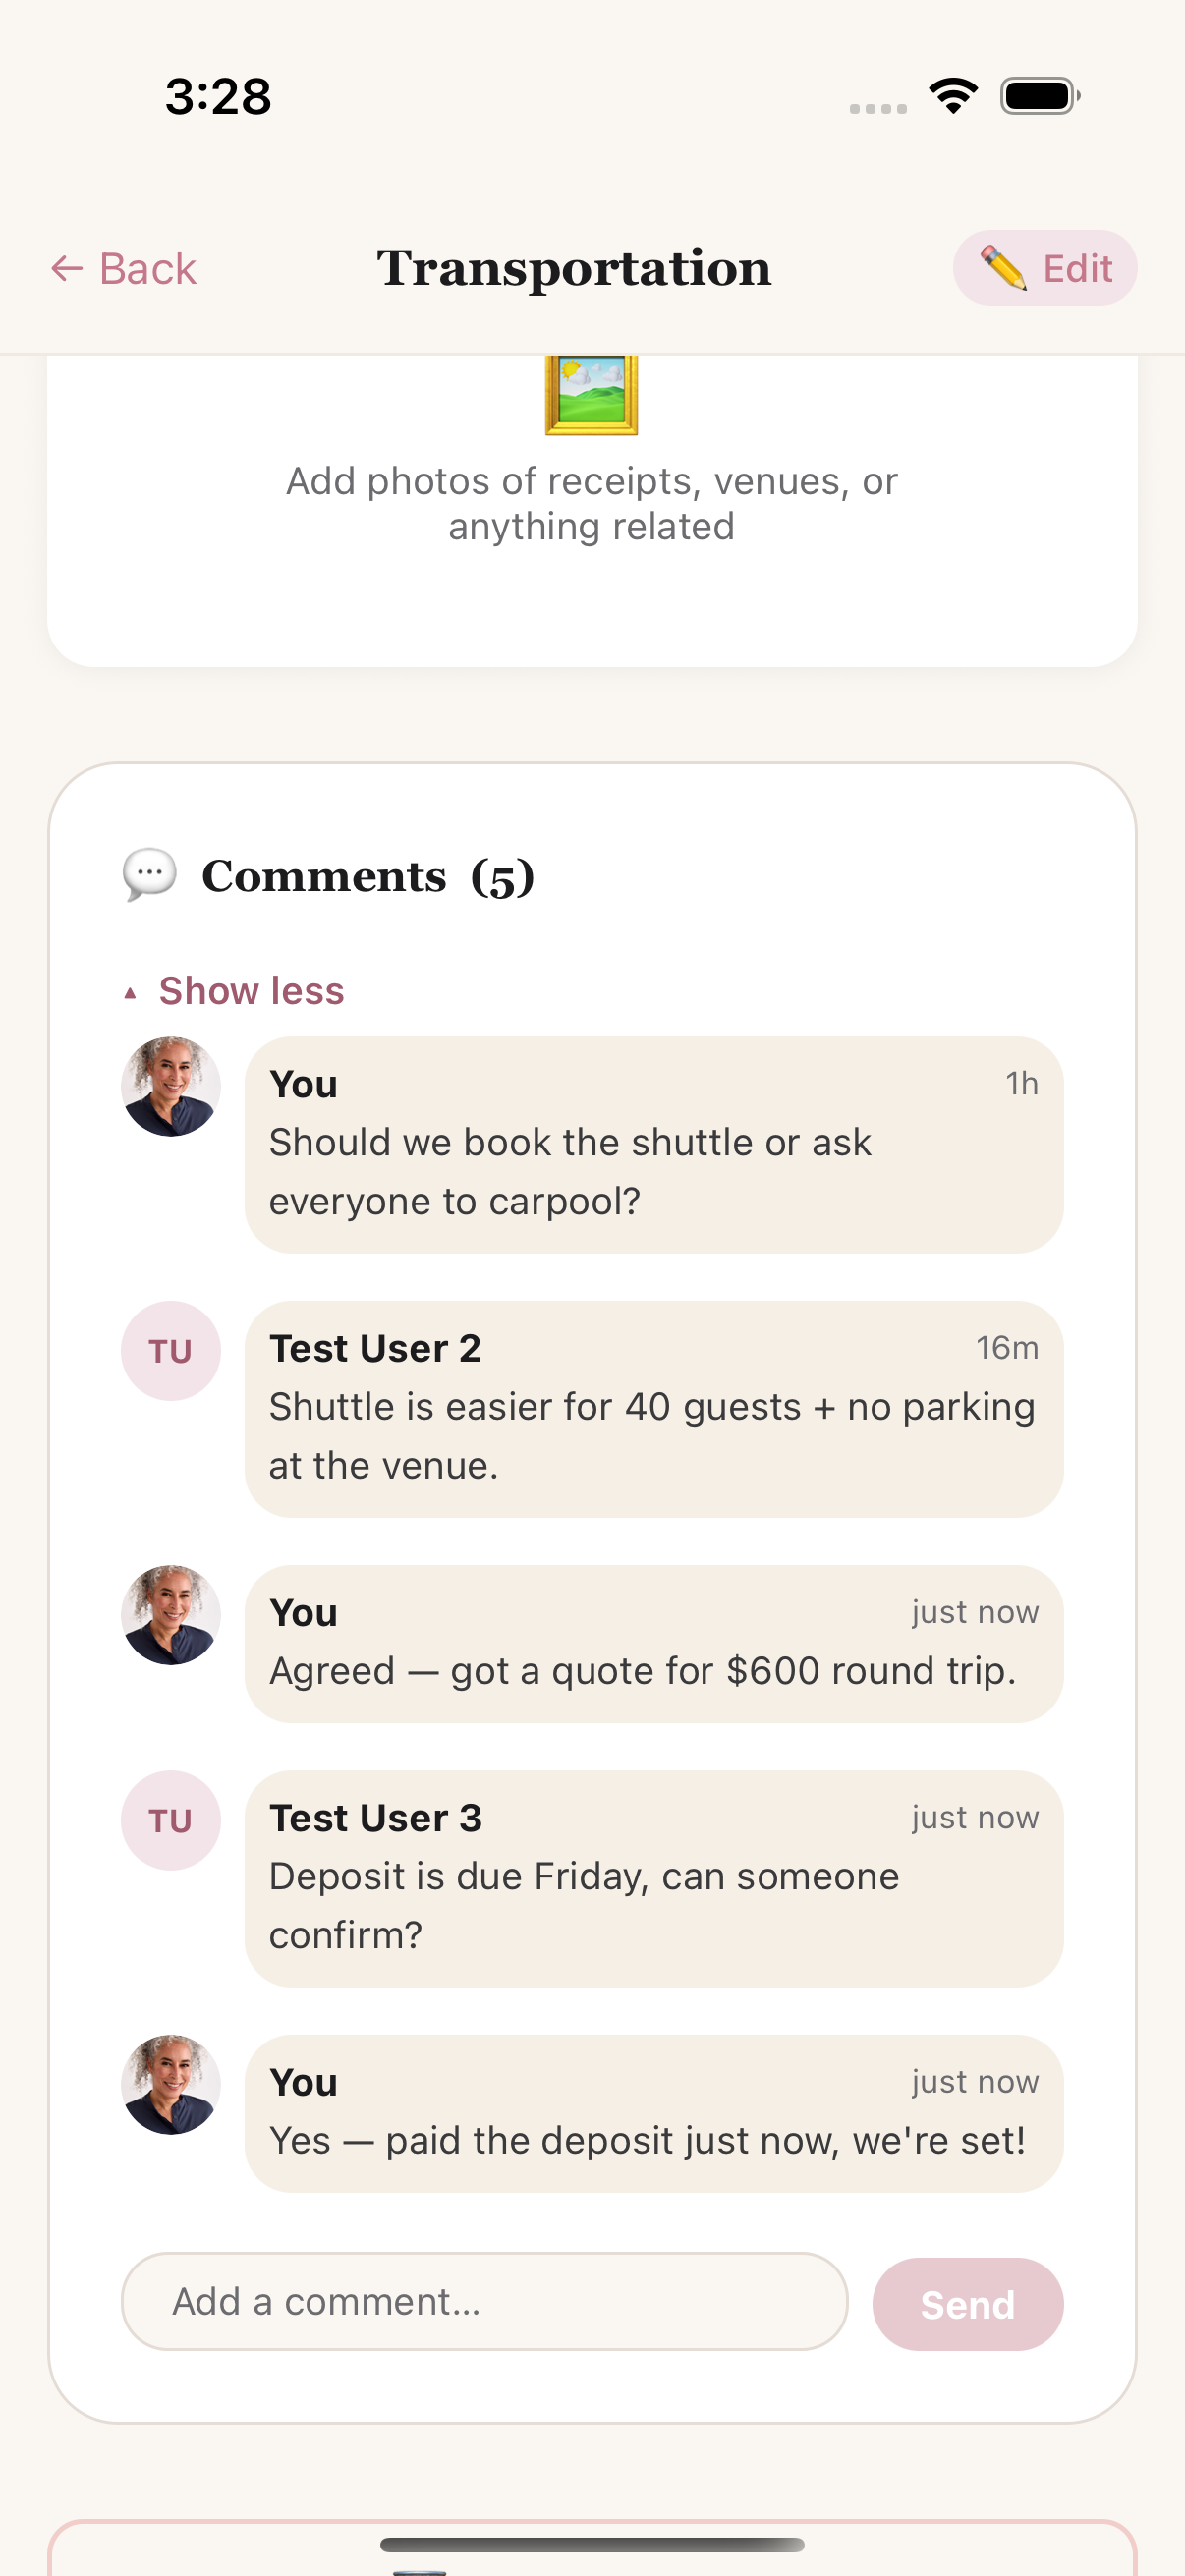
Transportation expense — co-planners talking it through in the thread
People & attendees
- Quick add a person with a name and role; duplicate contacts are flagged so you don't add someone twice.
- Import from a spreadsheet for big guest lists — same idea as importing expenses: upload a .xlsx, .xls, or .csv with Name and Email/Phone columns (Role, Address, City, State, and Zip are optional) and everyone's added at once.
- Mark anyone as not splitting (e.g. a vendor or a child) and they're left out of cost math.
- Splitting isn't the same as attending. Someone can share costs without being there — a parent chipping in for the wedding, or a guest who cancels after the deposit is already paid and still owes their share. Revel Tally never changes who's splitting based on who turns up; that call stays with the organizer.
- Someone dropping out later? Take them off the expenses they were on, and once their last share is gone they move to Not Splitting on their own. You can also do it directly: open the People tab and turn Splitting off for them. Either way they stop appearing in the split summary and stop being included when you add a new expense.
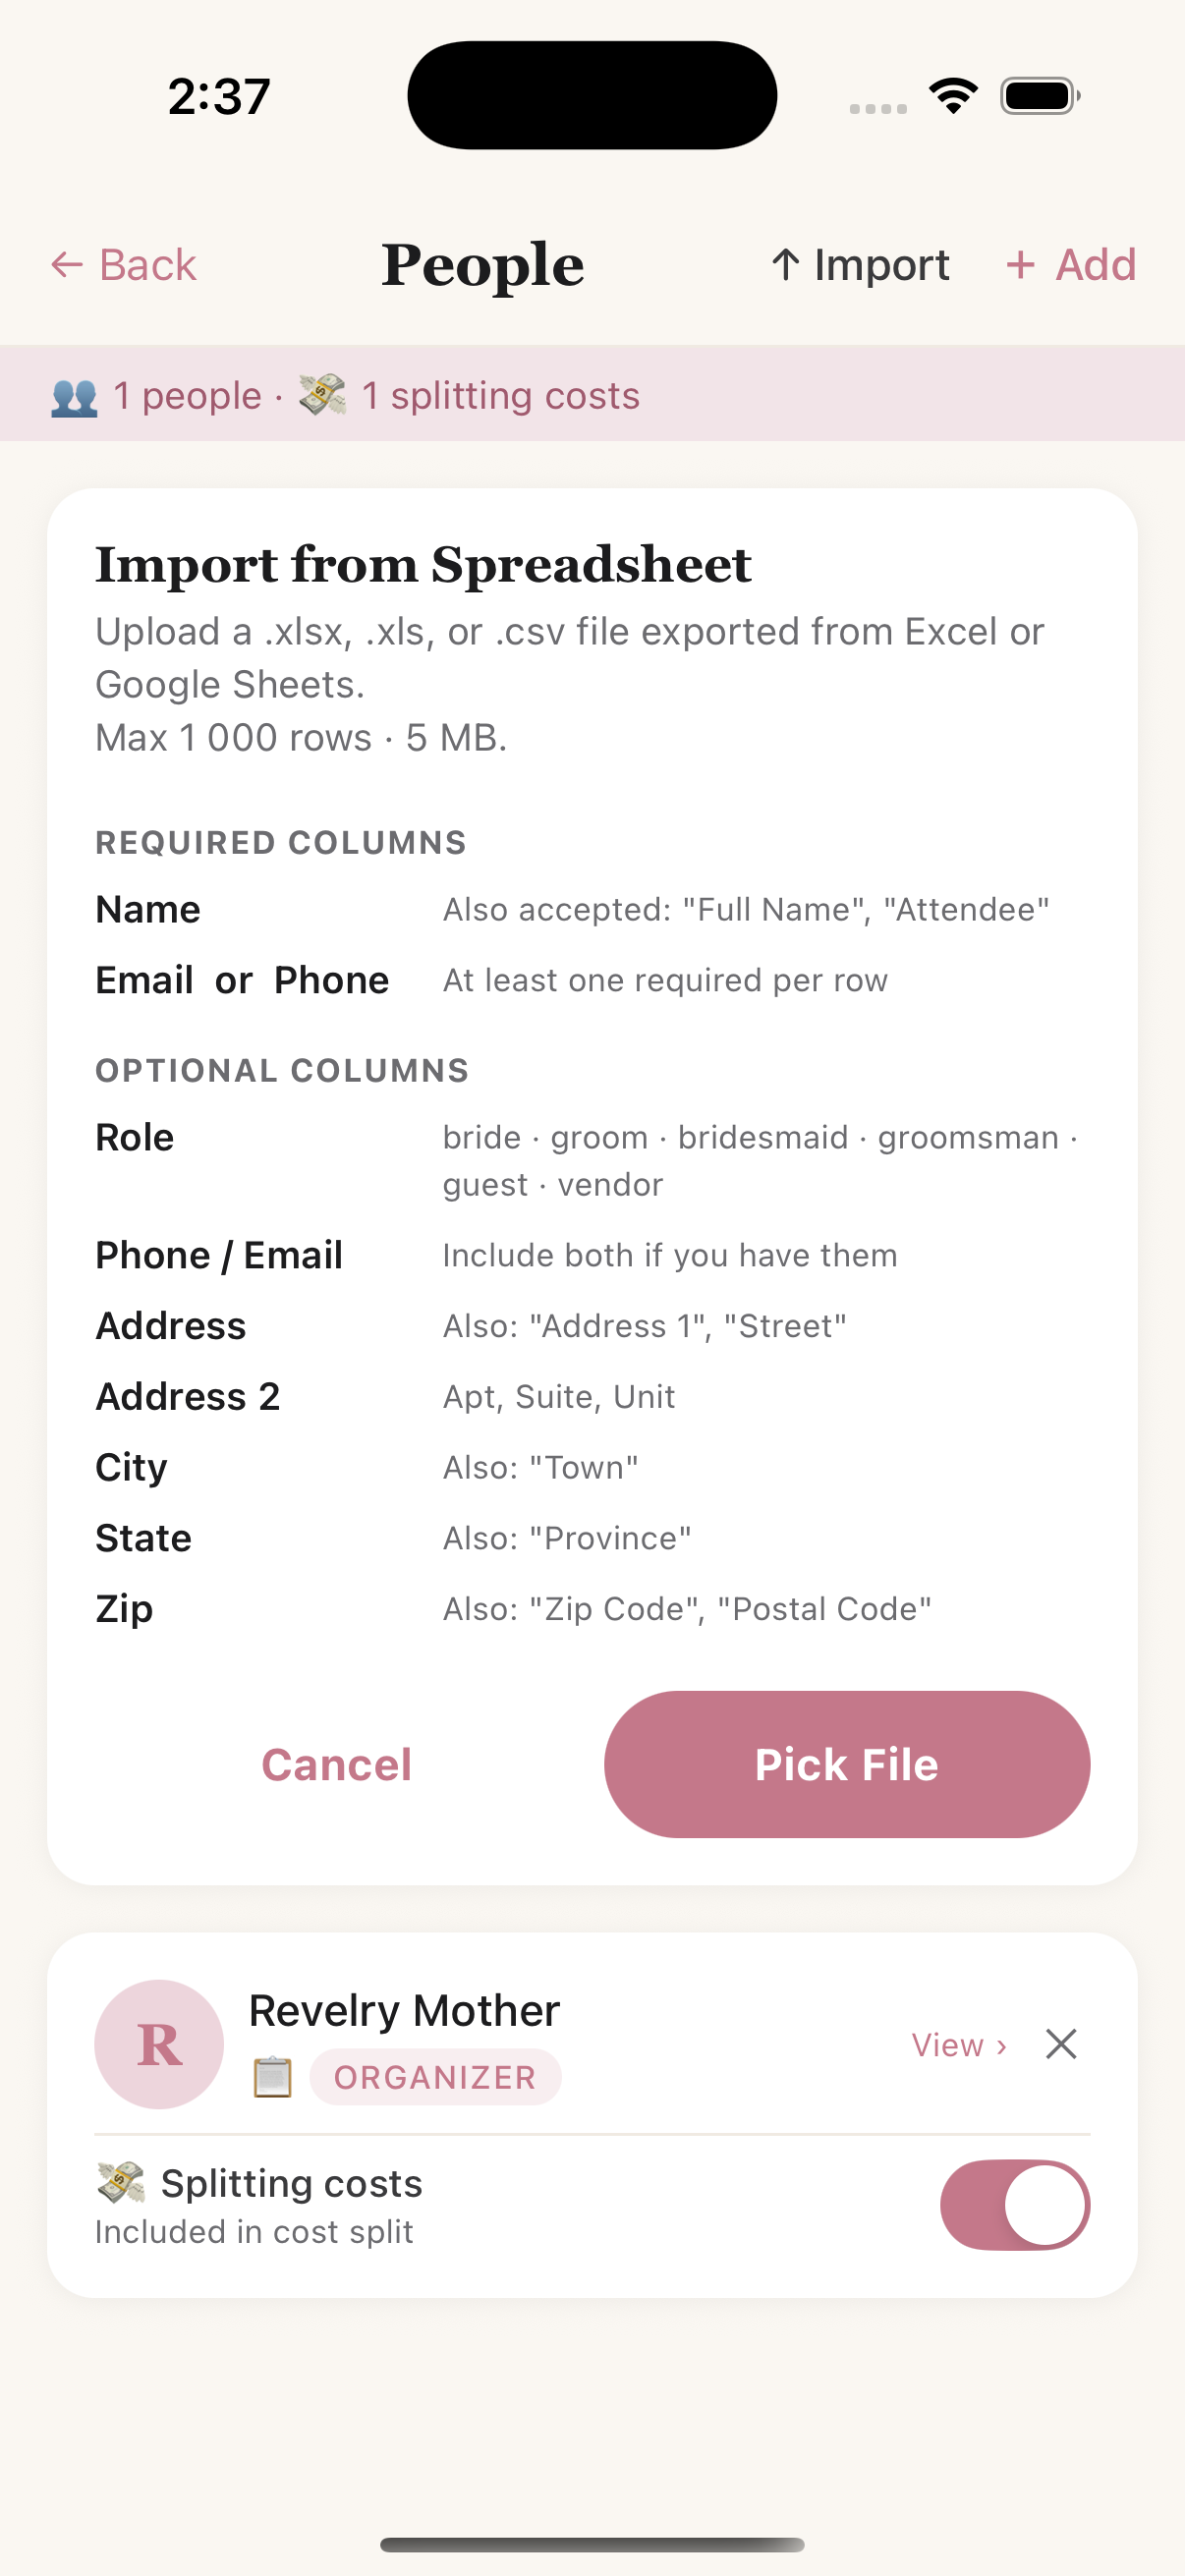
People tab — Import brings in a whole guest list at once
Headcount — what you owe the venue, before the invoice
Wedding venues price on a guaranteed minimum: 100 guests at $85 a head, payable whether or not 100 come, with every head beyond that billed on top. Today the app stores the total and knows nothing about the 100 or the $85 — so the largest financial risk in the budget is invisible until the invoice lands.
A Headcount tab appears beside People on the events that have a guest list and a venue — a wedding, shower, party or corporate event. A group trip does not get one: everyone going is already on the list and there is no minimum to miss. You can turn it on or off on any event.
What it shows. Your venue's minimum and maximum against the number of people on your list, and how far under or over you are. Under the minimum is the one worth catching early — 62 against a guaranteed 100 means paying for 38 empty seats, and that is only fixable while there is still time to renegotiate.
“On your list”, not “invited”. It counts everyone you have added on the People tab, whether or not you have actually sent them an invitation — the app cannot know that, so it does not claim it.
One row is often more than one person. An invitation goes to “Sarah and guest”, or to a family of four. On the People tab each person carries a party size — how many the invitation covers, including them — and how many of those are children. That is what the venue counts, so a list of 40 invitations can be 90 heads. You can add the other names when you know them, or leave it at “and guest” and fill them in later, and you can say how the invitation should be addressed — “Mr & Mrs John Smith”, or “& Family” once children are coming.
Not everyone gets an invitation. You are hosting, so no envelope is addressed to you — and the same goes for the couple and any vendor. Each person has an on the invite list switch, set sensibly by role to begin with and changeable on anyone: a plus-one already covered by their partner's card comes off it too. Taking someone off does not remove them from the headcount. They still eat, and the venue still counts them.
Three separate questions, deliberately. Who shares the costs (splitting), who gets an invitation (invite list), and how many are coming (party size) are set independently. A family of four on one invitation is four heads at the venue and still one payer.
Children are asked about, not assumed. You tell the app whether children are invited, roughly how many, what the venue charges for them, and — the one that matters — whether the venue counts them toward the minimum. Vendors genuinely differ, and it is a term in your contract, so guessing would put a wrong number on the biggest line in your budget. With 110 on the list and 20 children the venue excludes, only 90 count toward a minimum of 100: you are under by 10, not over.
And what it costs. Tap What the heads cost for the breakdown — it sits one tap away rather than on the tab, the way payment history does, because it is there to read rather than act on. Adults and children are priced separately at their own rates and totalled, so “$40 a child” is money on the screen rather than a setting you entered once. It is an estimate from today's list, never a booked cost — your venue's invoice is what counts.
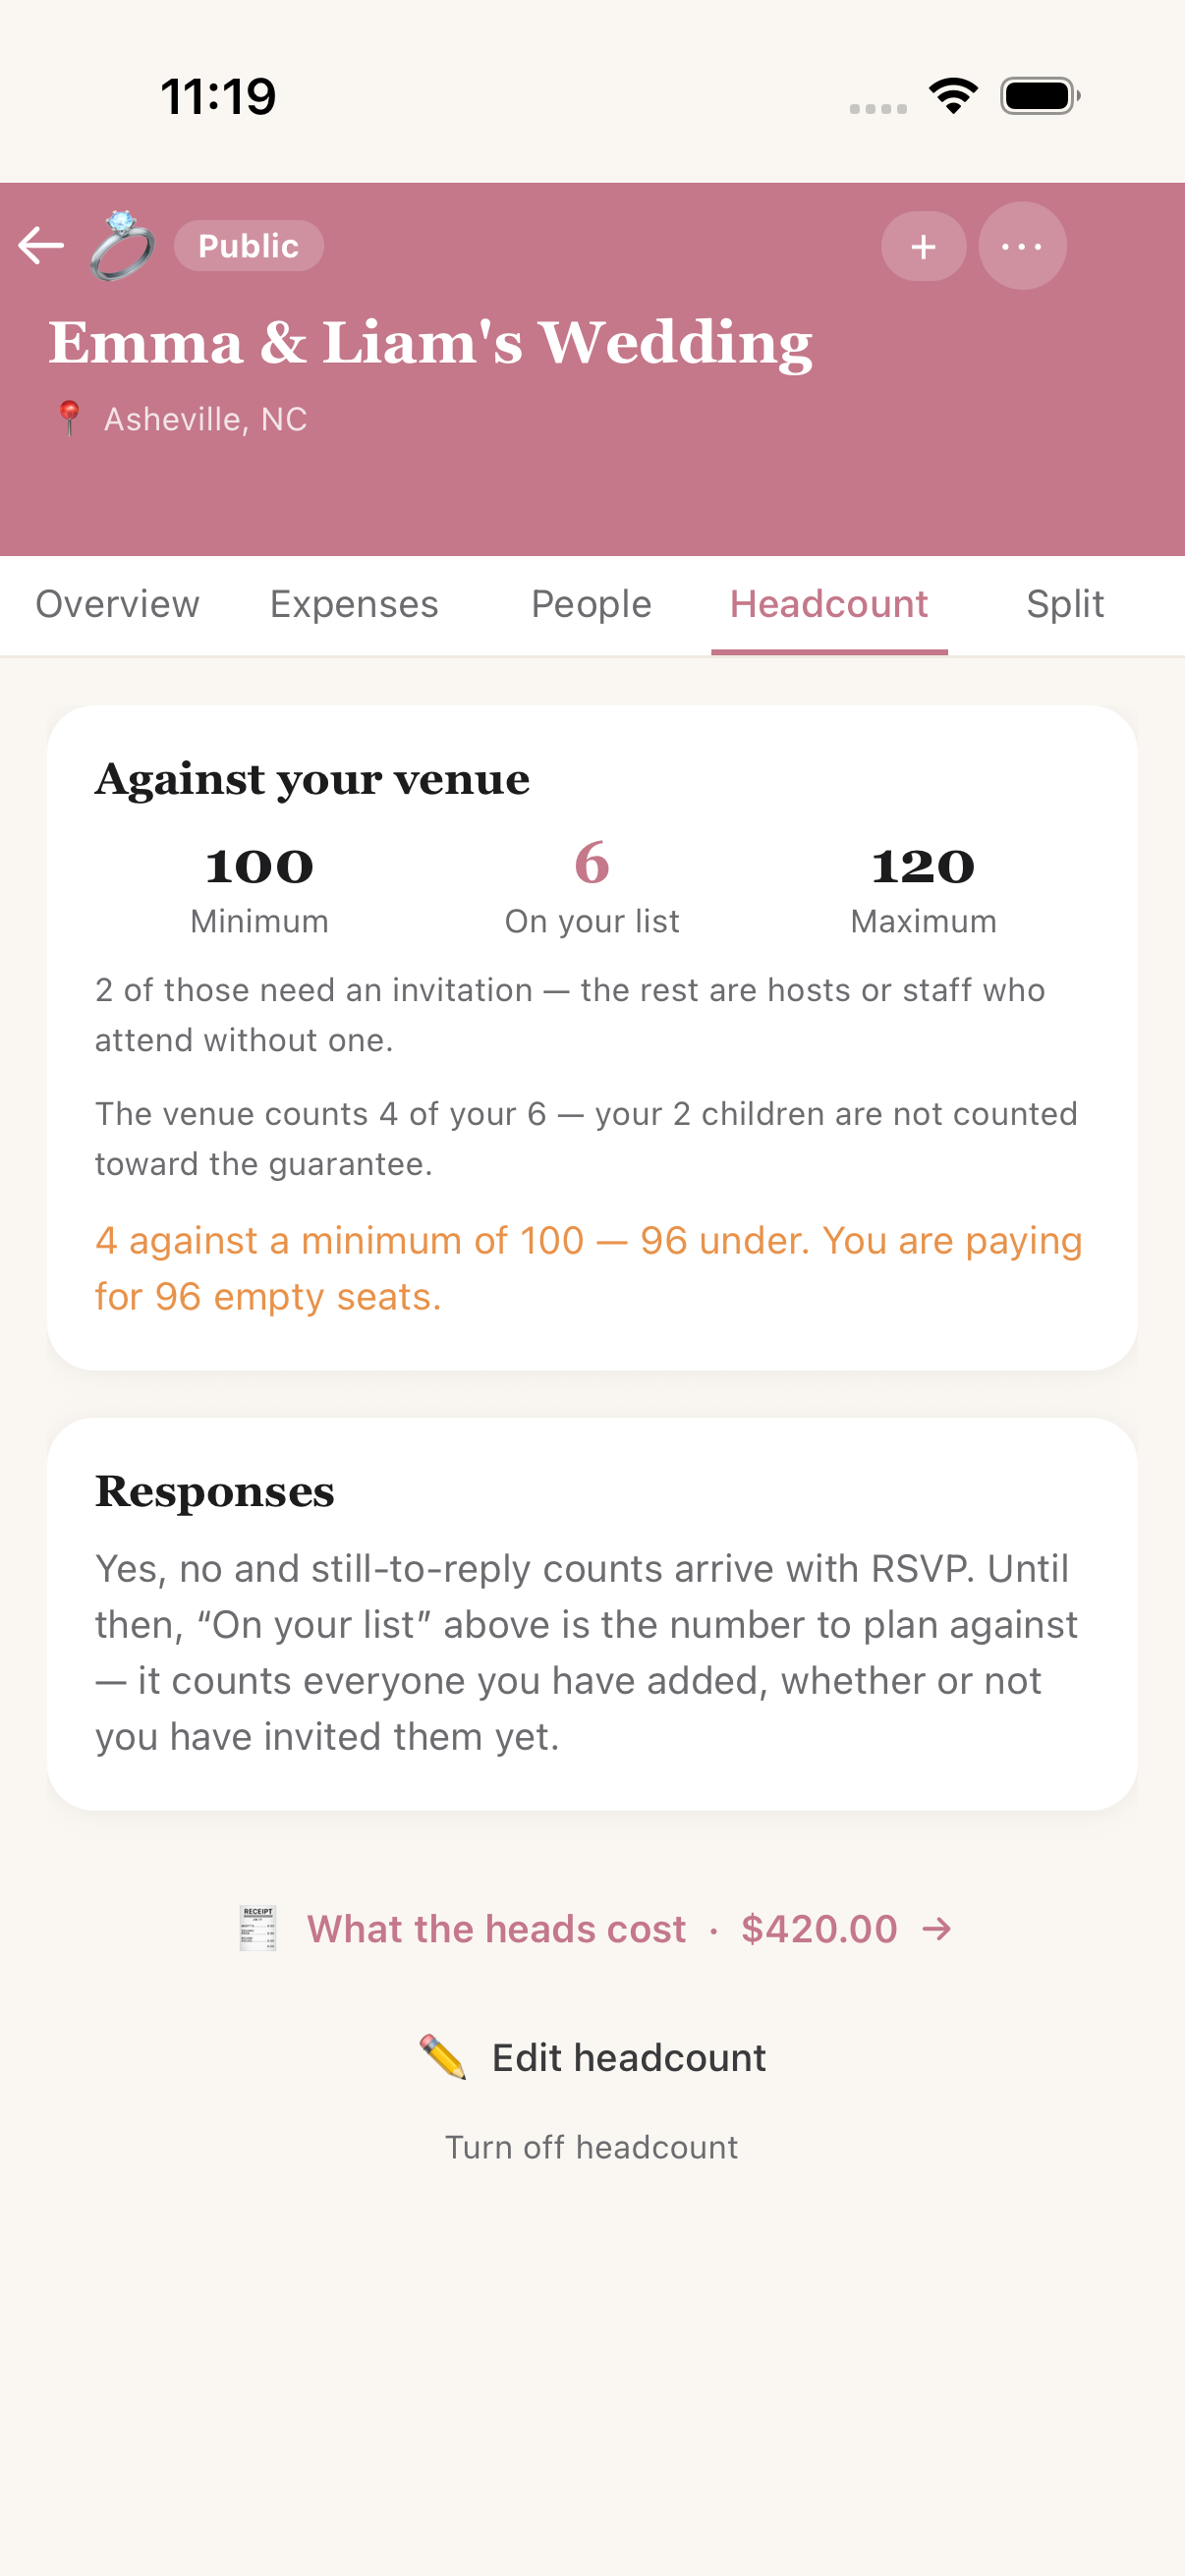
Headcount — the venue's limits, and who it counts
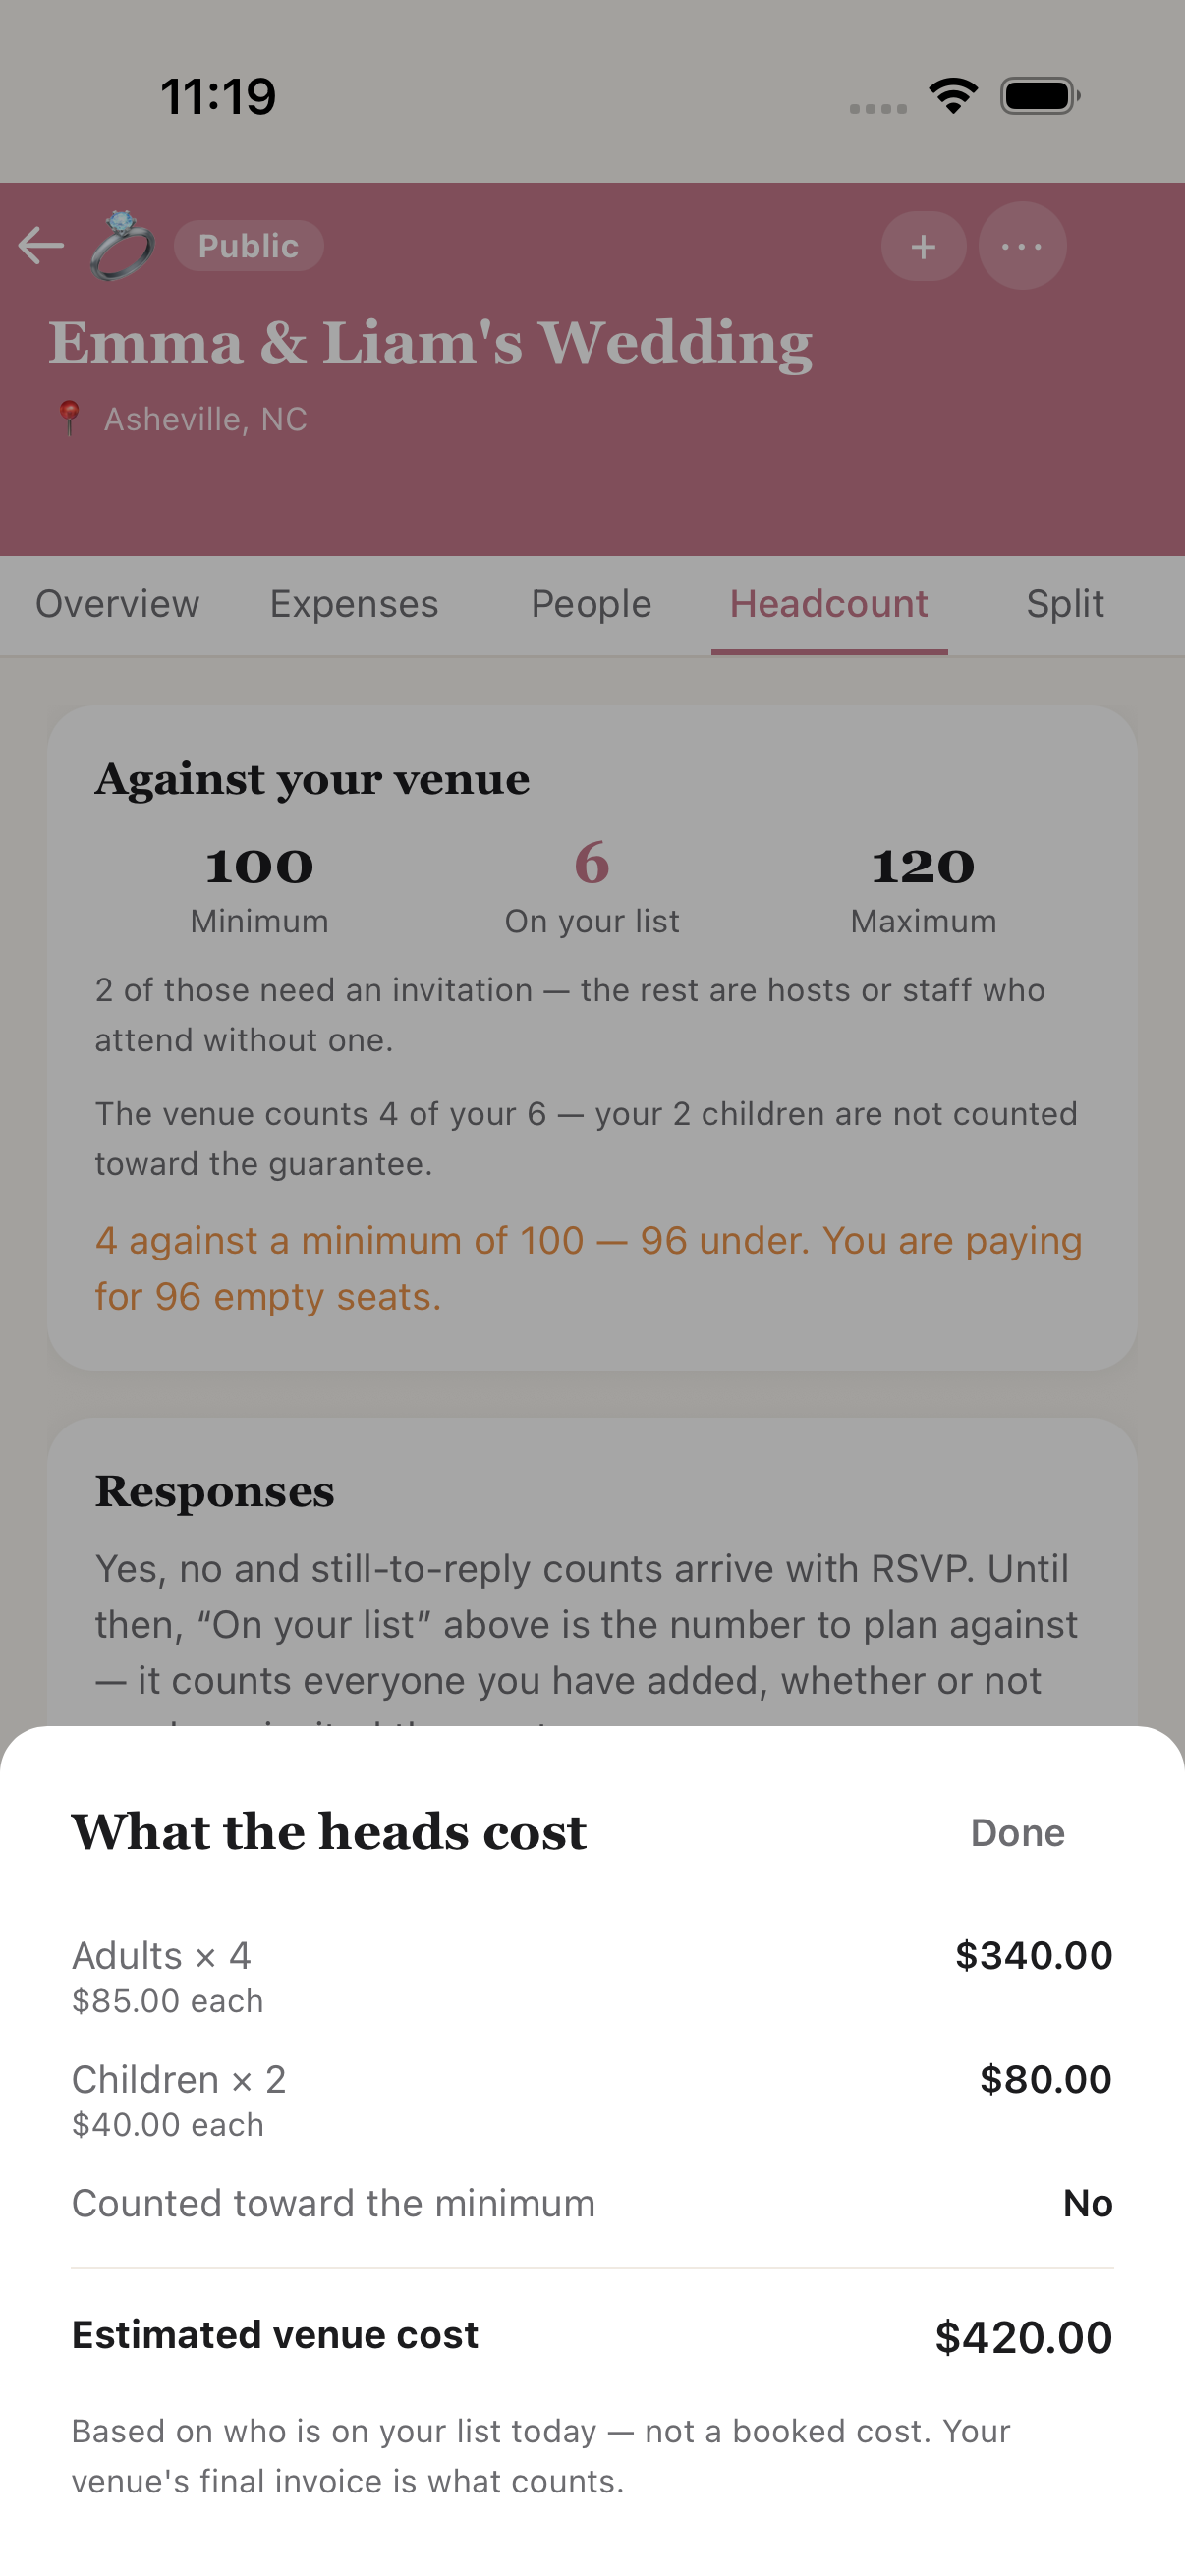
One tap away — adults and children at their own rates
Now with replies. The tab leads with Responses — yes, no, and still waiting — counted in people, not invitations: a party of four who send two adds two to Yes. See RSVP below.
RSVP — letting guests reply themselves
You can record replies by hand, but you do not have to. Turn on Let guests reply themselves on the Headcount tab and the event gets a guest page: a plain web page, no app and no account, where the people you invited say whether they are coming.
| How you hand it out | Use it when |
|---|
| One link for the event, plus a printable QR code | It goes on the invitation, or a sign by the door. Guests identify themselves by the email or phone the invitation came to. |
| A code per guest | You want no identify step at all — the link already knows who they are. Best for a household that shares one address, or a guest whose number you store differently from how they would type it. |
| Mail-merge file | Hand it to whoever lays out the stationery: a row per guest with how to address them, their postal address, and their own link and QR. |
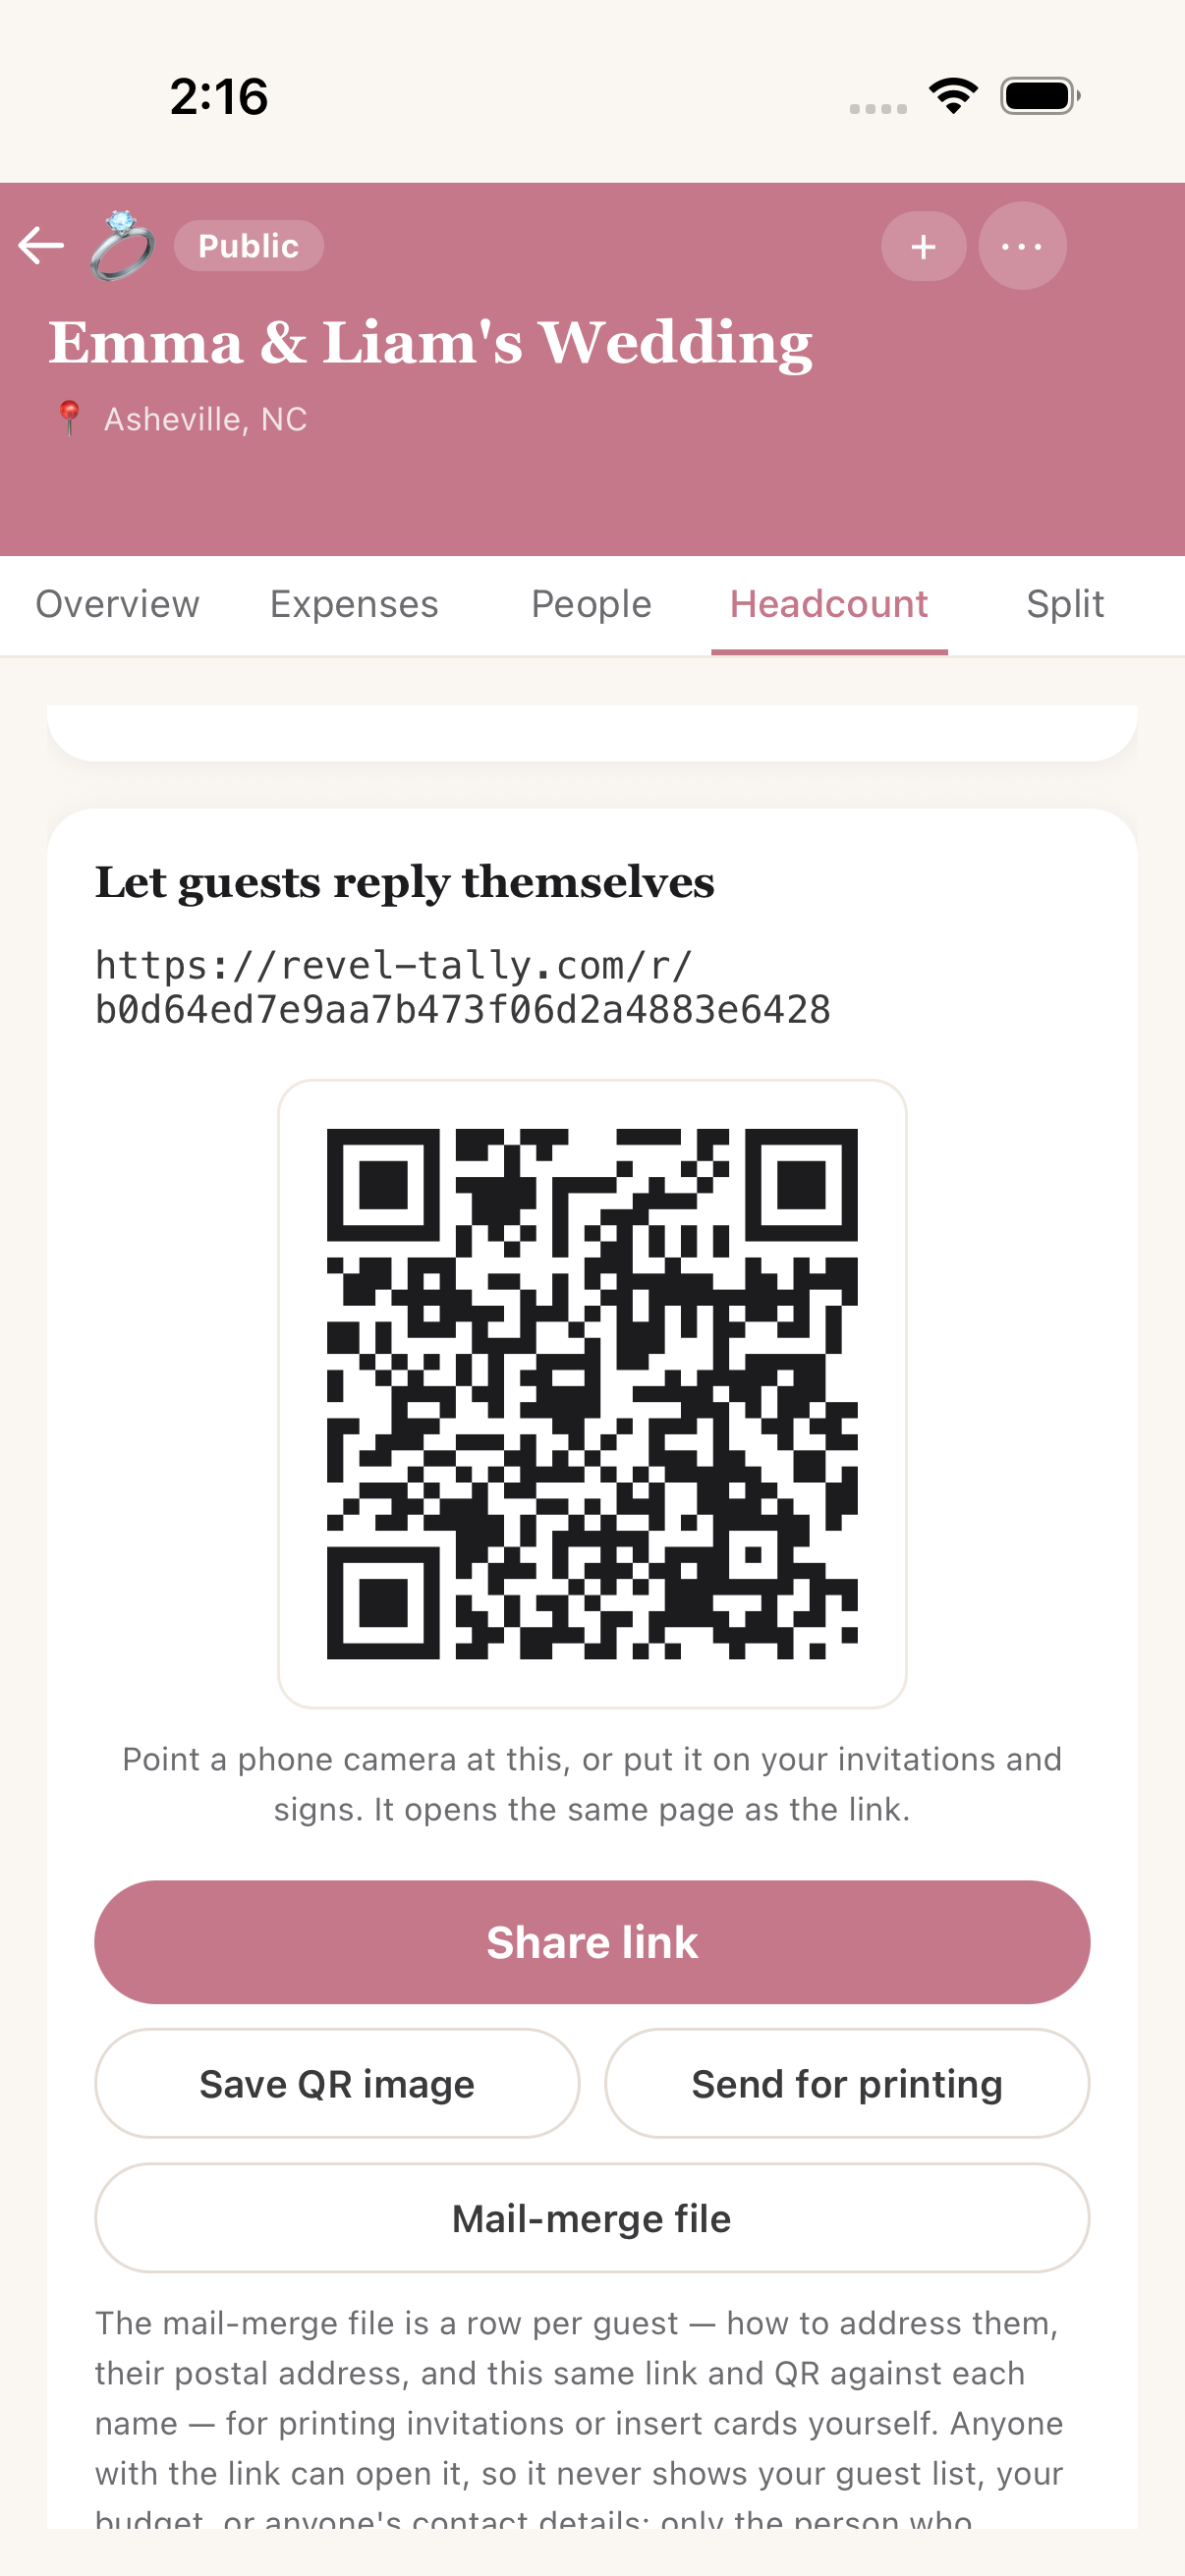
Headcount — the guest link, its QR, and the ways out to a printer
Getting the code onto paper
Most of this ends up at a stationer or a print shop, so the exports are built for that rather than for your phone's photo roll.
| Export | What you get | Hand it to |
|---|
| Save QR image | A picture of the code, saved or shared like any photo. | Yourself — a slide, a quick sign, a message. |
| Send for printing | A vector QR (an .svg web address) rather than a screenshot. It stays sharp at any size, from a place card to an A1 welcome board, and opens straight into a design tool. | Your stationer or print shop. |
| Mail-merge file | A spreadsheet, one row per invited guest: Addressed As, Name, Email, Phone, Address 1 & 2, City, State, ZIP, Party Size, Code, RSVP Link, QR Image and whether they have replied. | A printer doing variable-data printing — every invitation gets that guest's own link and own QR automatically. |
Why a link and not a file? The person laying out your invitations is on a laptop in a design tool, not holding your phone. A web address they can open, print, or drop into a layout beats a screenshot AirDropped across the room — and a vector never goes fuzzy when they scale it up.
The mail-merge file works whether or not you are using per-guest codes. Each row says which kind of link it carries — Personal or Shared — so a list caught mid-switch never prints the wrong square on somebody's invitation.
Once codes have left the app, the link becomes permanent. Squares are on paper now, and replacing the link would break every one of them. You can still switch guest replies off entirely — the app is explicit about the difference between the two.
What a guest sees. Who the invitation covers, a yes or no, and then only what applies to them — the seats on their invitation, a box to name an “and guest”, a tick for children, and a dinner choice if you have set a menu. They can come back to the same link and change their answer.
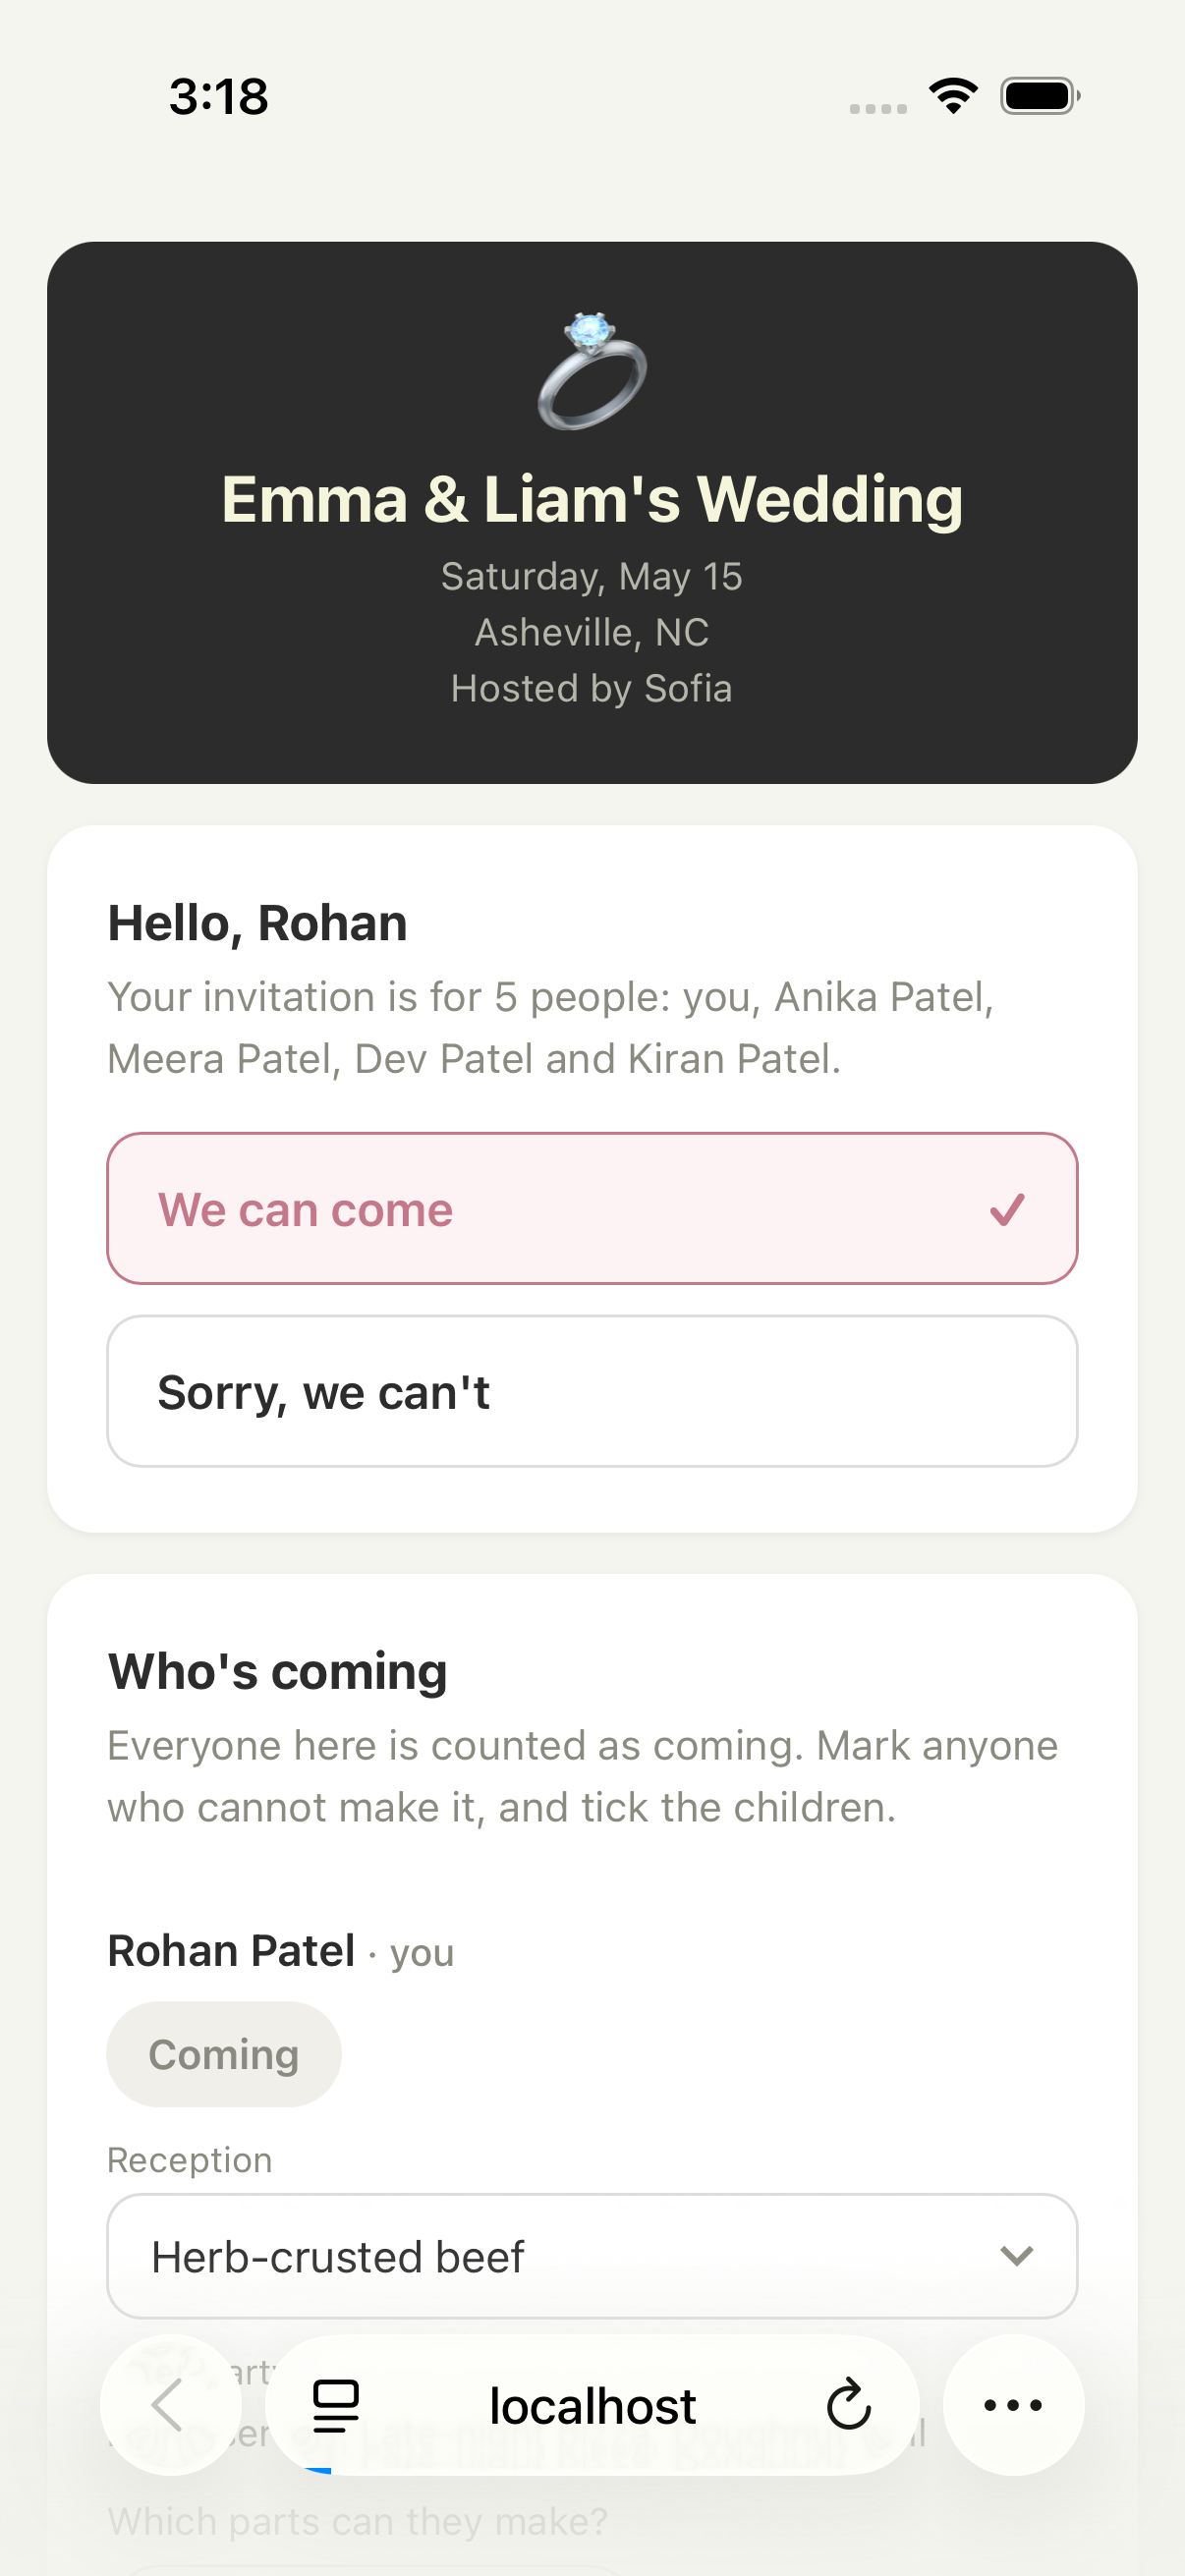
What a guest opens — a web page, no app and no account
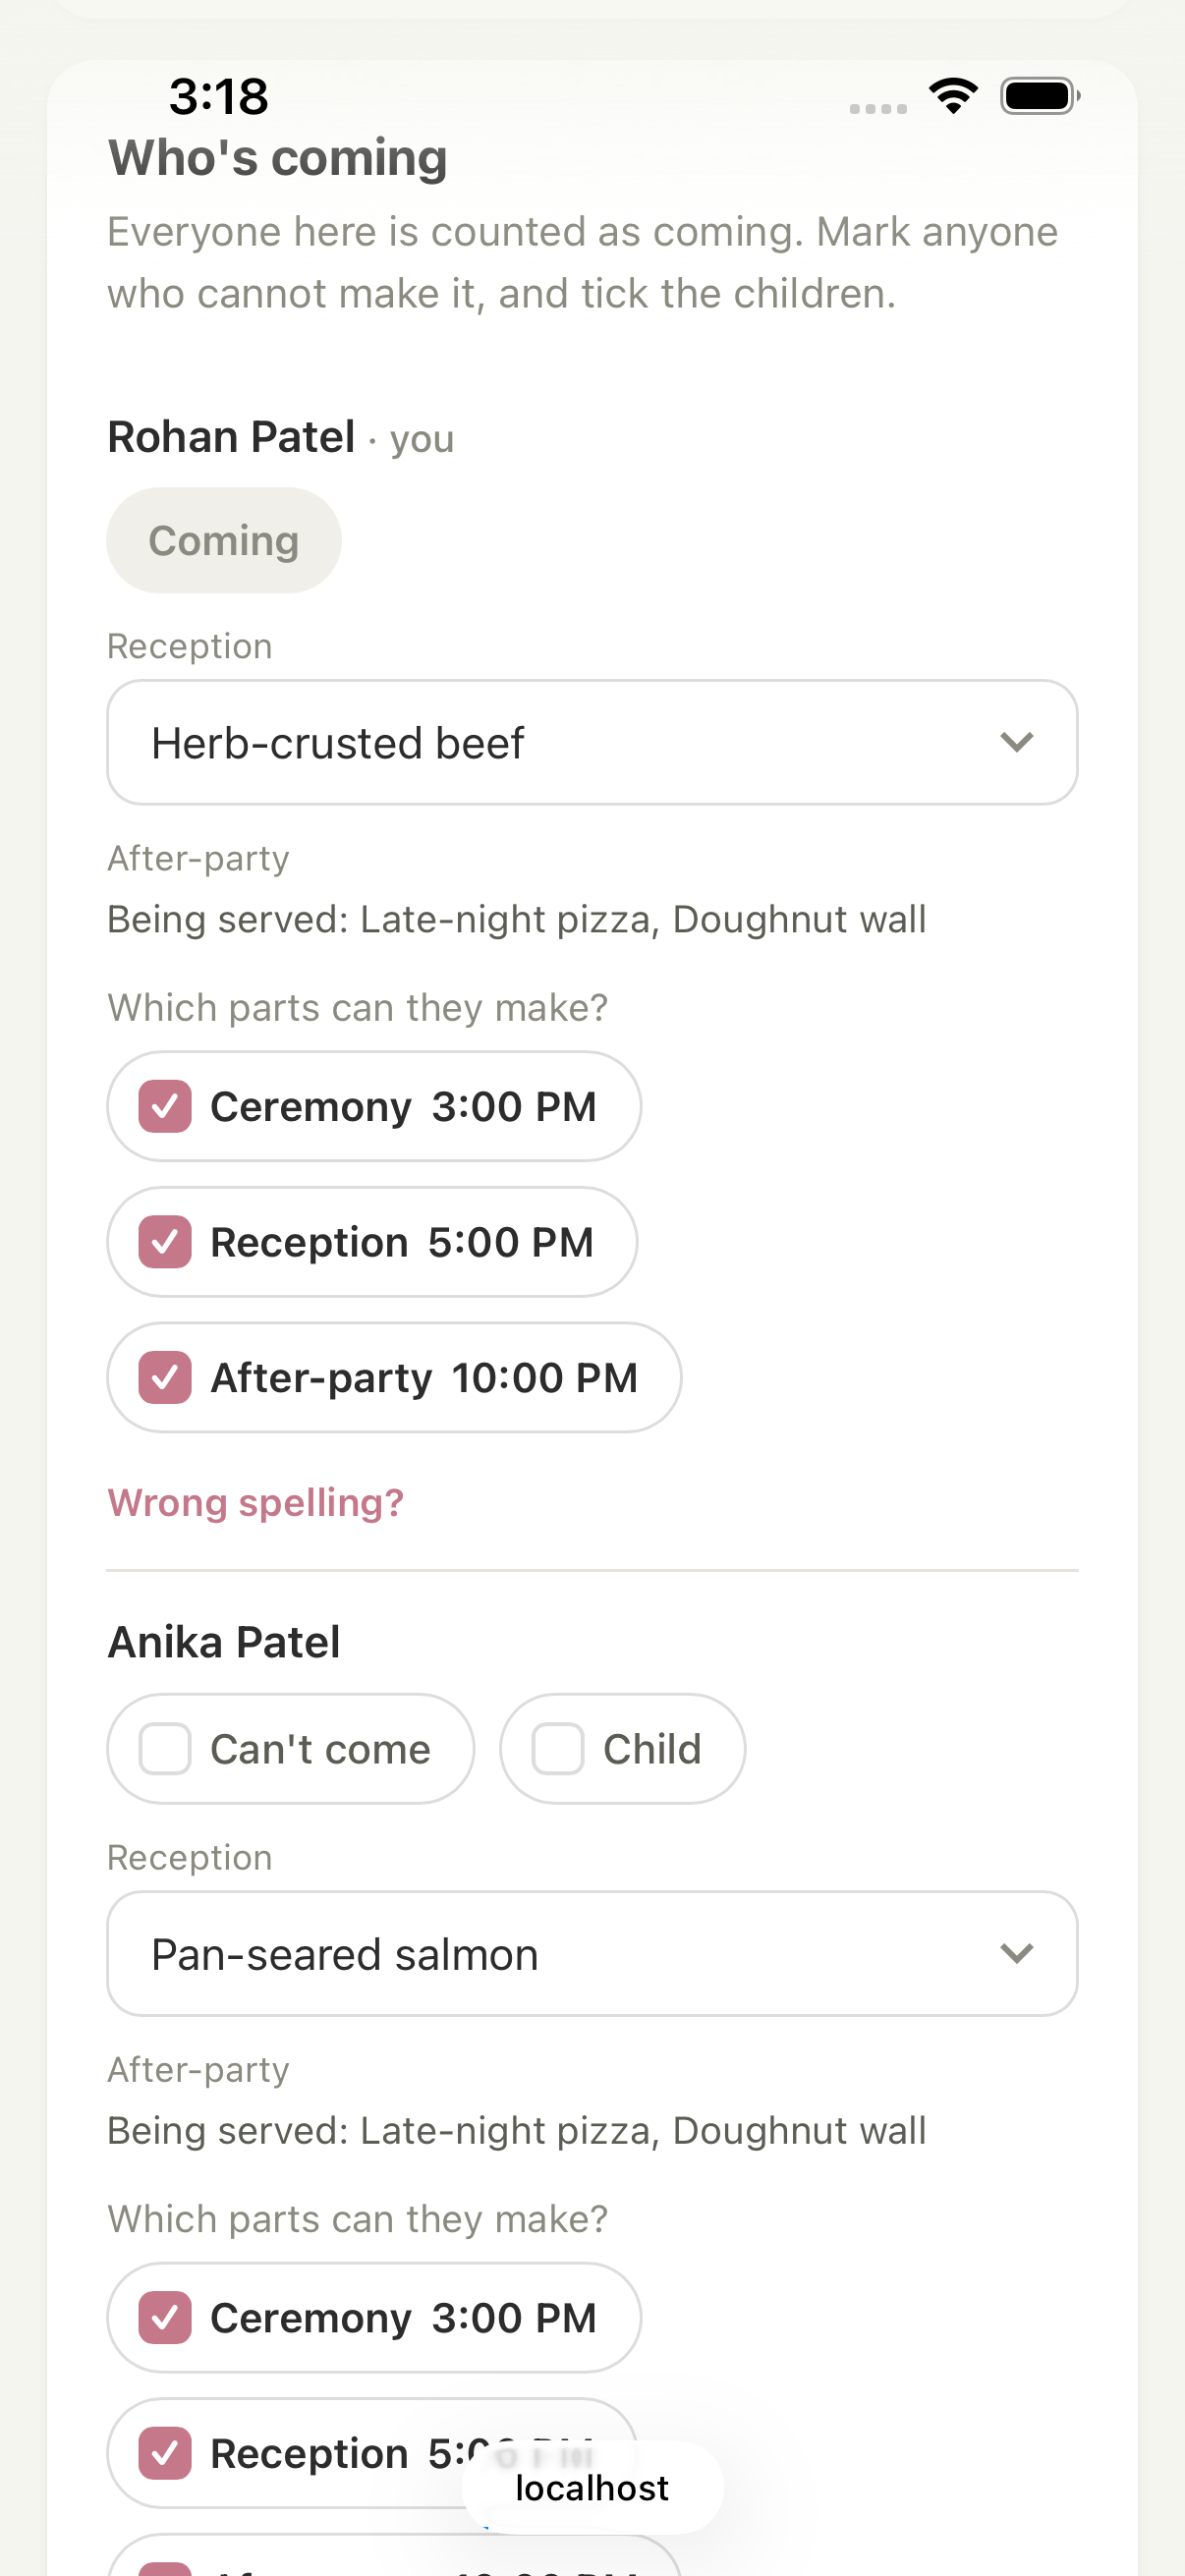
One reply: who is coming, what they eat, and which parts they can make
Set the menu before you hand out the link. The guest page shows whatever exists when it is opened, so anyone who replies before you add the menu never sees a dinner picker — and you are then chasing those choices one at a time.
A seat that is coming has to say who. “And guest” is a real state and stays one, but it lives in a seat nobody has answered for yet — not in one claimed as attending. A confirmed head you cannot put on a place card or a dietary list ends the conversation without answering it.
Where a reply came from. Each one is marked as the guest's own or as something you recorded, so a reply you took over the phone is never mistaken for one they gave. You can override any answer, and the app keeps that it was overridden.
Turning it off. Replace the link if it gets somewhere it should not be — the old one stops working immediately — or turn it off entirely. Per-guest codes can be regenerated the same way.
Parts of the day — a wedding is not one room
Children come to the ceremony and go home before the reception. Forty people are at the dinner and ninety at the party after it. Add parts — ceremony, reception, after-party — each with its own name, time, and guest list.
Everyone is invited to everything until you say otherwise. An event with no parts behaves exactly as it always did, and a seat you have not narrowed is on every part's list. Narrowing is the exception you record, and it is per seat, because “the children are only at the ceremony” happens inside a single invitation.
The guest still replies once. They say yes, and mark the exceptions — not three separate RSVPs. A guest can never widen their own invitation; a carve-out only ever narrows, so the list stays yours.
The Headcount tab then breaks the replies down per part. They deliberately do not add up to the total, and the app says so rather than leaving you to work out why the reception is smaller than the ceremony.
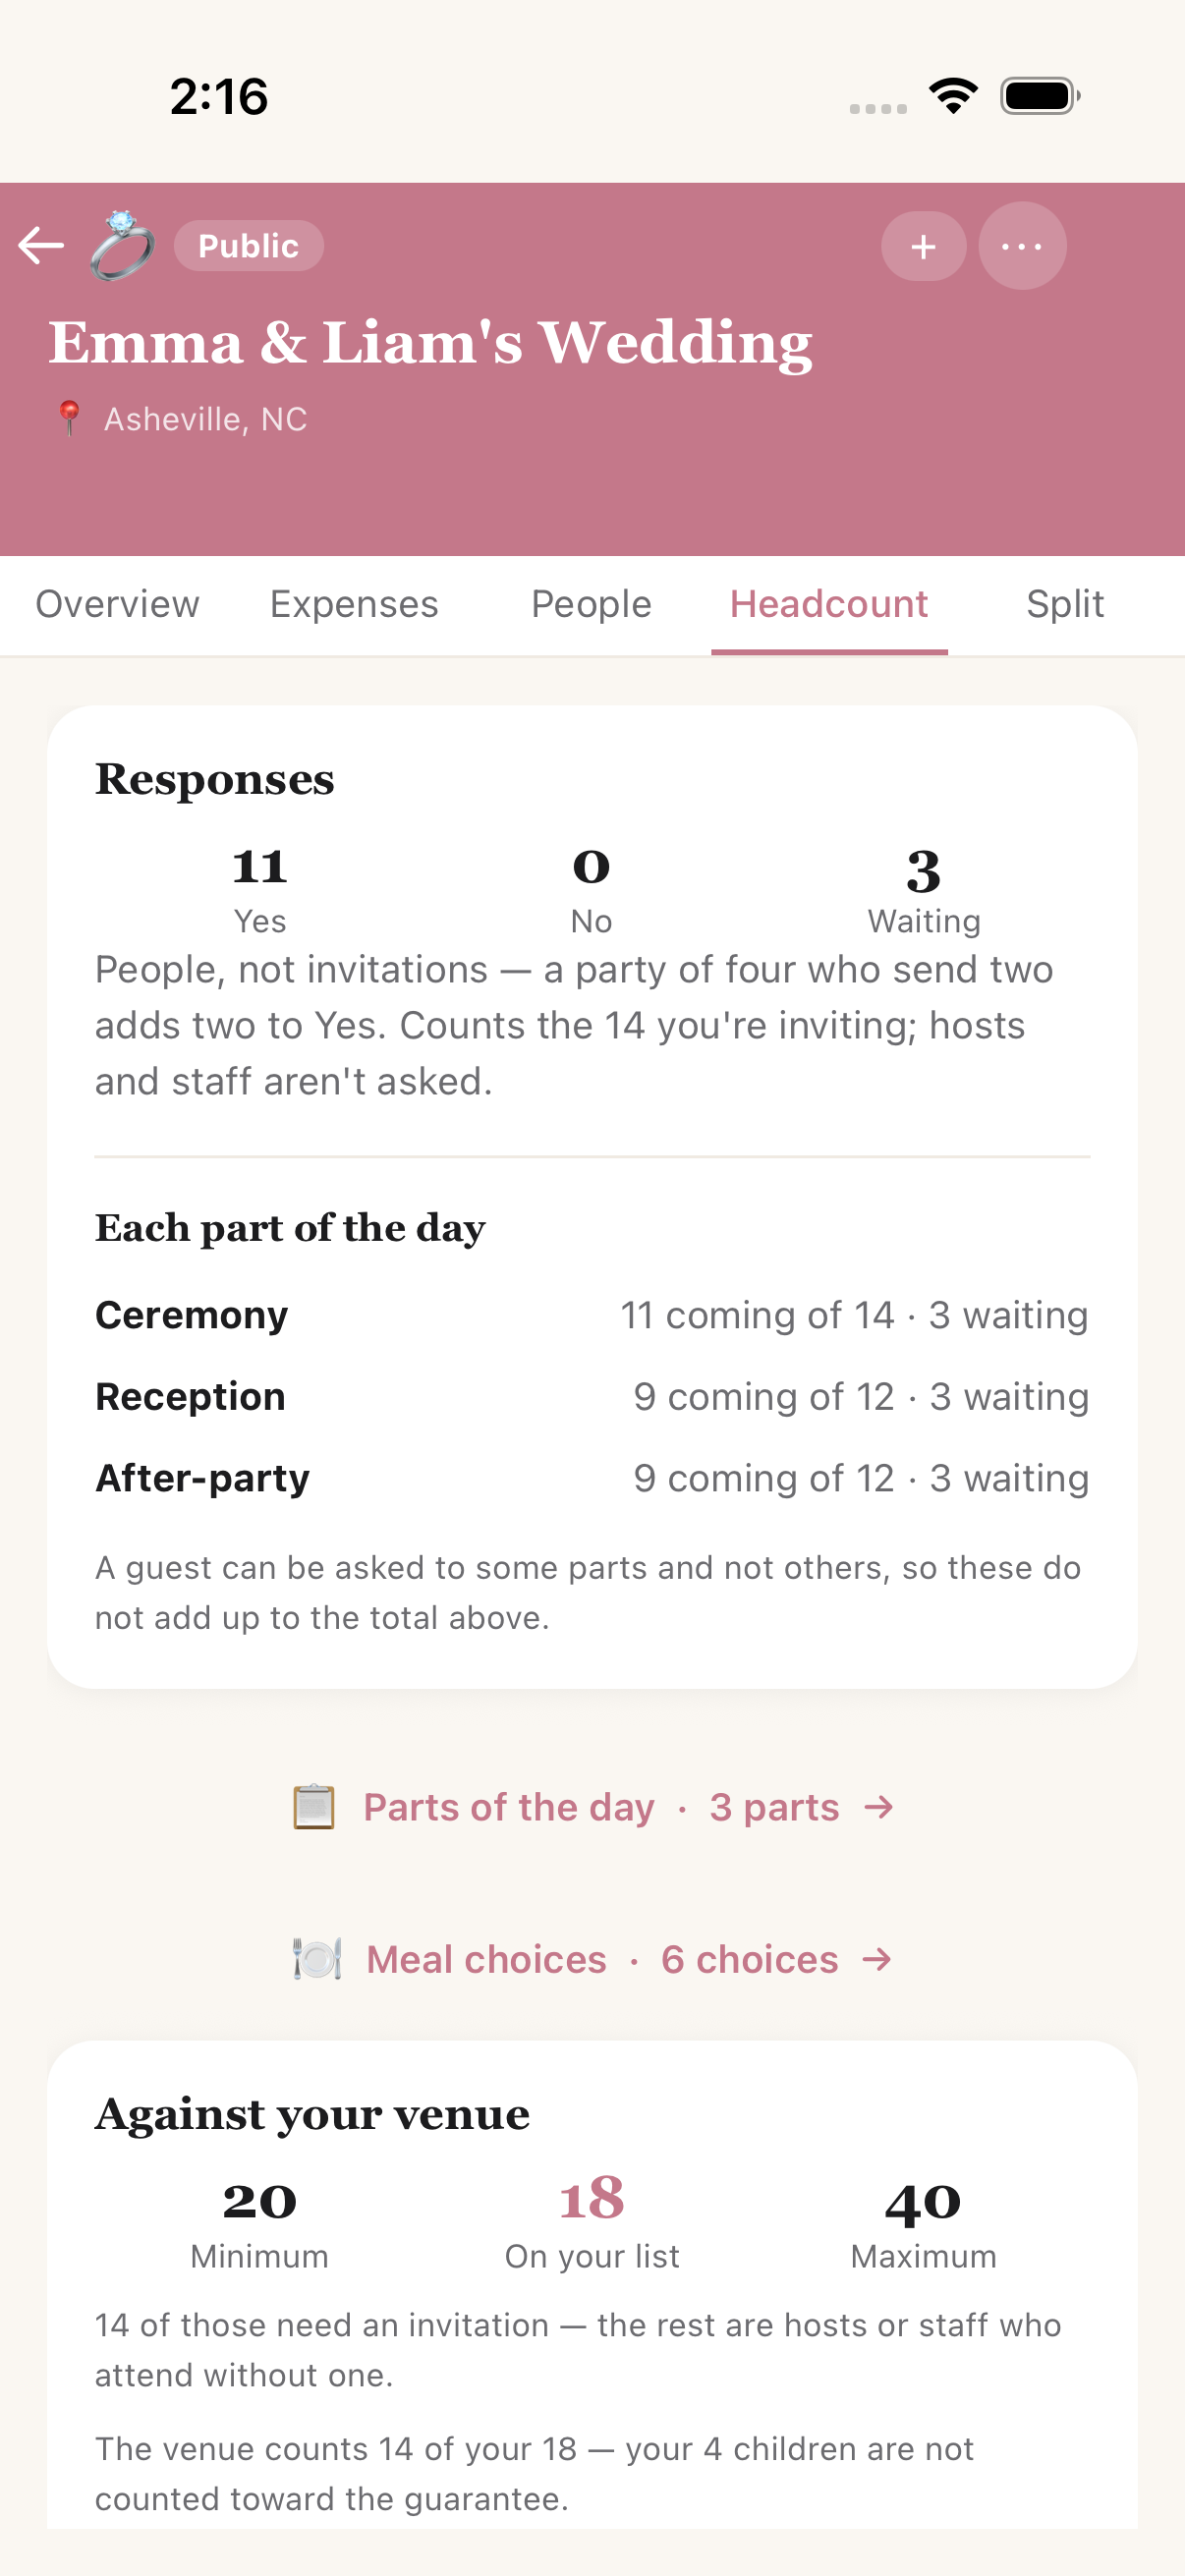
Replies first — then the same count, per part of the day
The parts themselves — each with its time and its own list
Meal choices & what to tell the caterer
Add a menu and guests choose their dinner as part of replying. Options belong to a part of the day, so a ceremony with no food simply has no options, and the reception and the after-party can have entirely different menus.
Two kinds of menu, and the difference matters:
- Guests pick one — a plated dinner. Each guest takes exactly one and the kitchen needs a count per dish.
- Served to everyone — snacks, a buffet, a doughnut wall. Nobody chooses; the only number worth having is how many people will be there. Asking a guest to pick a snack invents a decision they do not have.
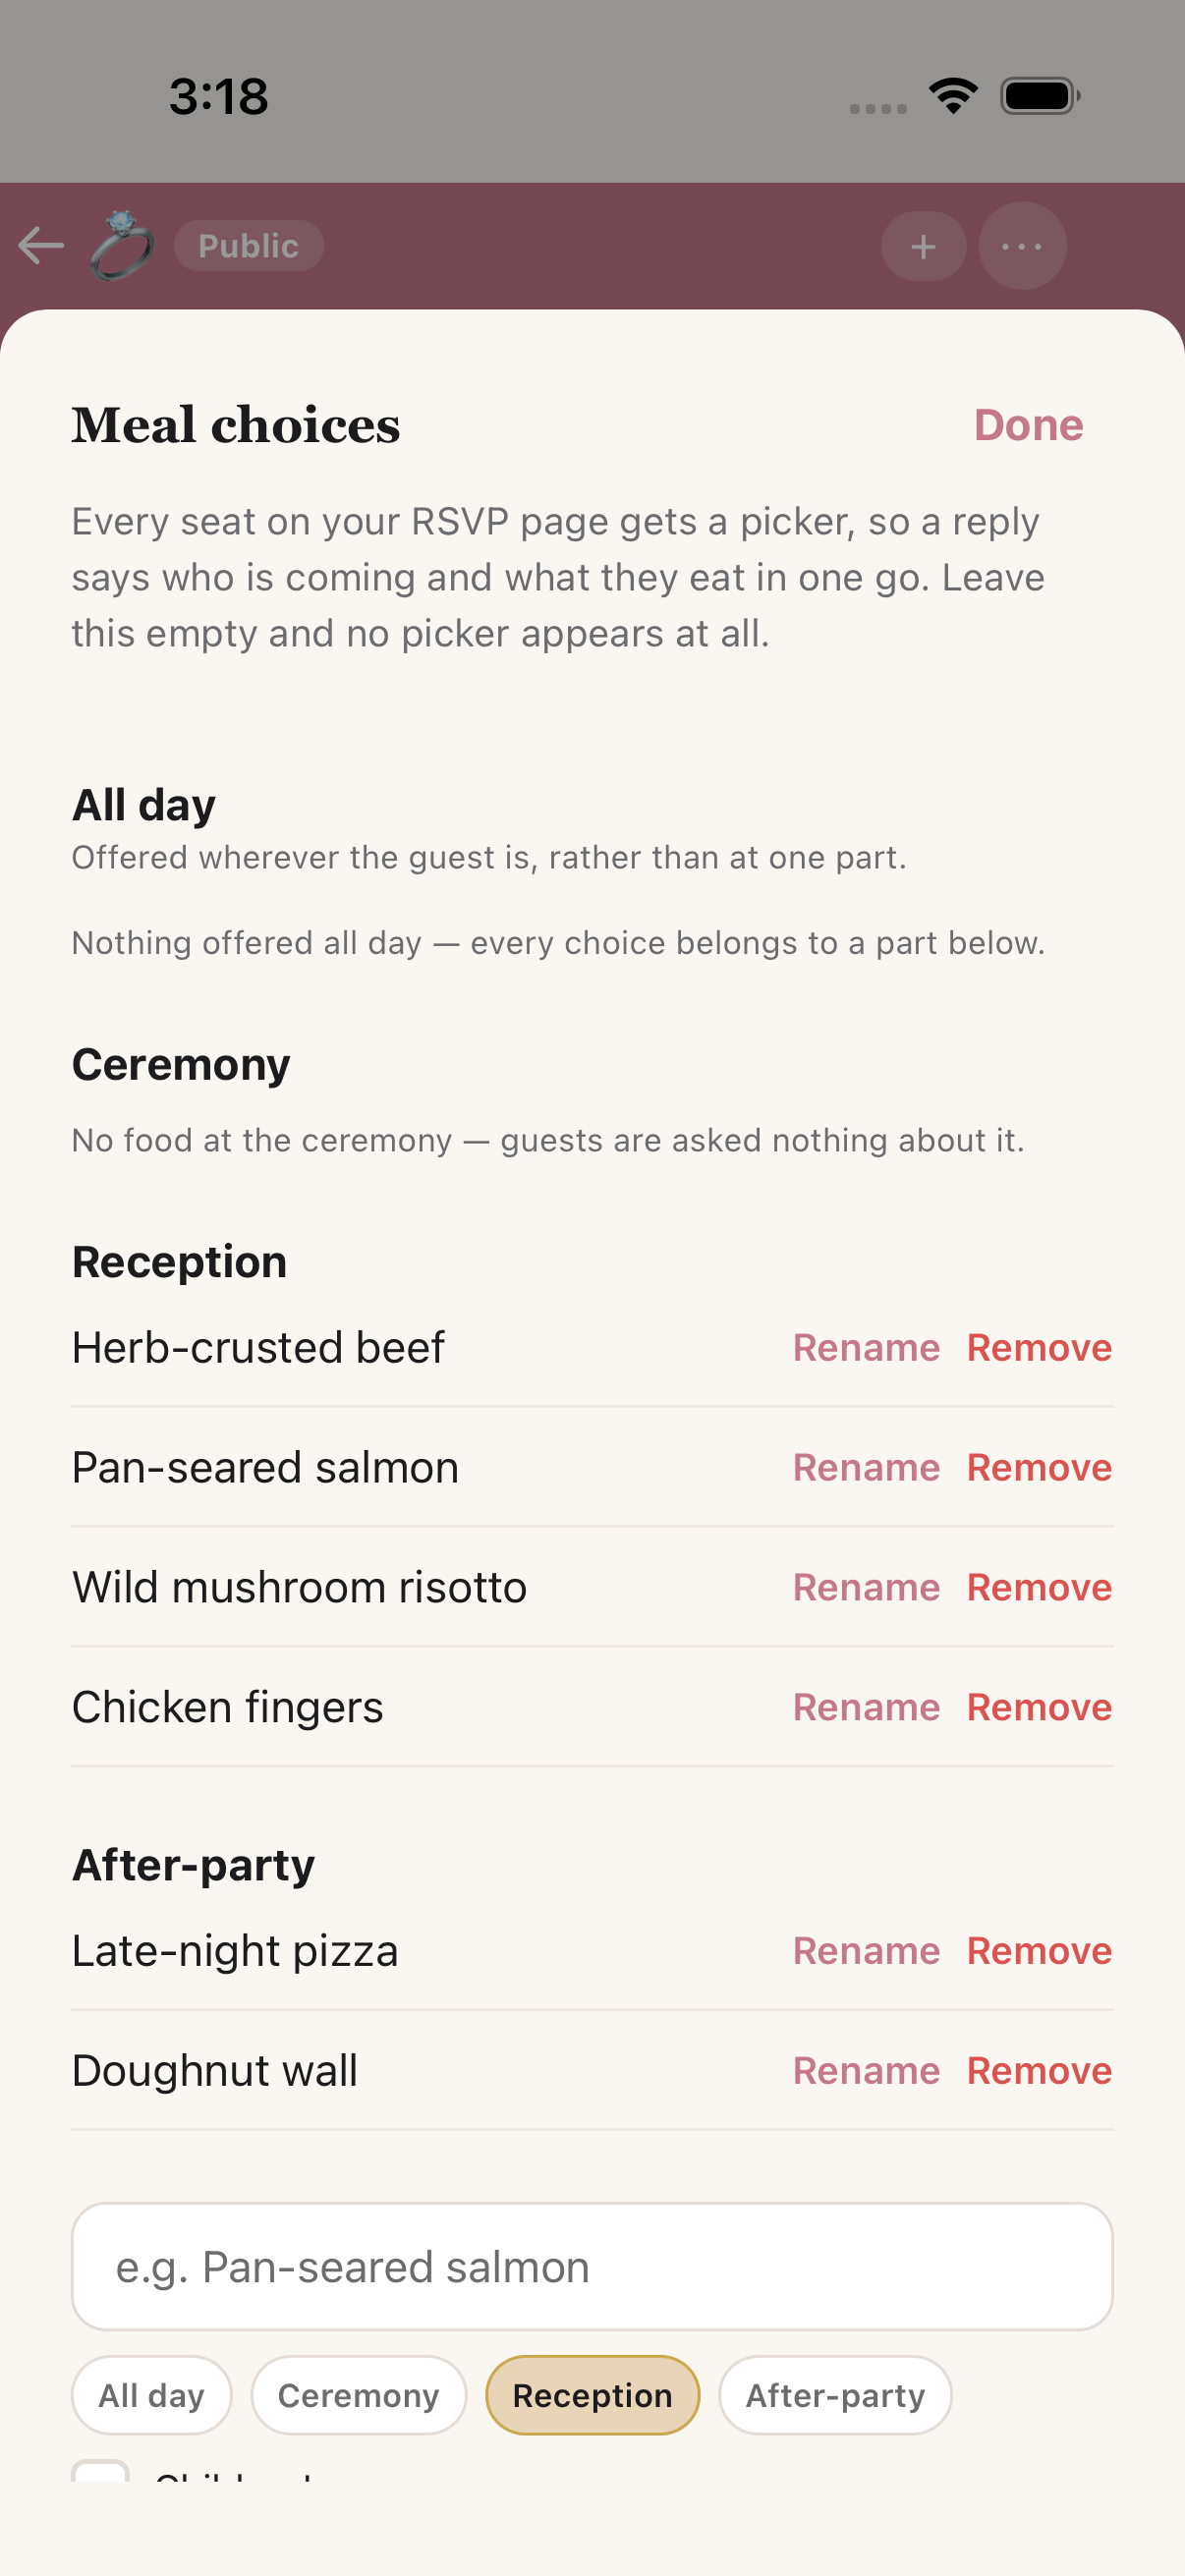
The menu, grouped by part — and a ceremony that simply has none
Children's options sit on their own menu, because catering contracts price them apart, and they can only be chosen for a seat marked as a child.
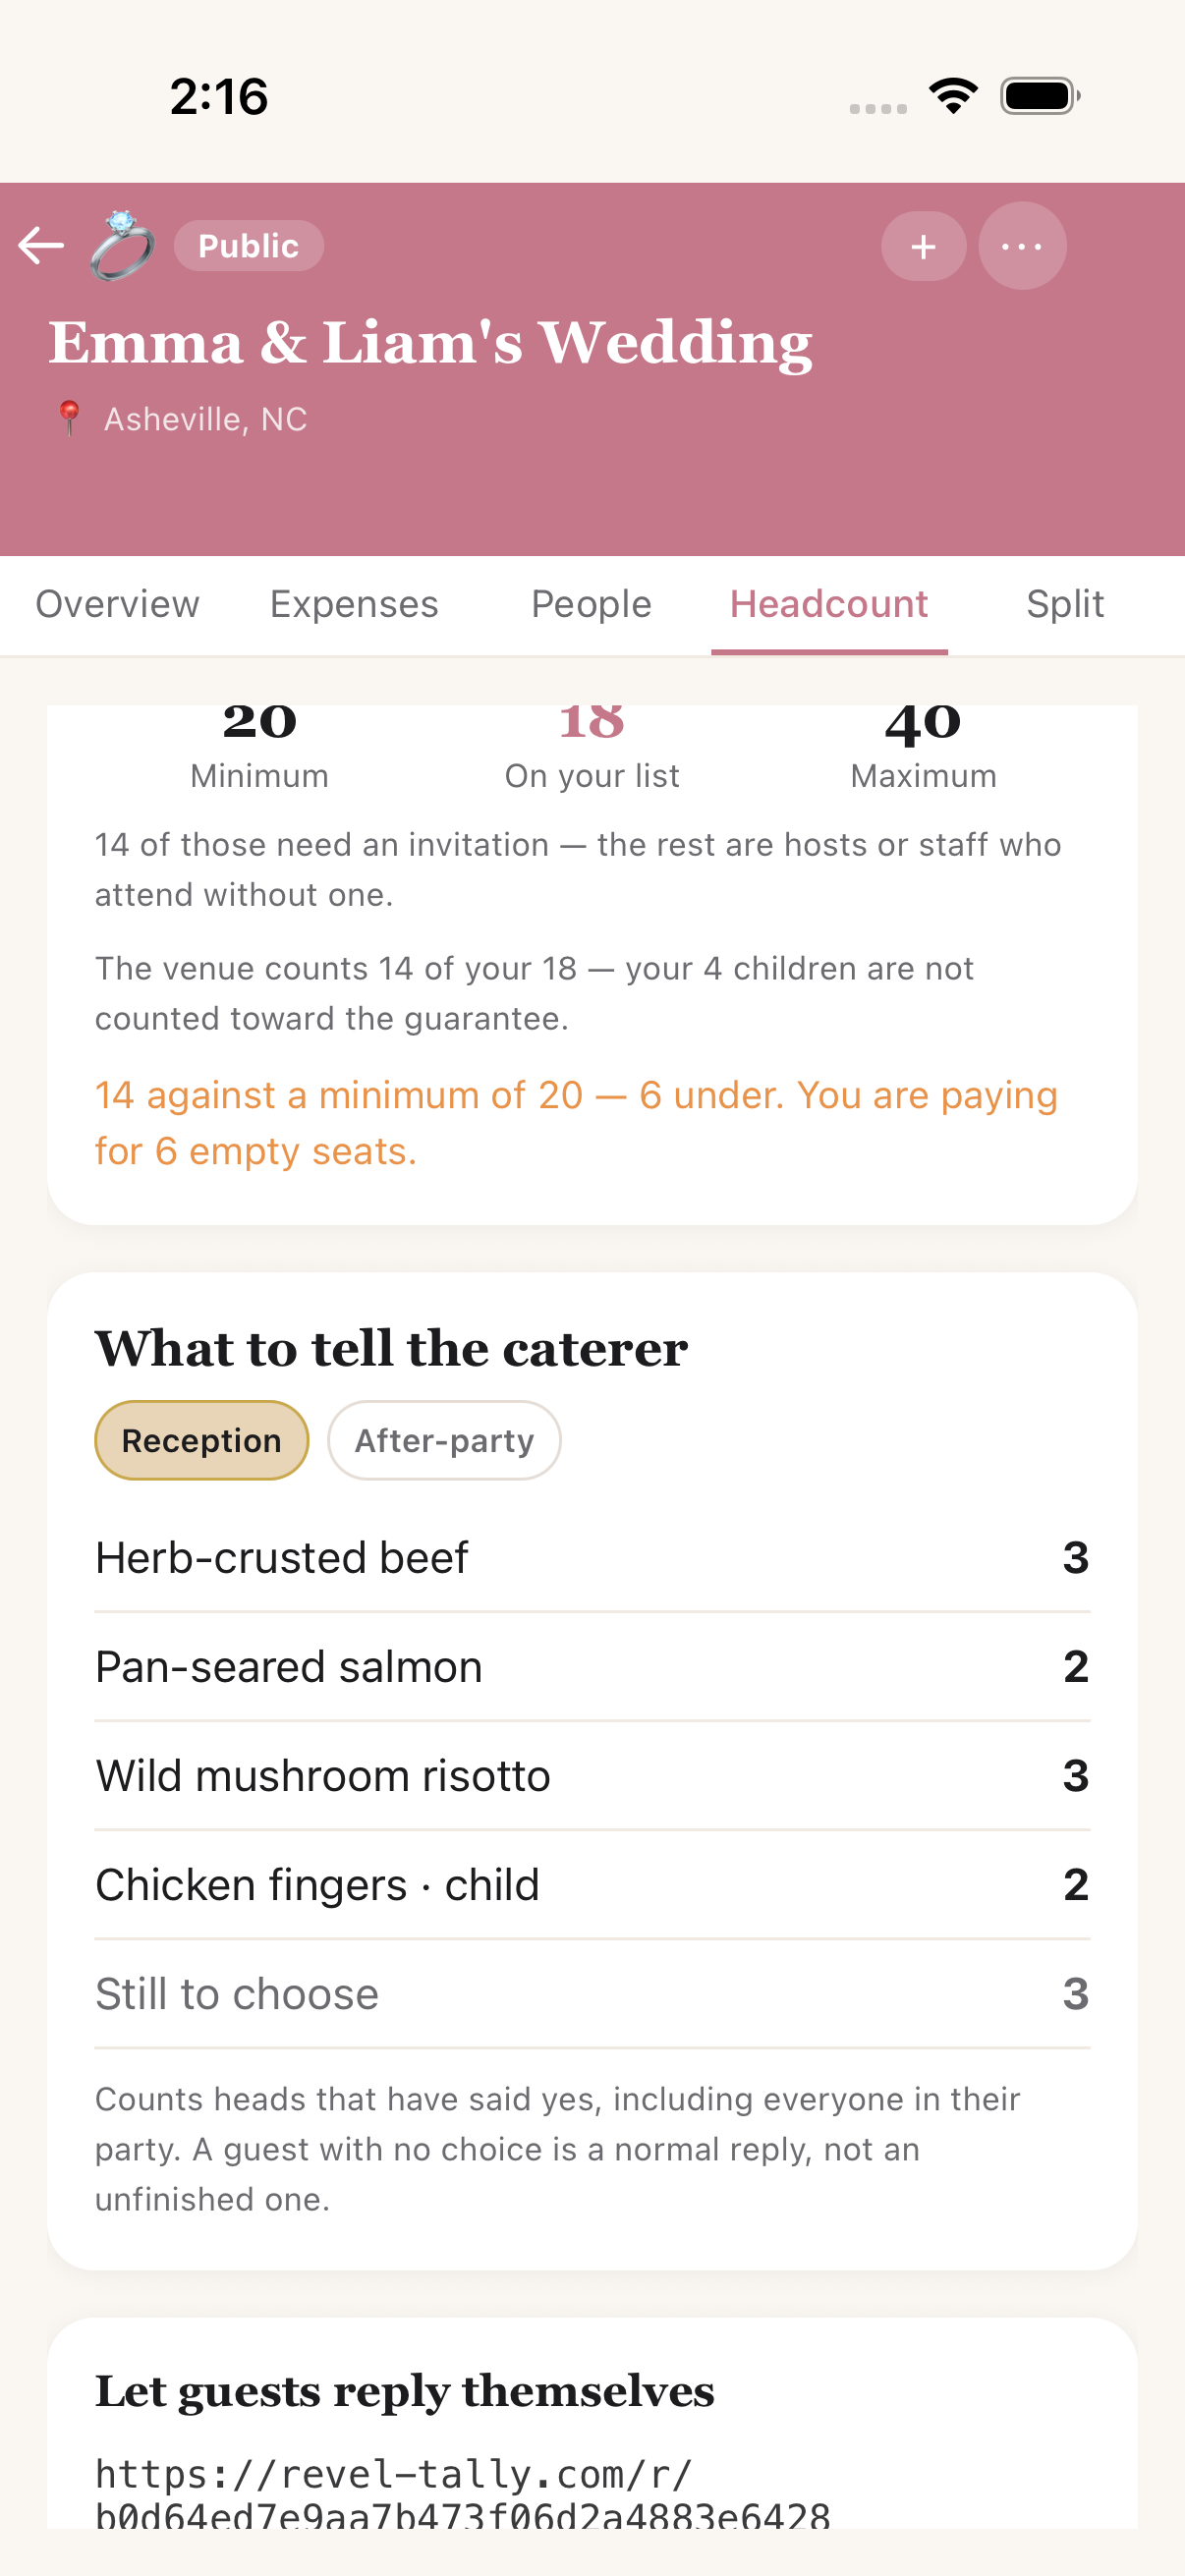
What to tell the caterer appears on the Headcount tab once a menu exists: a count per dish for the menus that are picked from, and a head count for the ones that are served. Guests with no choice yet are shown as still to choose rather than folded into a dish nobody picked.
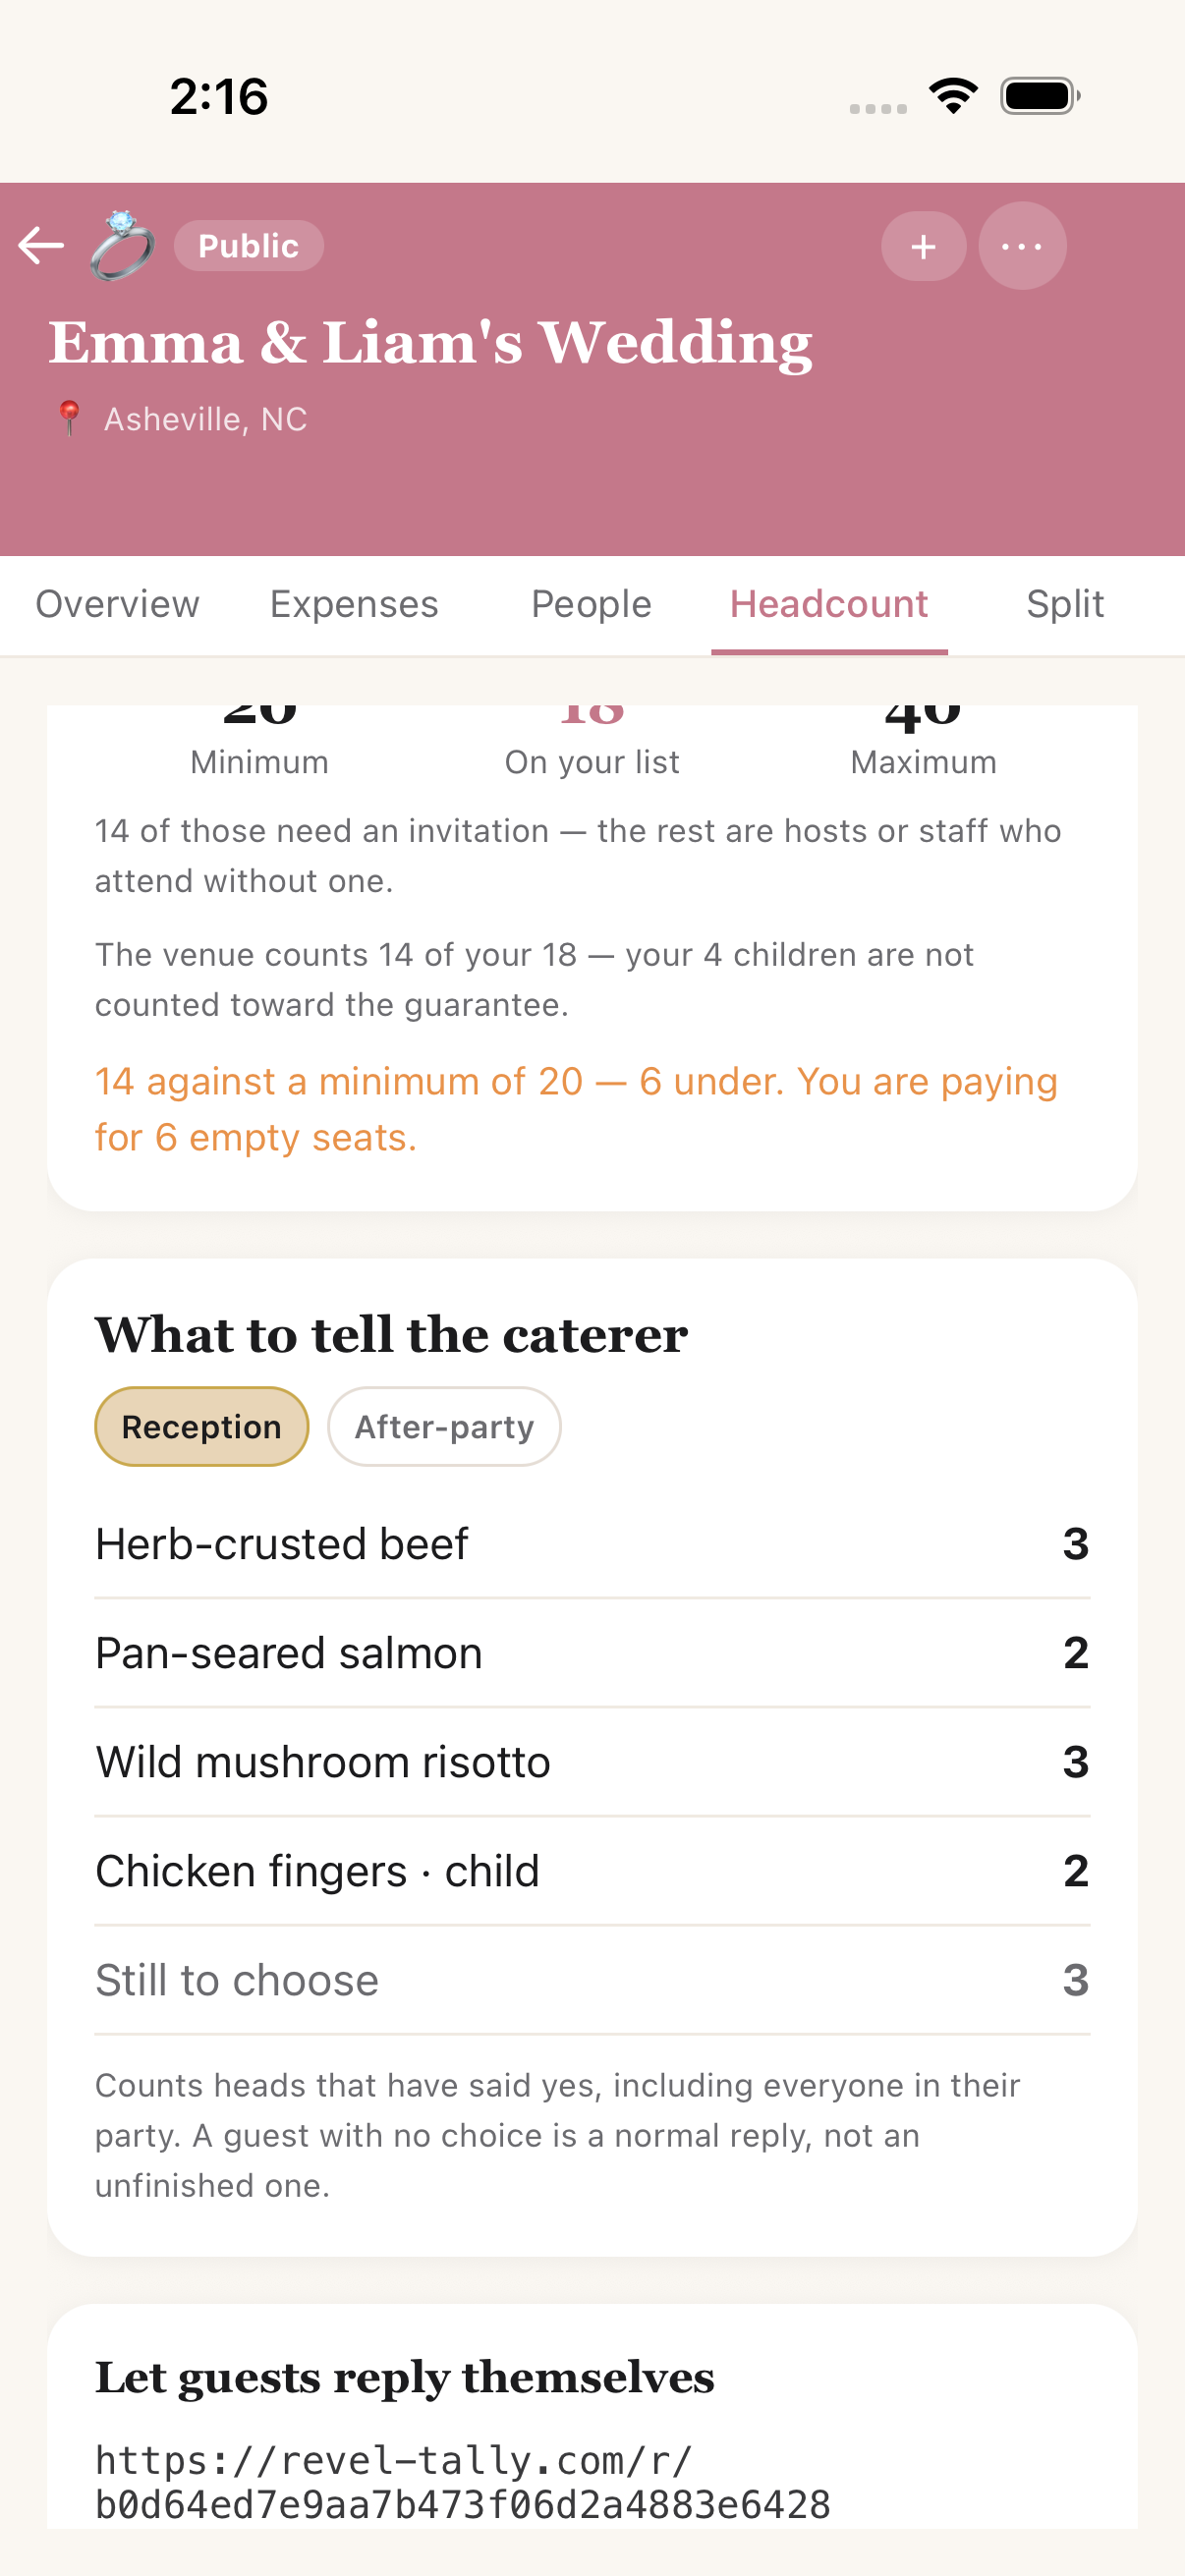
What to tell the caterer — per dish, per part, children counted apart
Renaming is safe. Changing an option's name never rewrites what somebody already chose, and retiring one keeps existing answers readable instead of blanking them — a guest's answer stays their answer.
Guaranteed minimums & the overage forecast
The venue's minimum lives on the Headcount tab. A contract's minimum lives on the expense it belongs to. Open any expense and you can record the heads the price covers, the cost per extra head, whether children count toward it, and which part of the day it is measured against — so a reception caterer counts the people at the reception rather than the whole guest list.
The expense then carries a forecast beside the amount. While replies are open it is a range, because a single number would be wrong by most of the room:
- how many are confirmed, and how many the price already covers;
- what the final headcount could be, depending on who still replies;
- and what that might cost on top — or how many seats you are paying for and not filling.
It never changes the amount you owe. It sits beside it as a forecast, and you edit the real figure when the vendor confirms the bill.
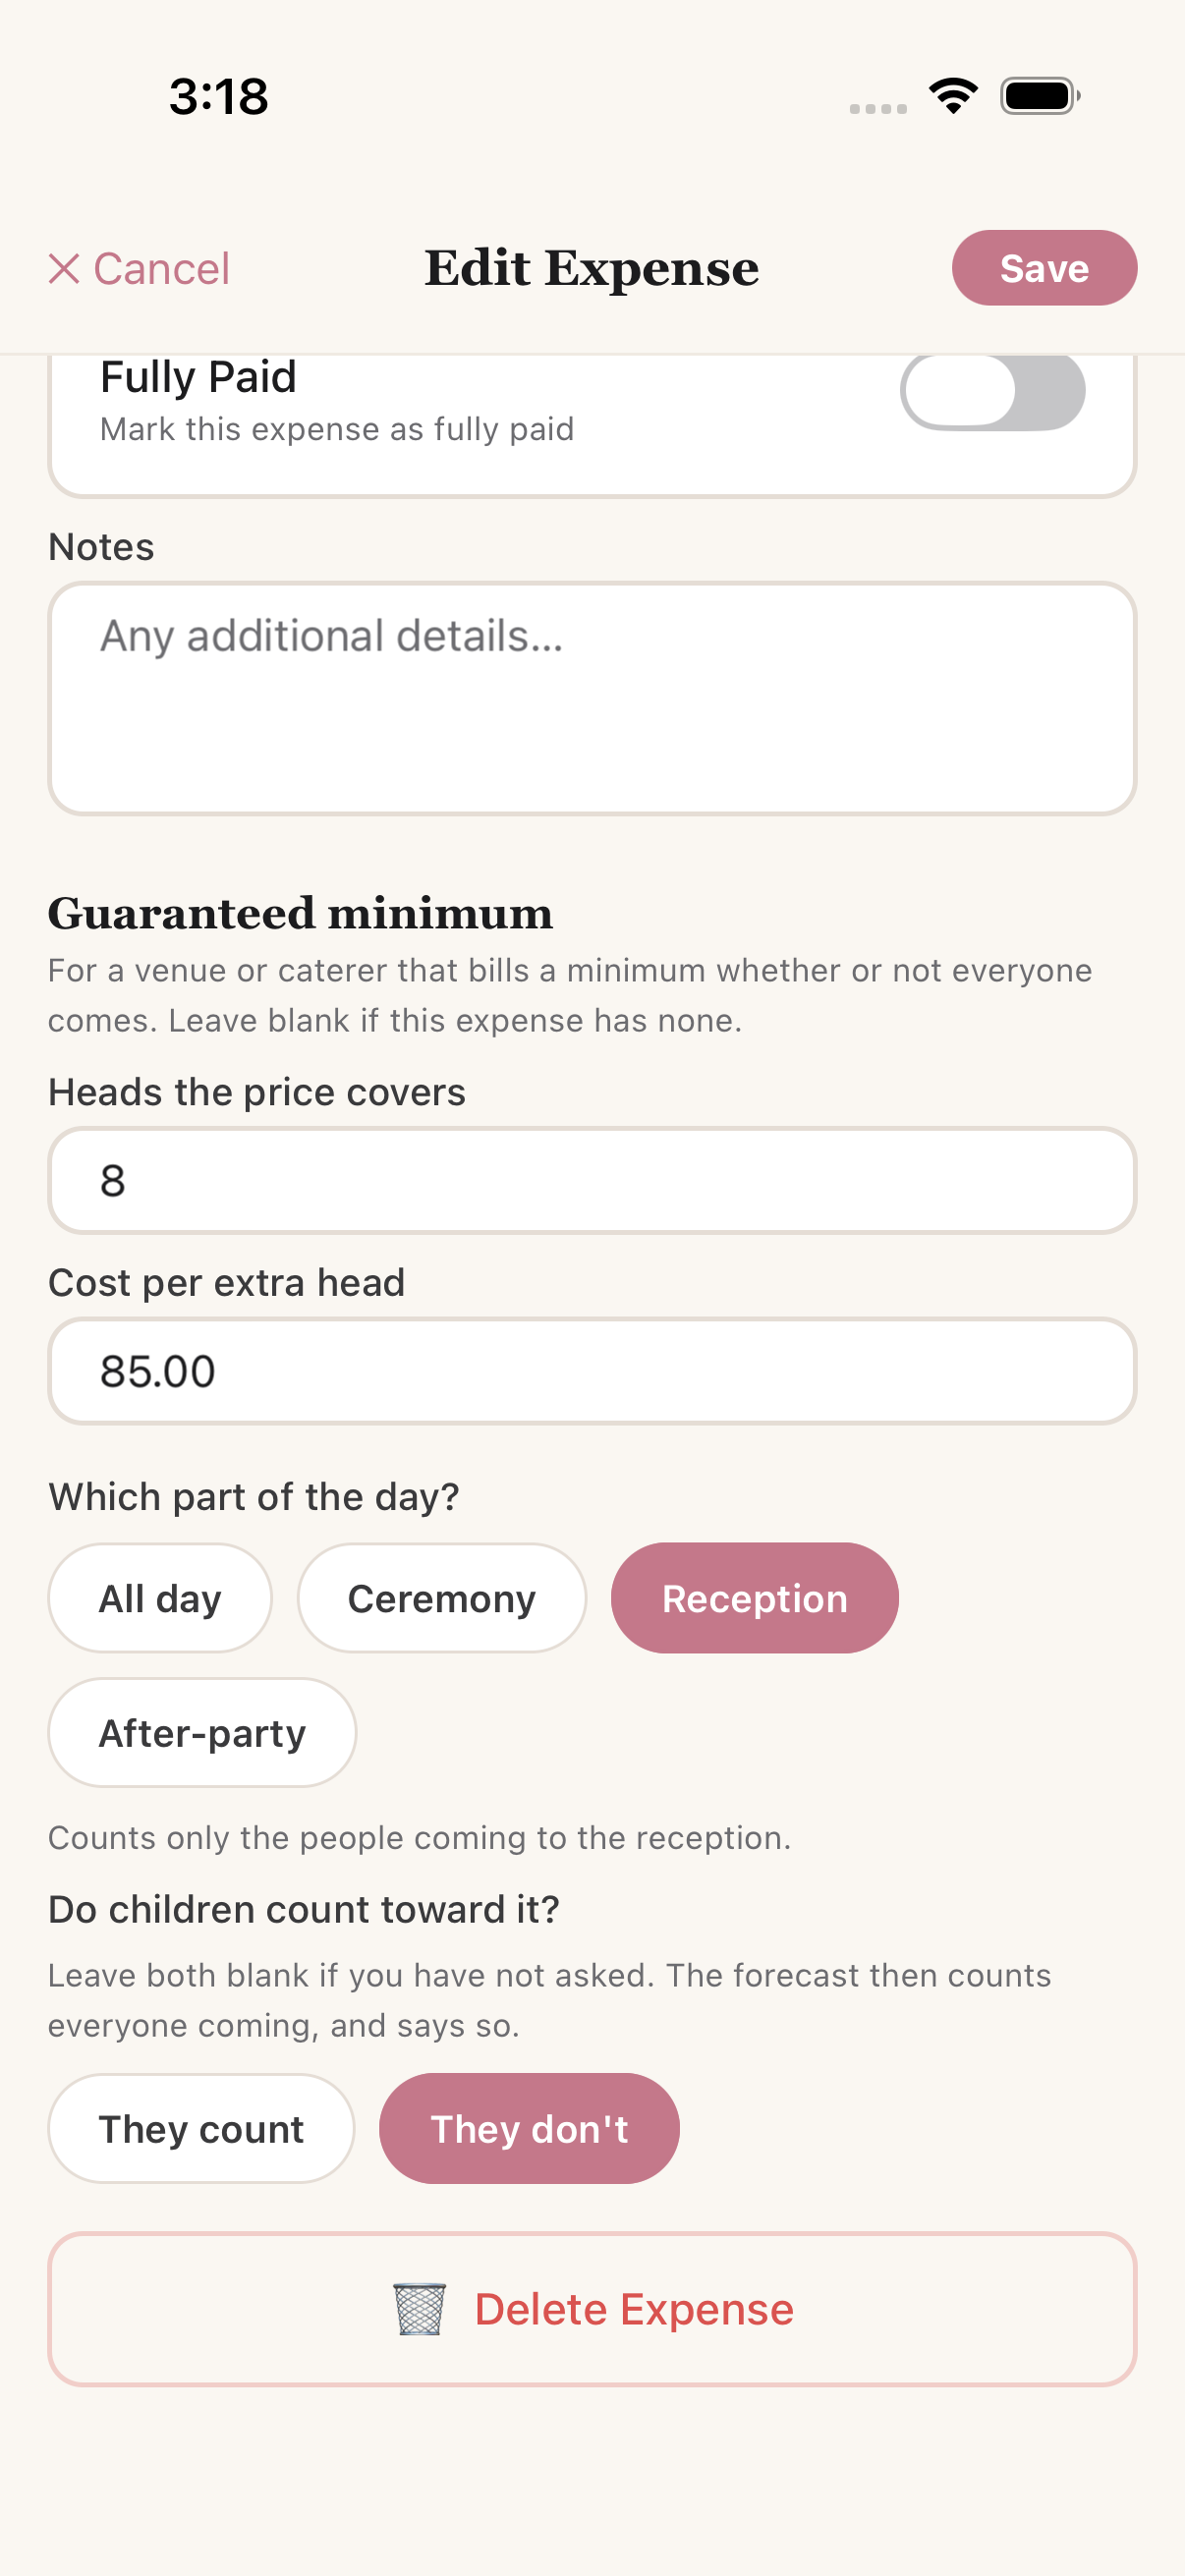
The contract's terms — heads covered, rate, part of the day, children
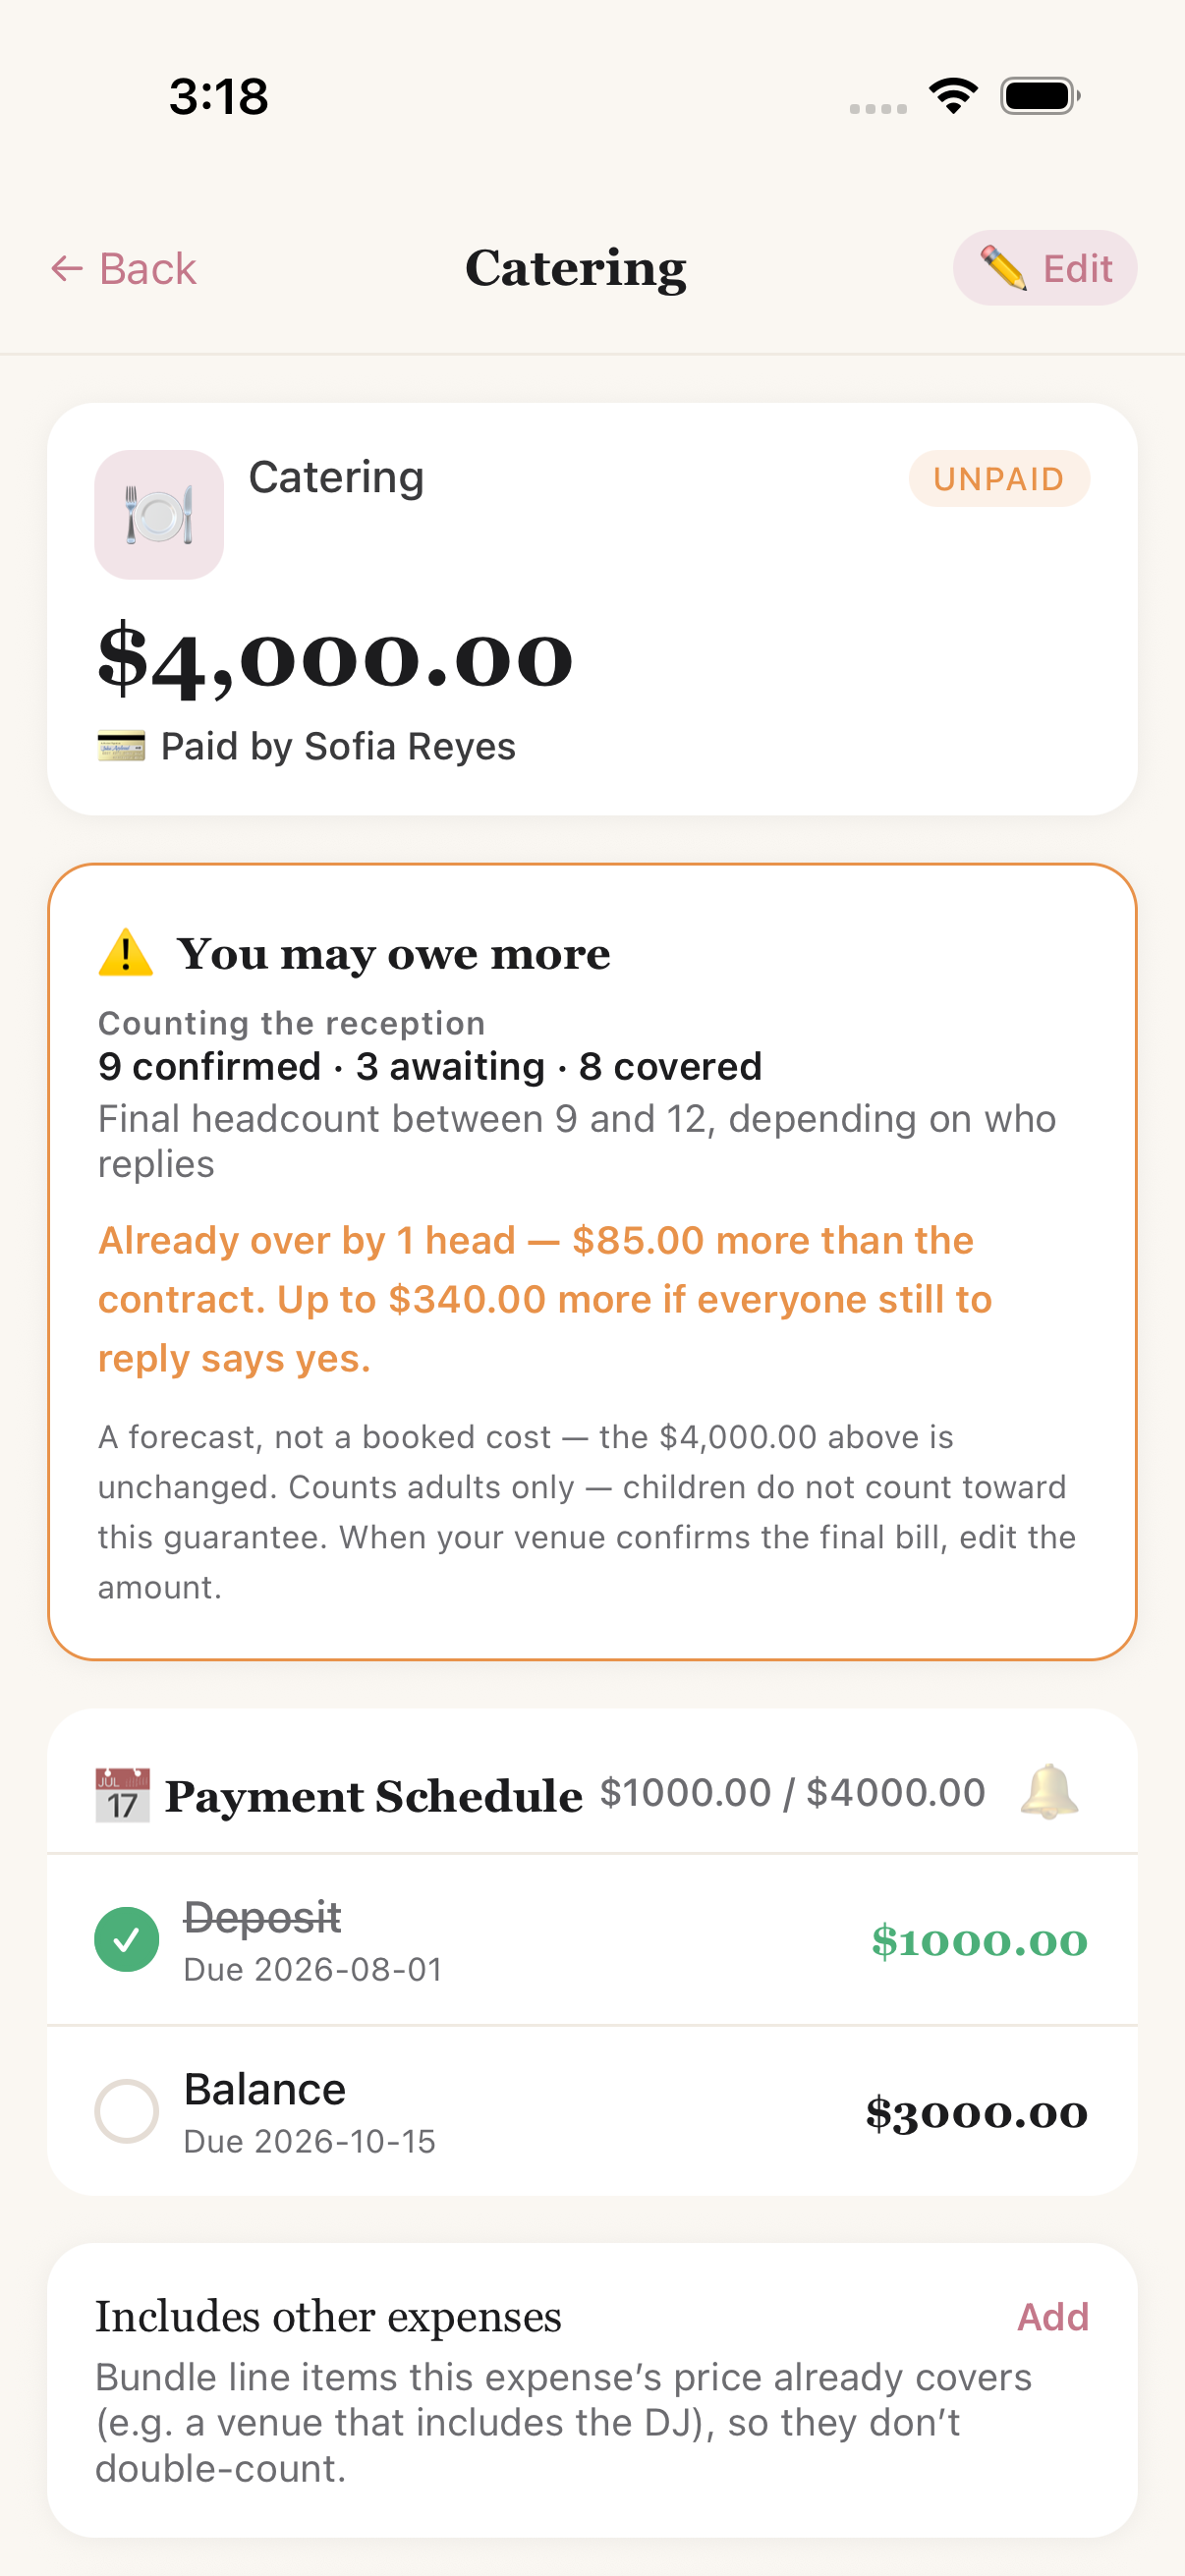
…and the forecast they produce, as a range while replies are open
Whether children count is a term of that contract, not of the event. A coach hire counts a child as a seat; a caterer's minimum often does not; and one guest list has both. Left unanswered, the forecast counts everyone and says so.
Adults-only events
If children are not invited, say so once on the event and the app stops asking about them everywhere else — no child tick on the guest page, no children's menu, no child rate. If your list already has children on it, it tells you how many are affected before you switch, rather than quietly resetting them.
4
✉️
Inviting & Sharing
Every event has a ⋯ menu (top-right) — its control center for sharing, linking, exporting, going public, and wrapping up.
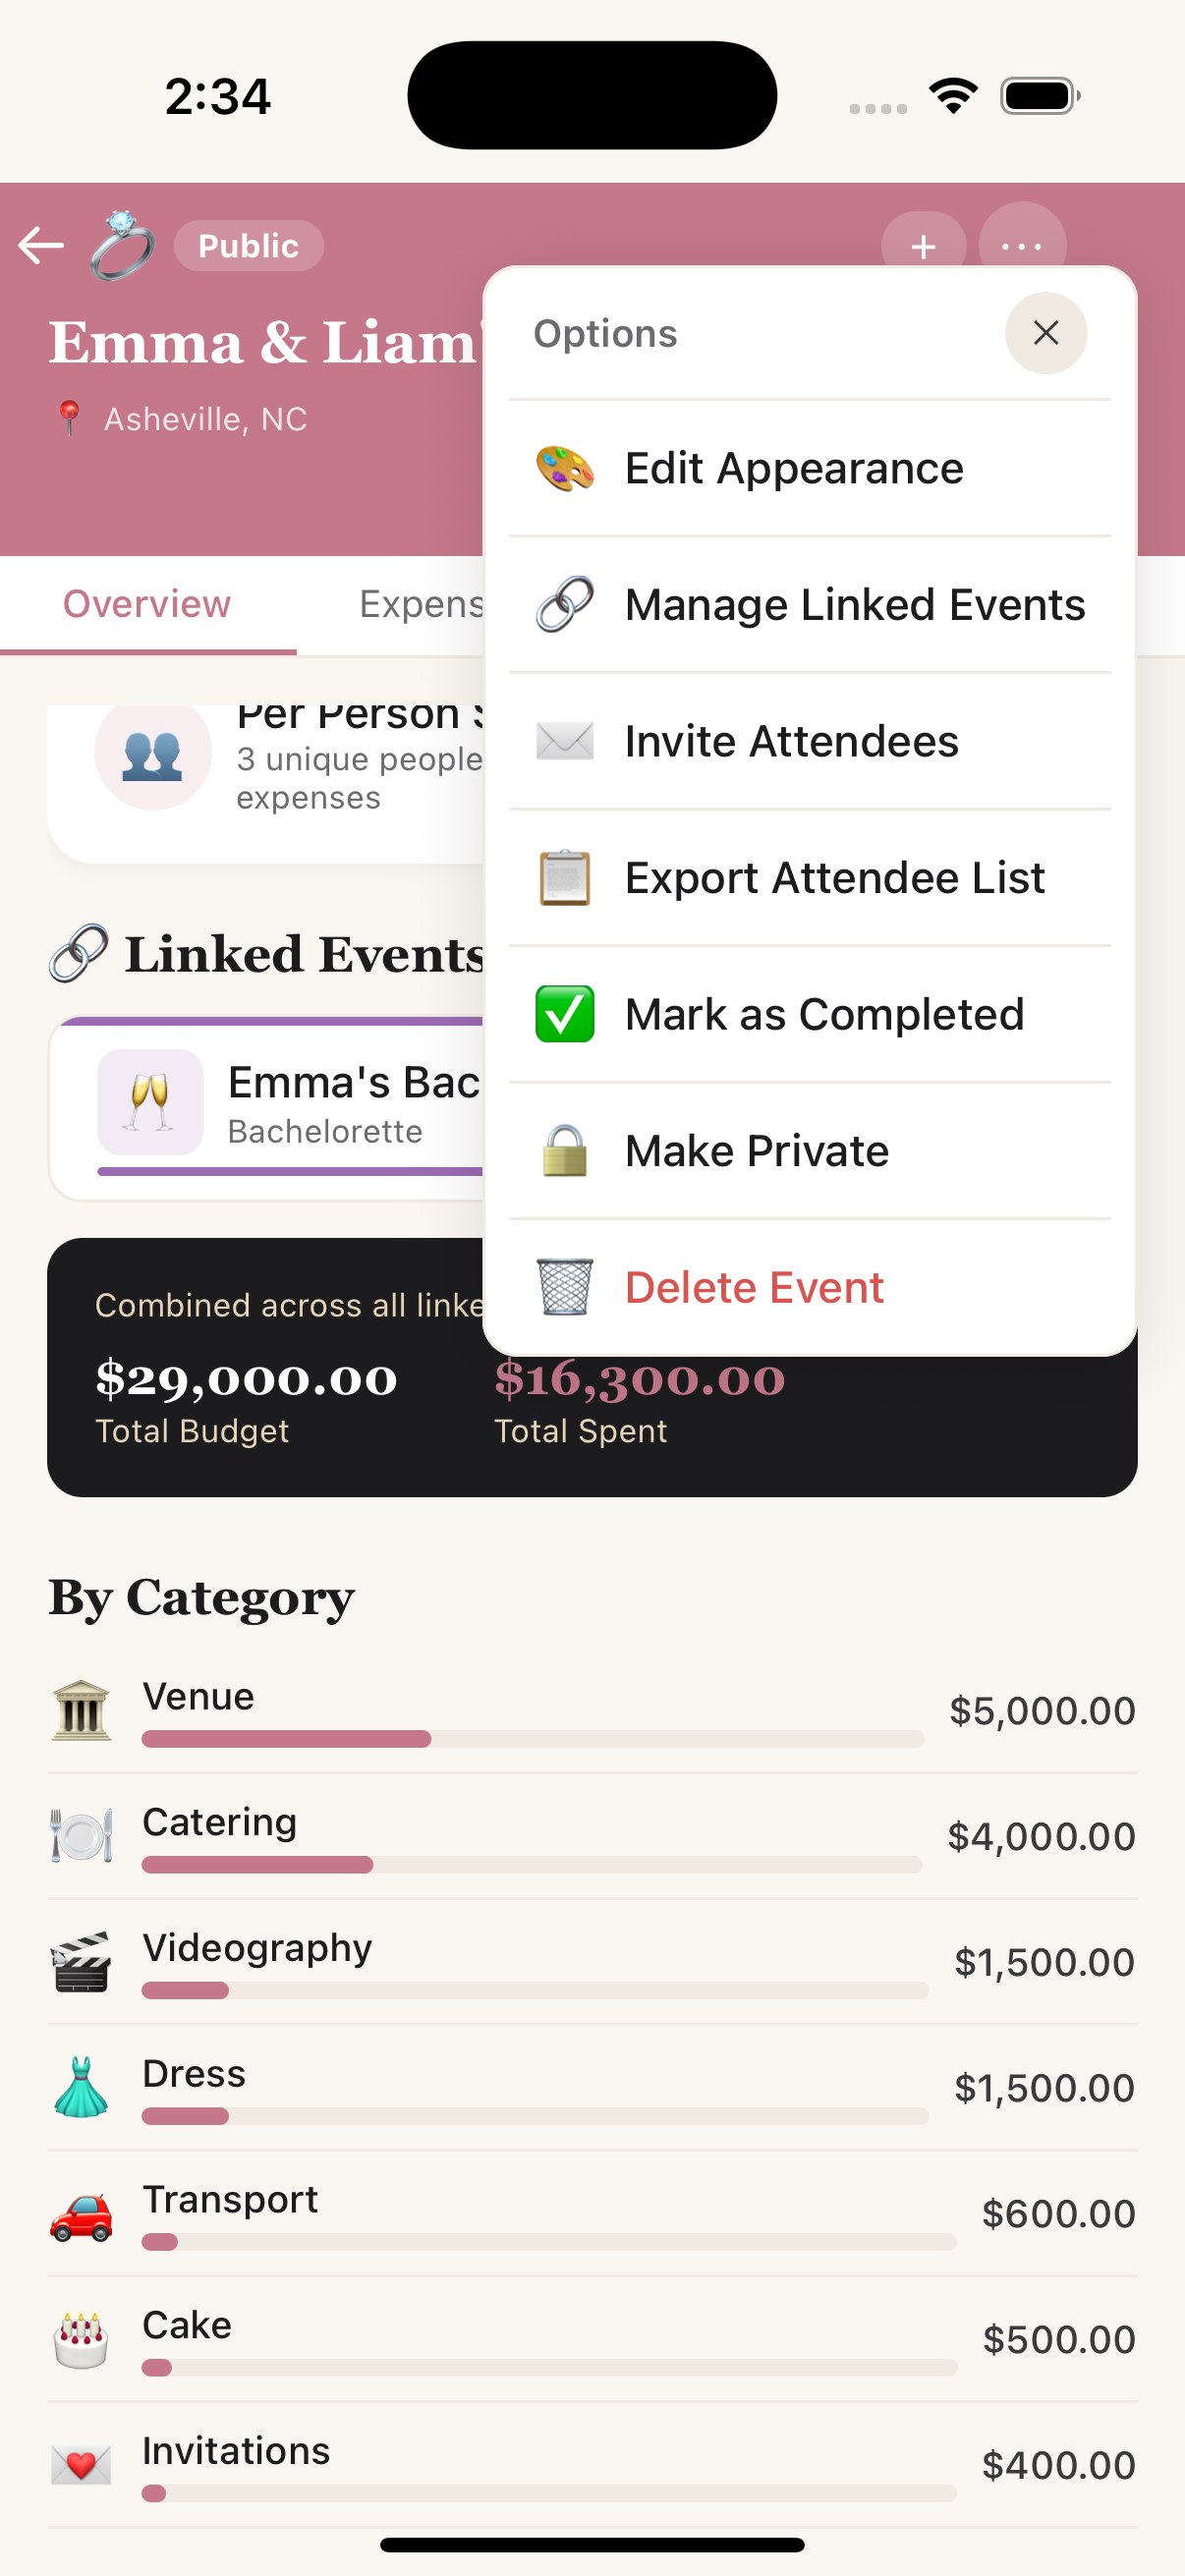
The ⋯ menu — invite, link, export, complete & more
Invite people to view your event (organizer)
Choose Invite Attendees. Add someone by email or SMS — if they already have a Revel Tally account the invite appears in-app; otherwise they get an email. SMS opens your device's own Messages app with the link pre-filled (nothing is sent from our servers).
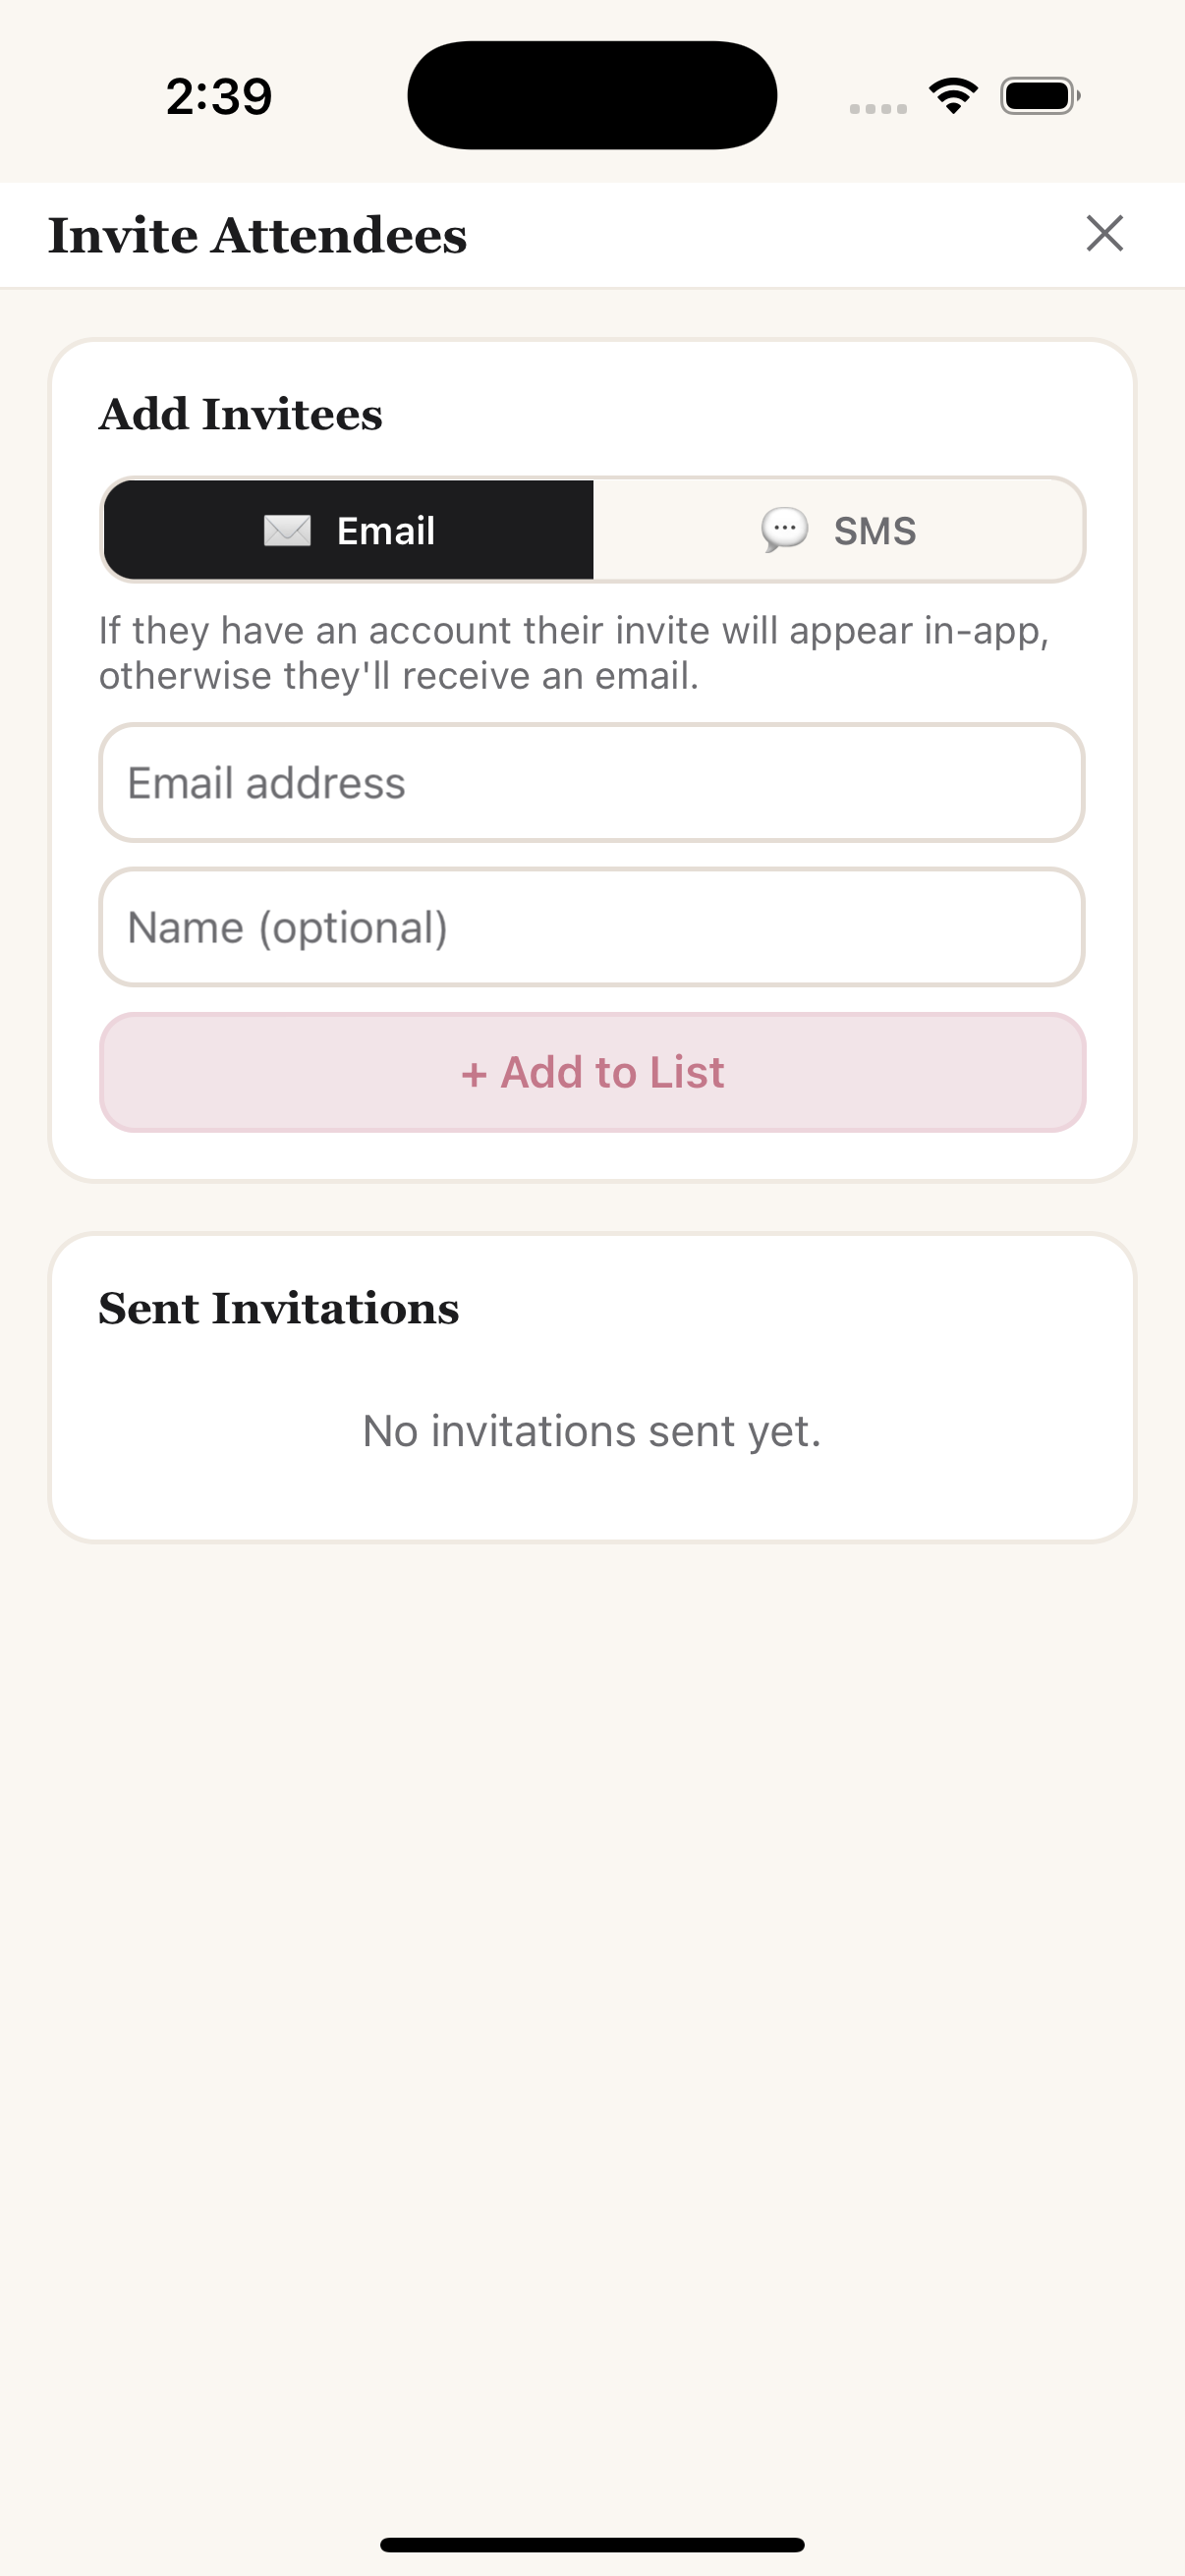
Add invitees by email or SMS
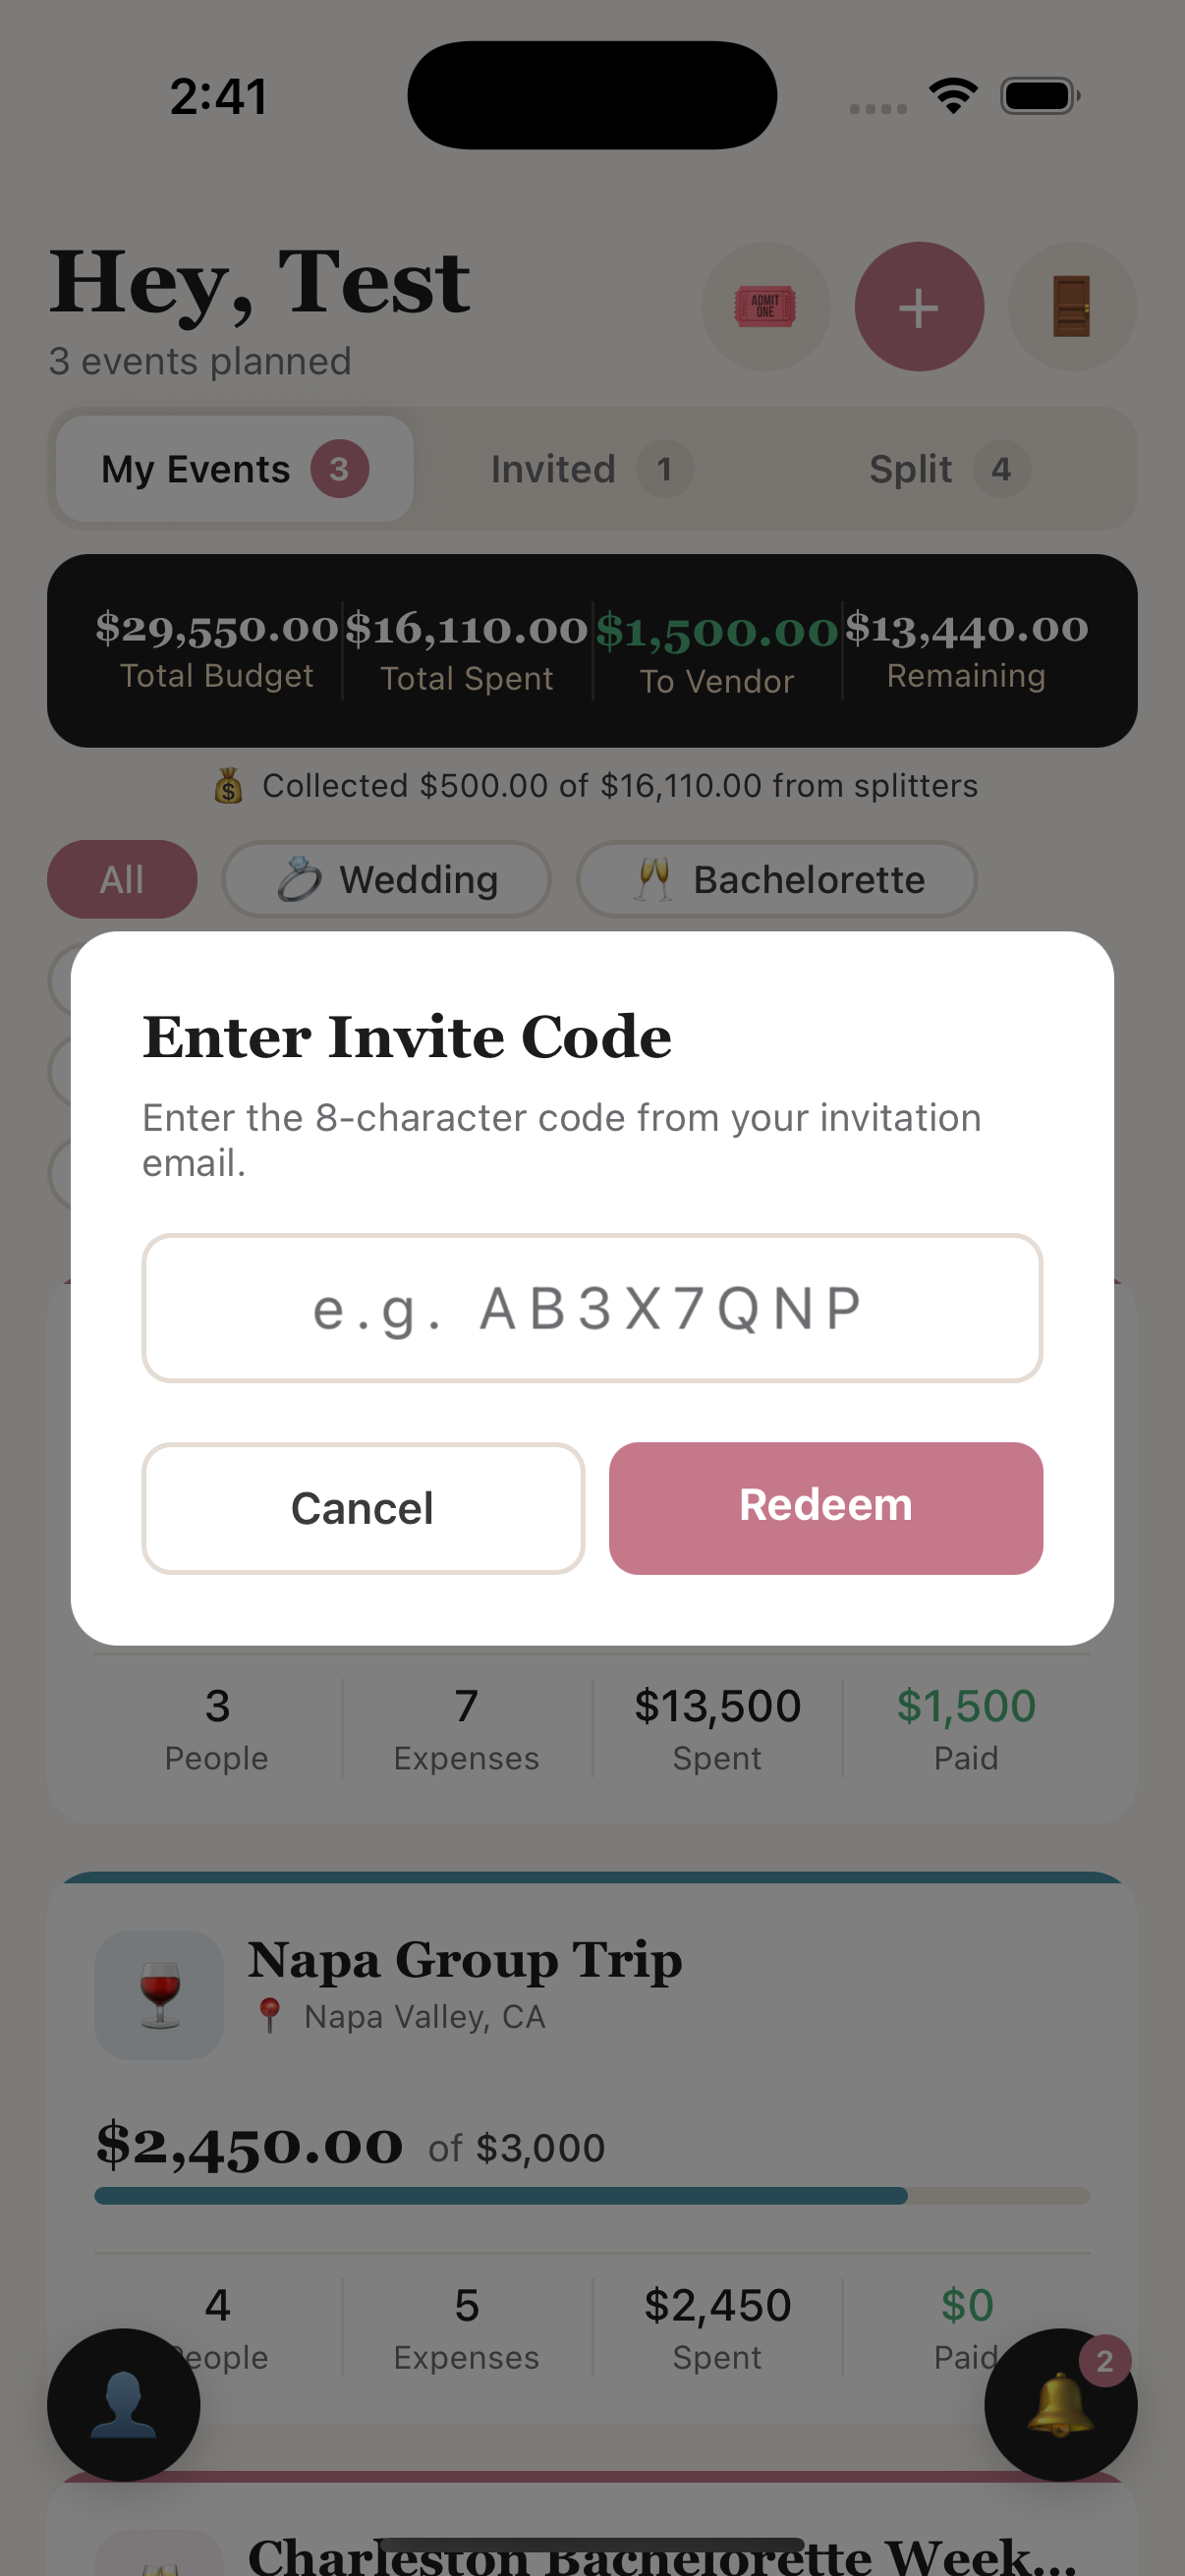
Guests tap 🎟️ on Home and enter the code
Guests see a read-only view — the budget, expenses, and their own share under the Split tab — but can't edit your event.
Share everyone's split (organizer)
When you're ready to tell people what they owe, open the Split tab and tap 📤 Share splits with everyone. Nothing is ever sent automatically — your guests only hear from you when you tap this.
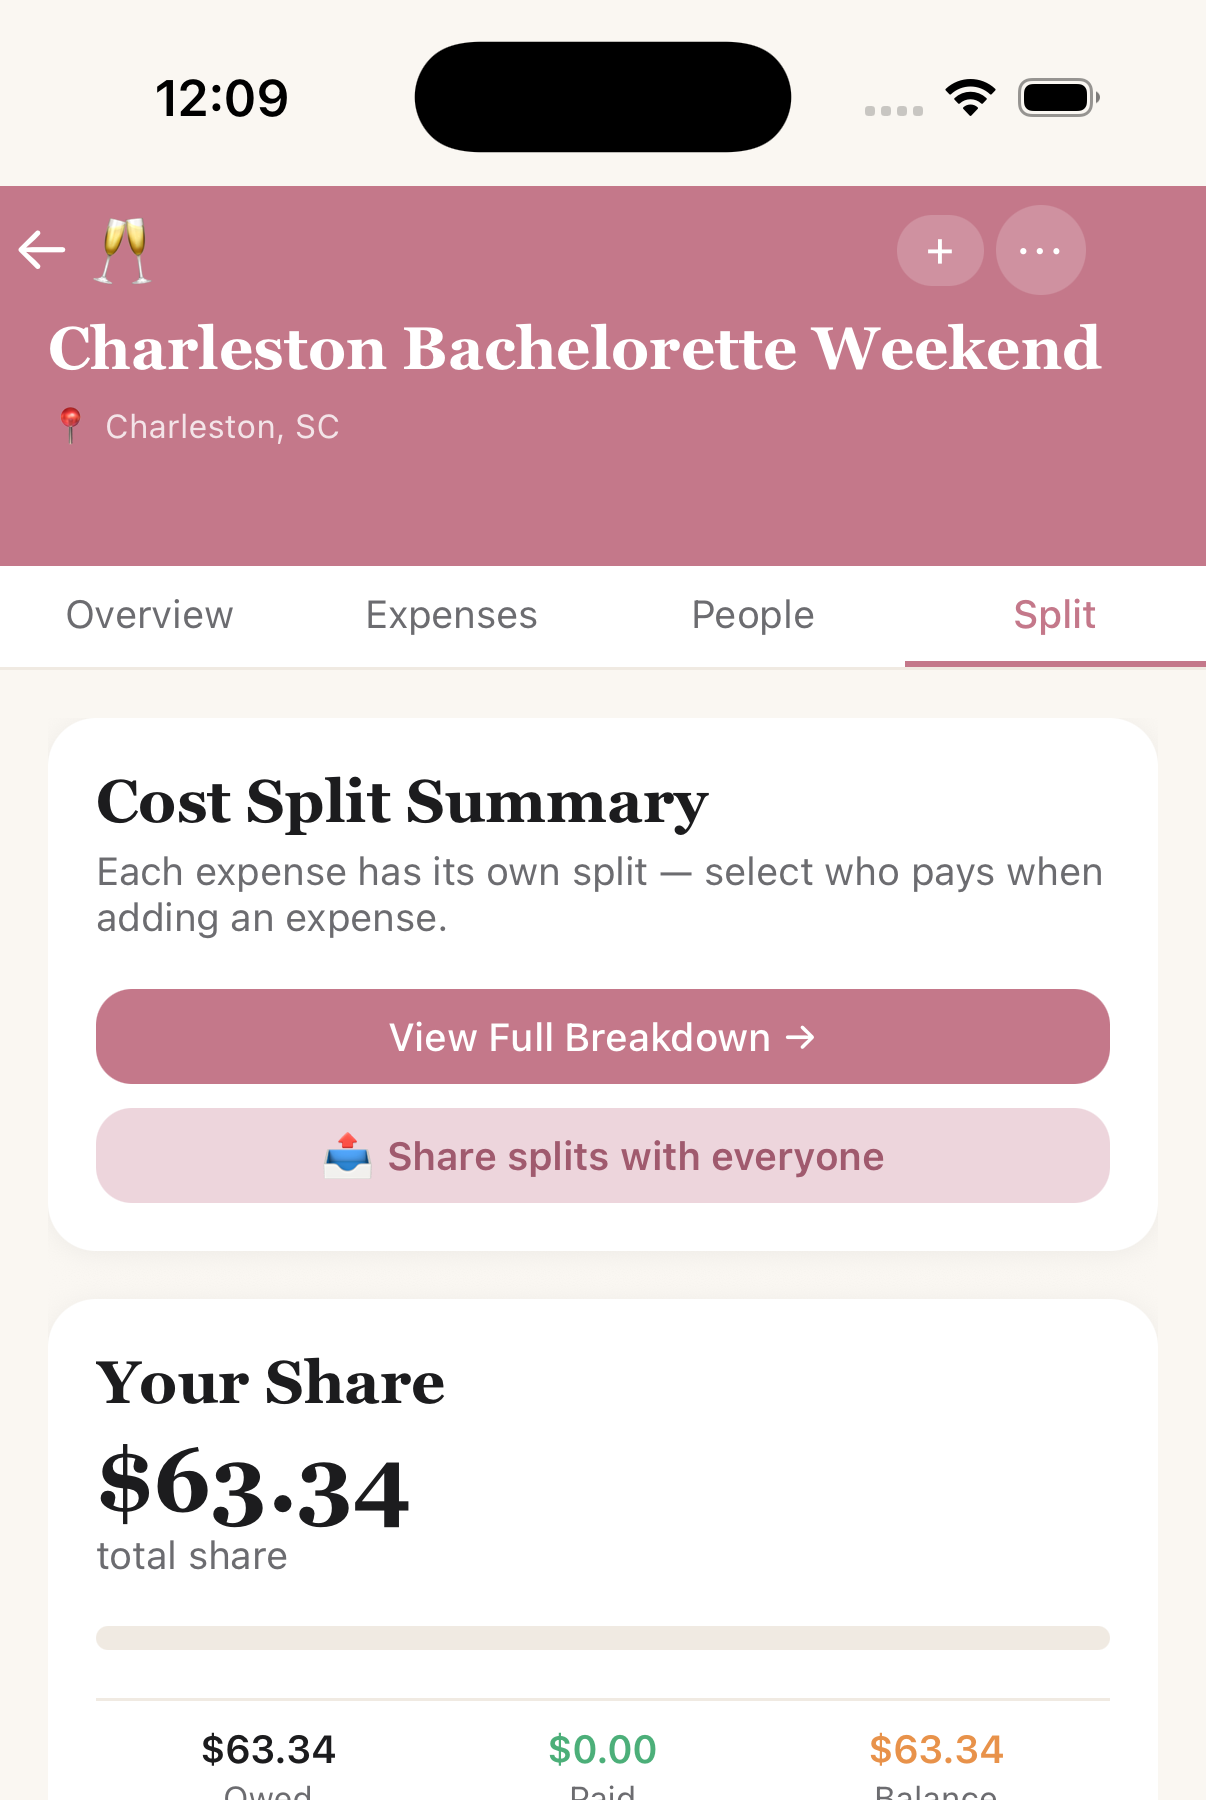
Split tab — Share splits with everyone
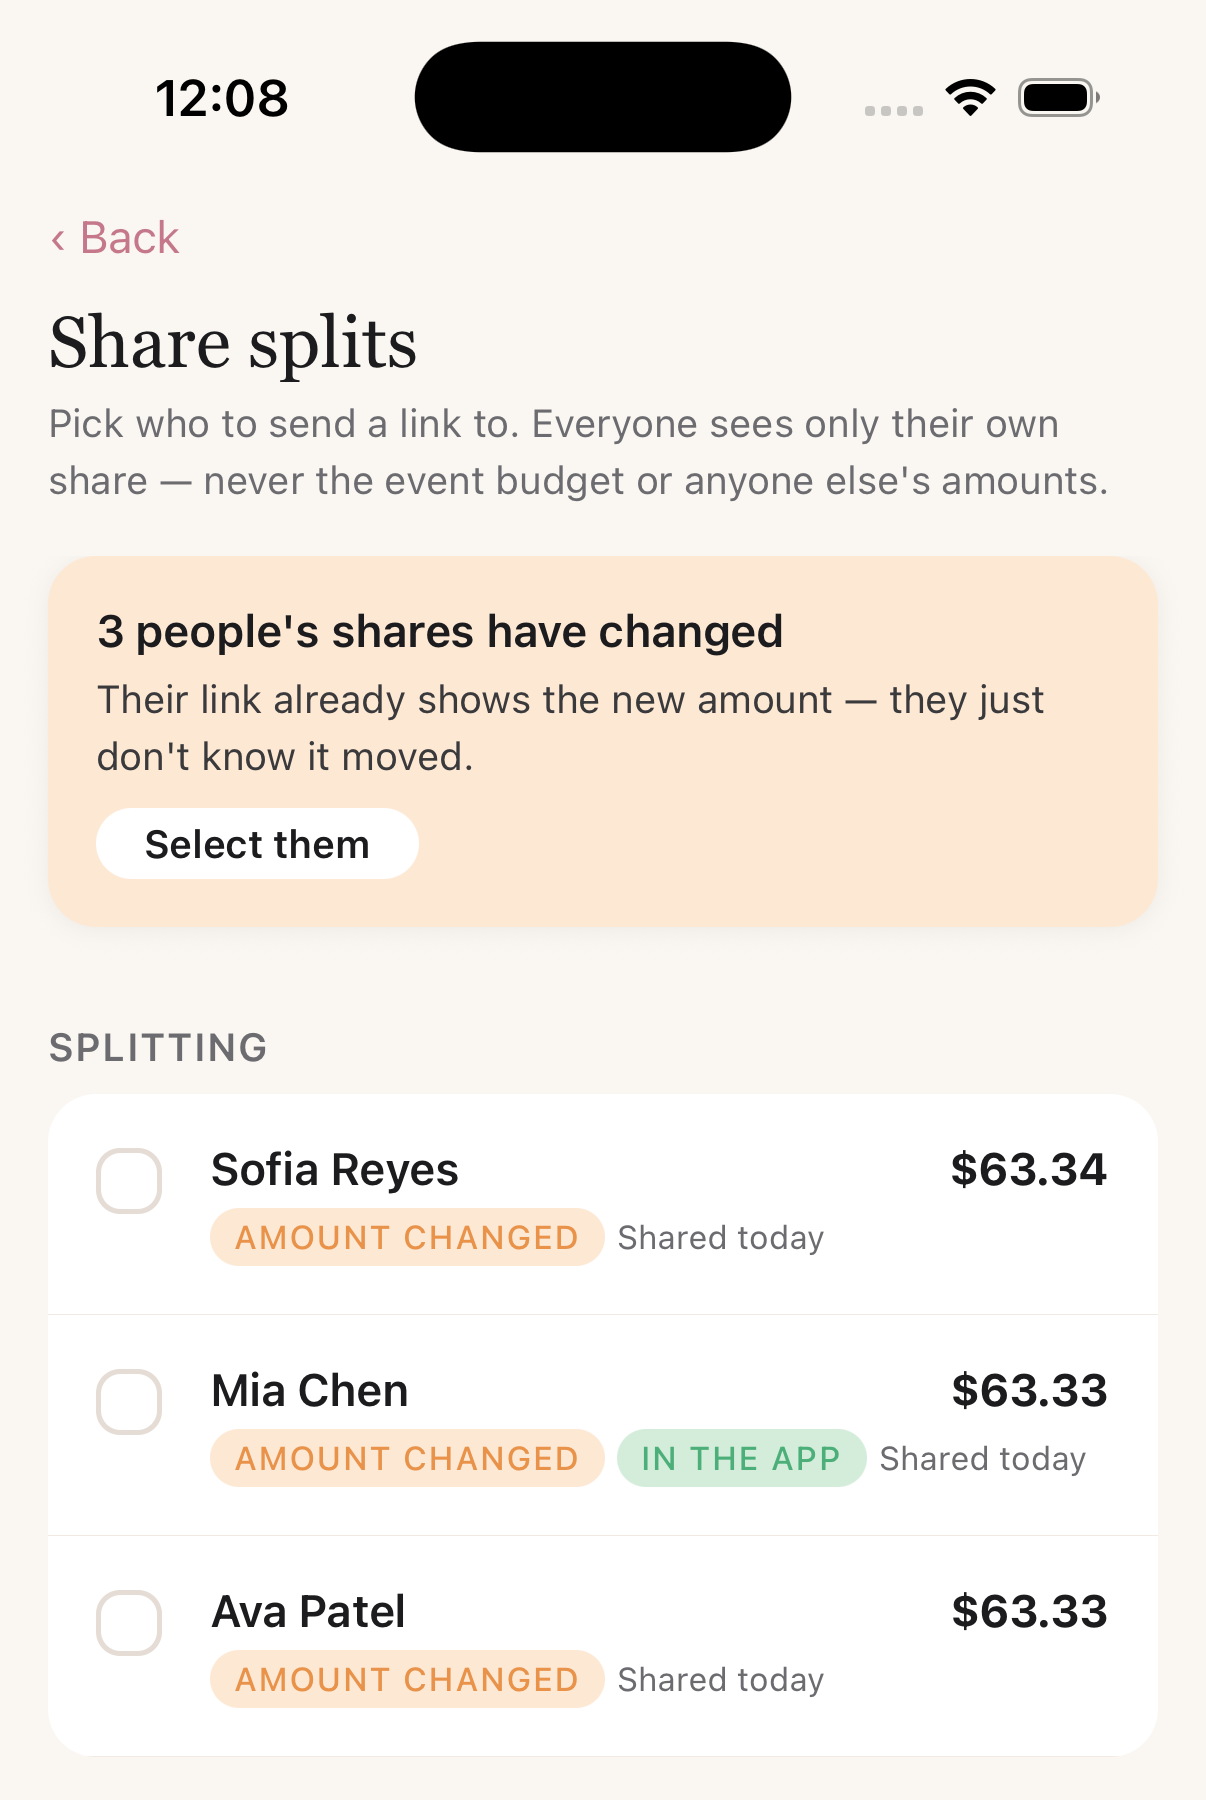
Pick who to send to — and see whose amount has moved
Tick the people you want to send to and tap Share. Your device's own share sheet opens with the message ready — pick Messages, WhatsApp, email, whatever you already use. Each person gets a personal link with their name, their total, and the itemised list behind it.
When amounts change, re-share
Add an expense or edit an amount and everyone's share moves. Revel Tally tracks who you've already told and flags the ones whose number has changed since — tap Select them to pick exactly those people and send an update in one go.
The links are always live. A link you sent last week already shows today's amount — you never need to send a new one to correct an old figure. Re-sharing is just a nudge so people know their number moved.
What your guests see
Tapping the link opens a simple web page — no app, no account, no sign-up. They see the event, what they owe, and exactly what it's for, with a quiet link to download Revel Tally if they want to track their own events.
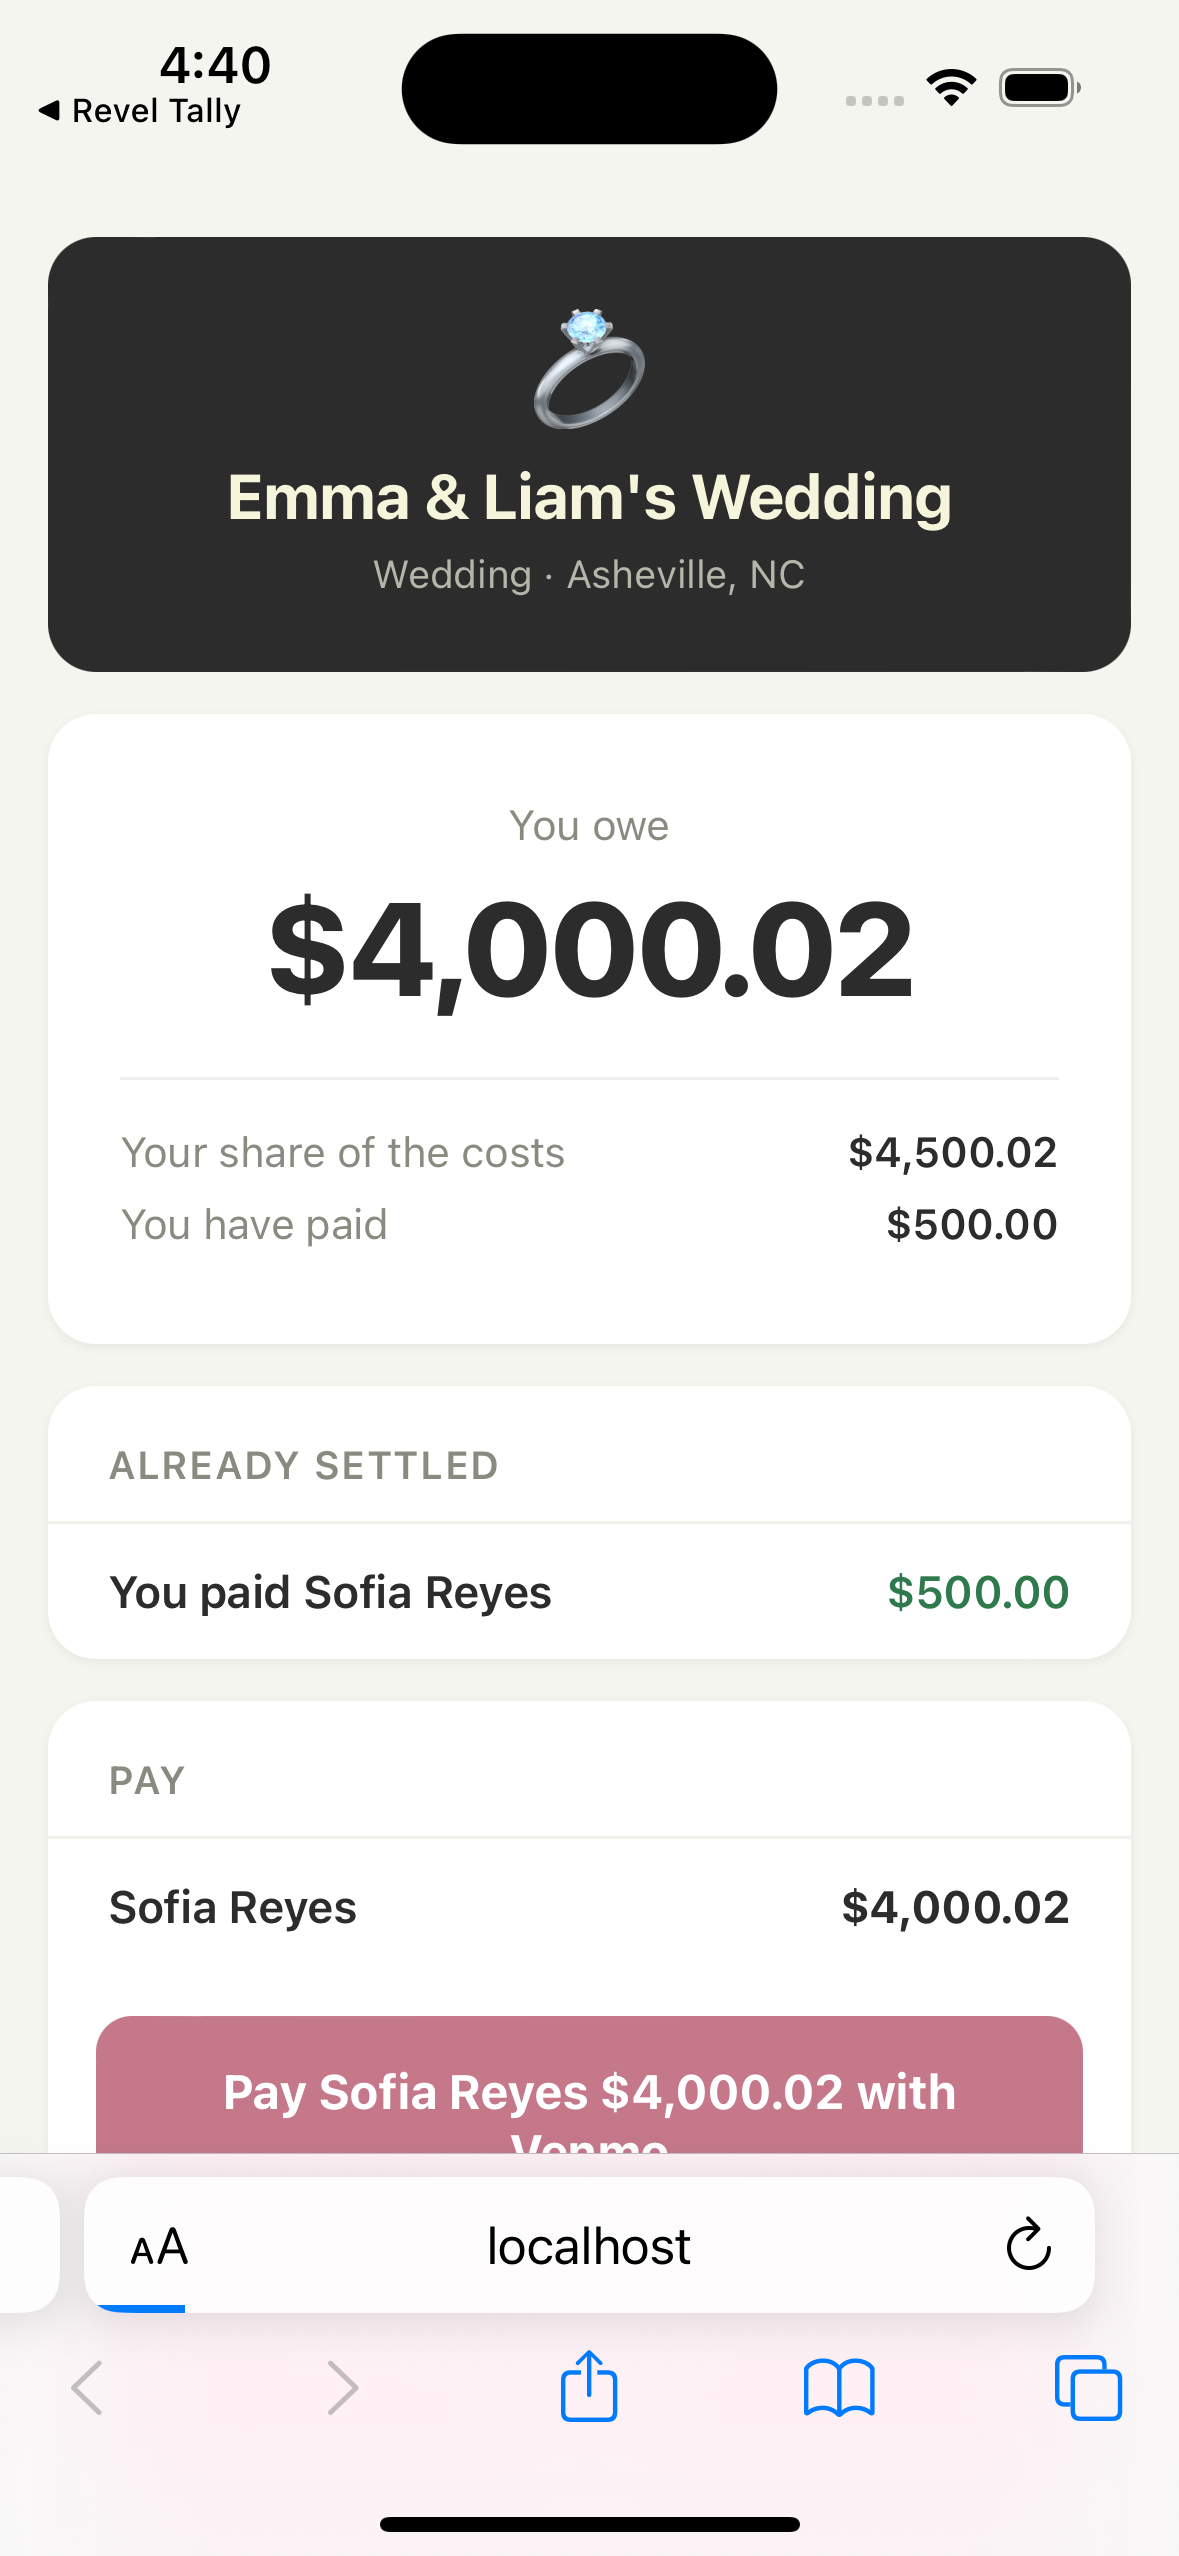
What lands in your guest's messages — no install required
Everyone sees only their own share. A share link never reveals the event budget, what anyone else owes, or who else is on the list — so it's safe to forward, and safe to drop in a group chat.
People who are attending but not splitting — the bride at her own bachelorette, say — can be sent a link too. Theirs shows the event without a bill, and the message leaves the money out entirely.
Share a summary of the whole event
Sometimes you don't want to send each person their own number — you just want to show the group where the money's going. From the ⋯ menu, choose Share Summary Link. That creates one link for the whole event: the budget, what's been spent, and the category breakdown, on a page anyone can open without the app.
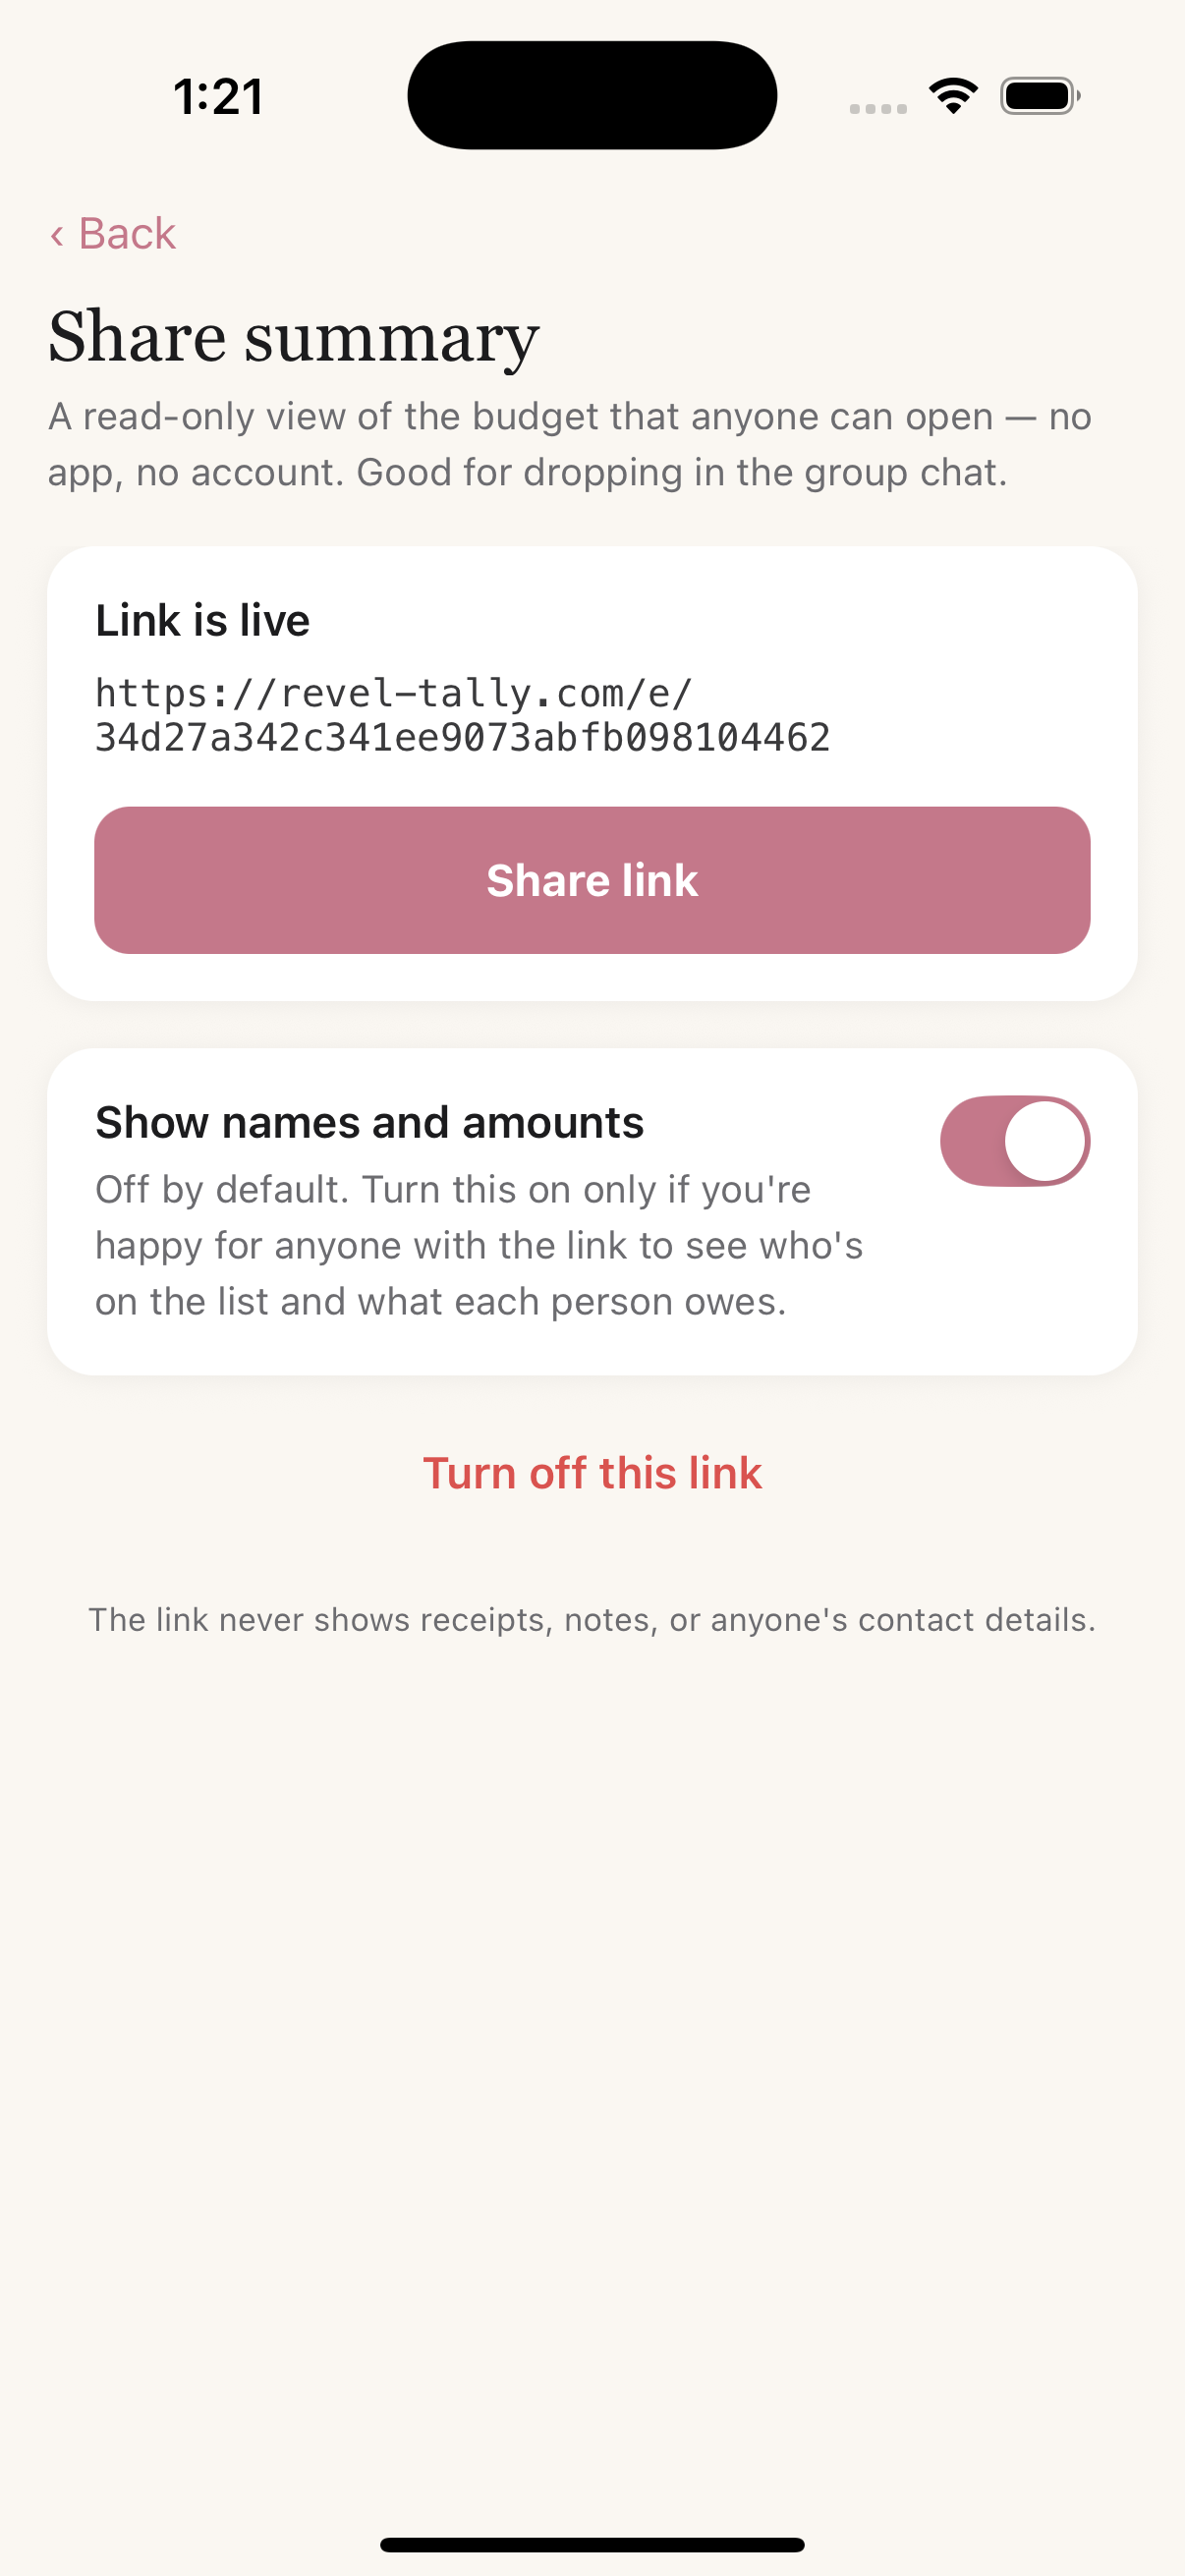
One link for the event — share, toggle, or turn it off
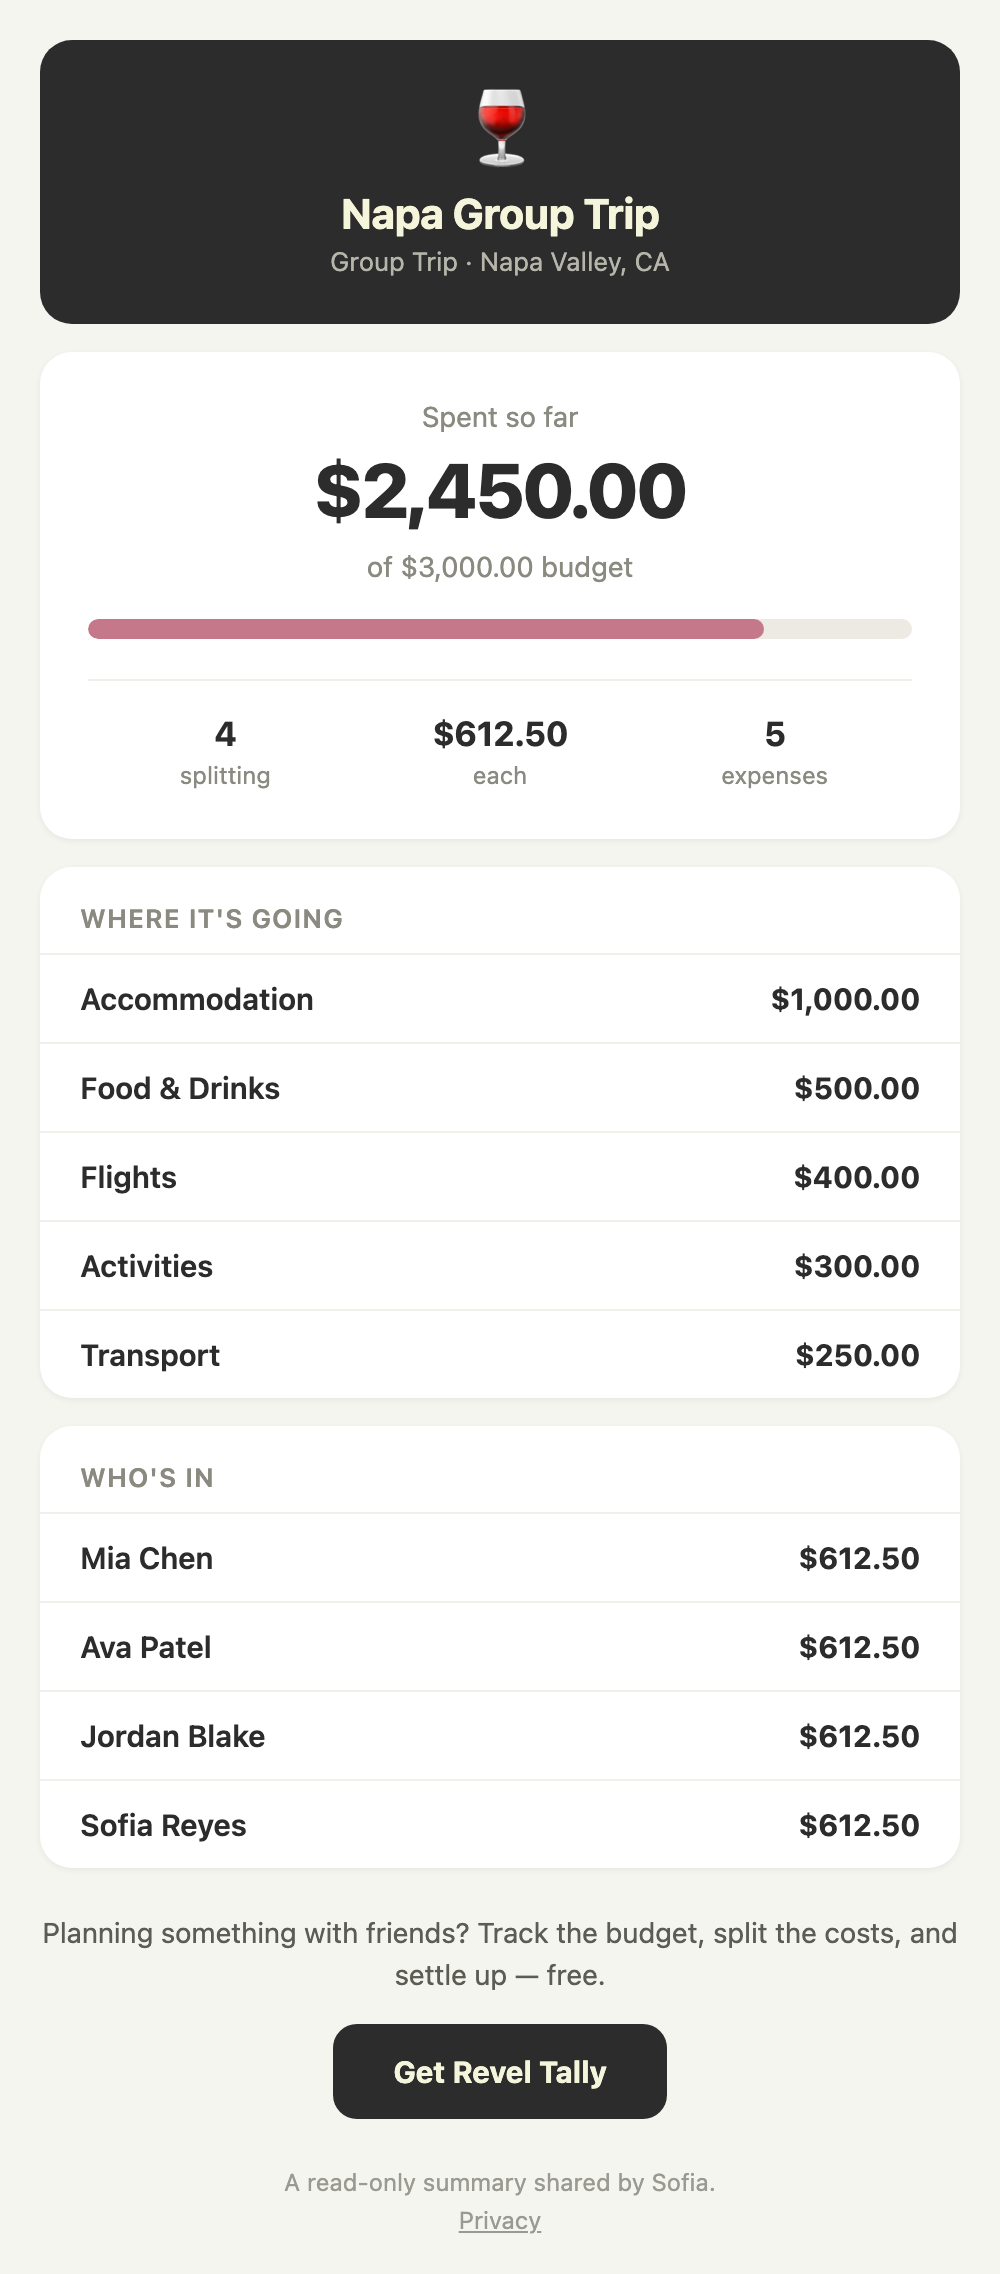
What the group sees — budget, spend, and where it's going
Names are hidden by default. The summary shows totals and categories, not who owes what. If you want the group to see each person's name and amount, there's a Show names and amounts switch — deliberately off until you turn it on, because anyone with the link can open the page.
Changed your mind? Turn off this link kills it immediately — anyone holding the old URL stops being able to open it. Sharing again later creates a brand-new link, and the names switch goes back to off, so a fresh link always starts private.
The summary never shows receipts, notes, individual expense comments, or anyone's contact details — only the totals, the categories, and (if you switch it on) each person's name and share.
Setting up a payment plan (invited guests)
If an event is more than two months out, an invited guest can spread their own remaining share over time instead of paying it all at once. From the My Split tab, tap Set Up Payment Plan: pick how many months to pay over (1 to 24), see the monthly amount work itself out, choose a starting month, and optionally turn on monthly reminders so a nudge lands right when it's time to set money aside.

Spread what you owe over months, with optional reminders
5
🔗
Linked Events & Notifications
Planning a wedding and its bachelor / bachelorette / bridal shower? Link them for one combined budget. When an event has links, they appear right under Per Person Split on the Overview, with a combined total across all of them.
A wedding is rarely one event. There is usually an engagement party, a bridal shower, a bachelor or bachelorette weekend, a rehearsal dinner — each with its own budget, its own guest list, and often its own organizer. Someone still has to answer “what is all of this costing?”
Why not just make them categories on one event? Because the bachelorette isn't the couple's budget. It's usually the maid of honor's, paid for by a different group, with a guest list that only partly overlaps the wedding's. Folding it in would put her spending in the couple's totals and her guests on their list. Linking gives you the combined number without taking her event away from her — she stays the owner, and can unlink any time.
| Event | Typically owned by | Why linking helps |
|---|
| The wedding | The couple | The anchor. Everything else rolls up to it. |
| Bridal shower | A parent, or the maid of honor | Separate guest list and separate payers, but the couple still want it in the total. |
| Bachelor / bachelorette | Best man / maid of honor | Often a trip with its own splits and settle-up. Links in without exposing it to the wedding's splitters. |
| Rehearsal dinner | Usually the couple or a parent | Same owner as the wedding, so linking is instant. |
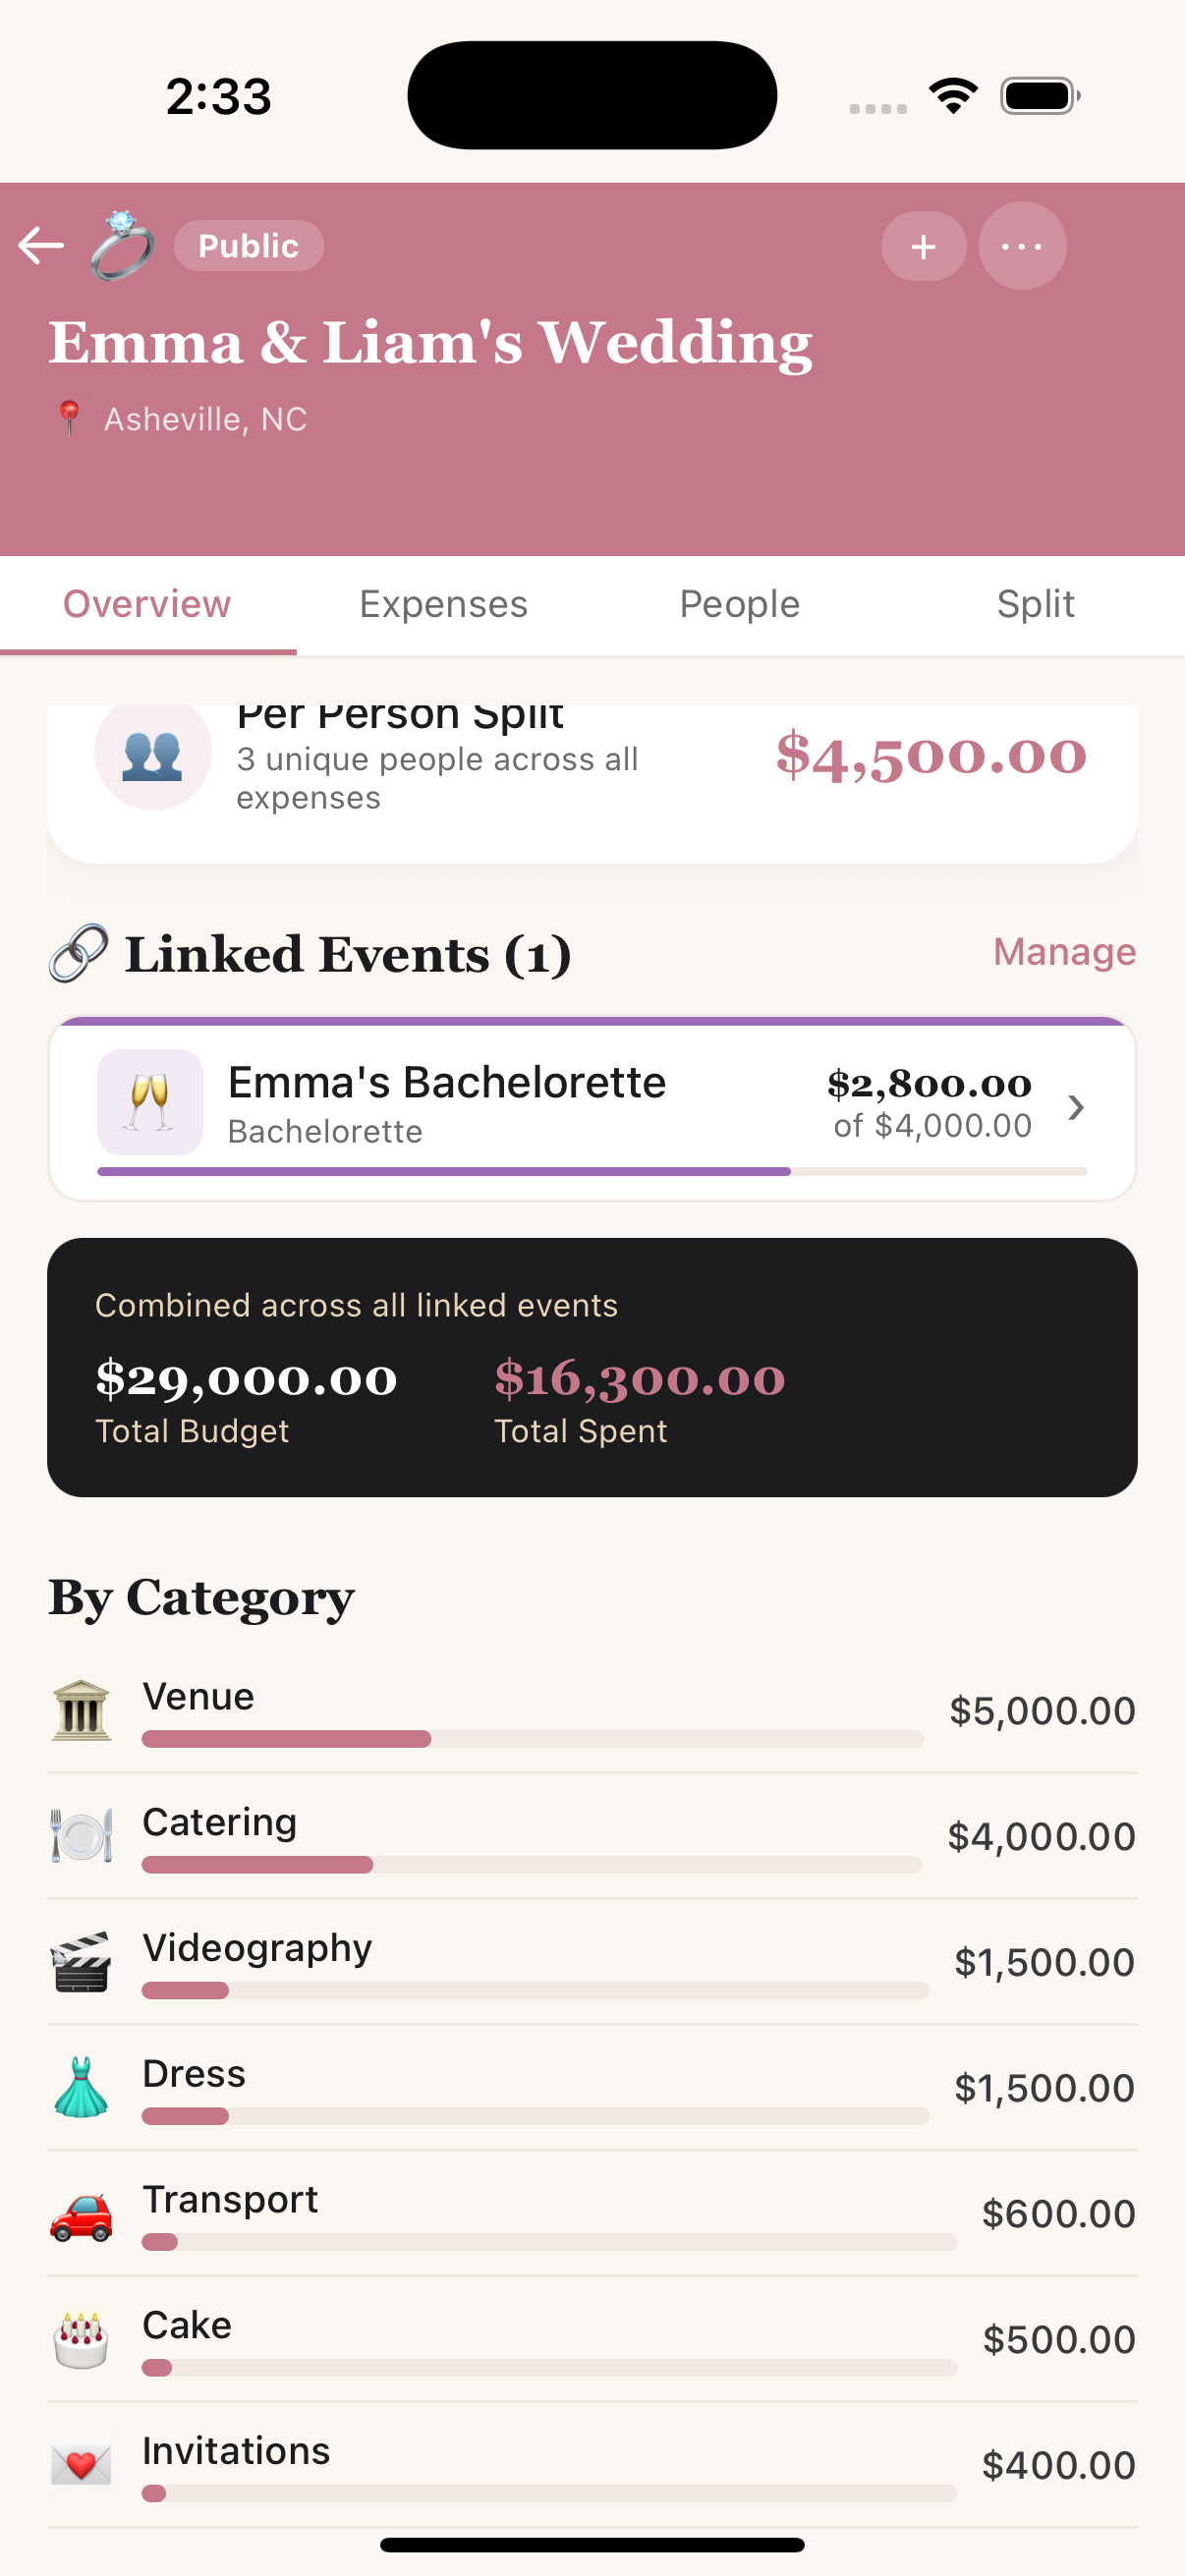
Overview — the linked bachelorette + combined budget
Linking your own vs. someone else's event
Linking two events you own is instant. To link with a different organizer — say a bridesmaid who's planning the bachelorette — the target event's owner first makes it searchable (⋯ menu → Make Public). The other organizer sends a link request, and you approve it from Manage Linked Events. Everyone keeps ownership of their own event; you just share the combined view.
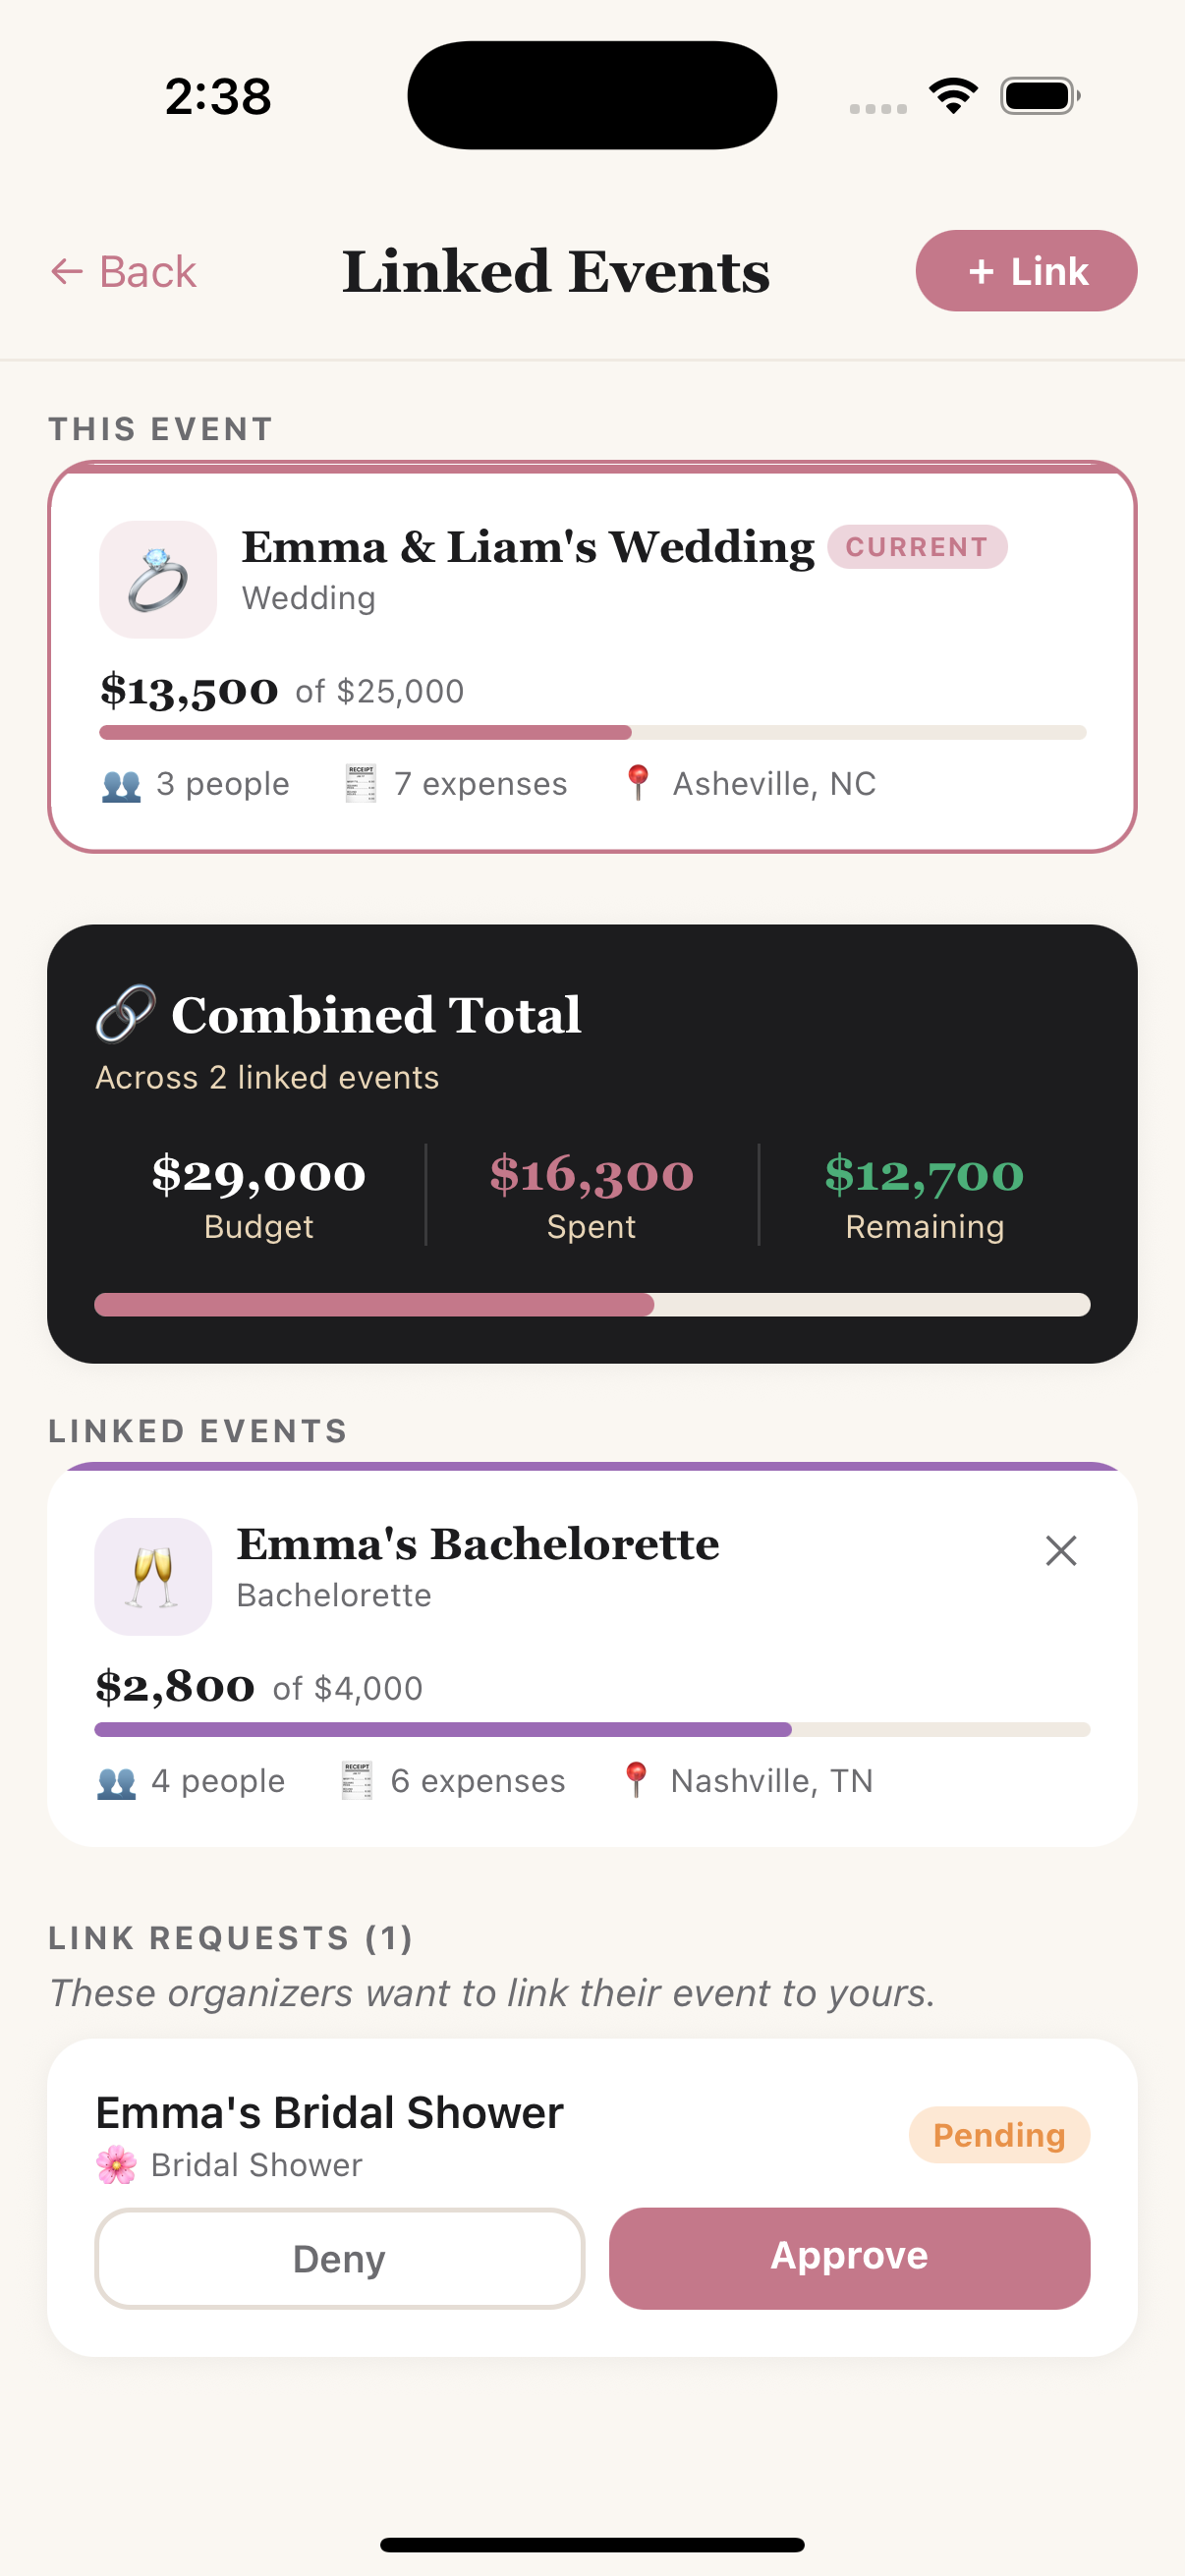
Combined total, linked events & a request to Approve / Deny

The 🔔 bell — link requests & updates land here
Push notifications & the weekly check-in
Everything that lands in the 🔔 bell can also reach you as a push notification, so you don't have to open the app to stay on top of things:
- Payment reminders — a nudge before a due date so a deposit never slips.
- New comments — when someone posts on an expense you own or have replied to.
- Link requests & approvals — when another organizer asks to link, or approves yours.
- Settle-ups — when someone records a payment to you, or confirms one you told them about, both sides are told.
- Weekly money check-in — every Monday, a quick summary of where your events stand (what's collected vs. outstanding) so nothing drifts. Tap it to jump straight to Payment History.
Telling people what they owe — in the app and on the web
The people splitting a cost are not all going to install an app, and the app does not pretend otherwise. There are two channels, and the same split reaches a person down whichever one fits them.
| In the app | On the web |
|---|
| Who it suits | Anyone with an account — the couple, a co-organizer, the friends who are on every trip. | Everyone else. No account, no app, no password. |
| How they get it | Their Split tab shows every event where they owe or are owed, and the 🔔 bell tells them when something changes. | You send them a share link — from Share everyone's split, each person gets their own. It opens a page with their number on it. |
| What they can do | See the breakdown, pay in-app or hand off to Venmo / Cash App / PayPal, and tell you when they have paid. | The same: see what they owe, pay by card or by hand-off, and say they have paid so you can confirm. |
| What they cannot see | Anyone else's balance, your budget, or the rest of the guest list. A share link carries one person's own share and nothing more. |
When amounts change, re-share. Adding an expense or editing a split changes what people owe. The links keep working and always show the current number — but nobody is notified by magic, so send them round again. The app offers this as a single action rather than making you message eleven people.
Someone who paid in cash can still close the loop. From their own link they say they have paid; it reaches you as a notification (and an email, because this one asks you to do something), and you confirm it. The ledger closes for money the app never touched.
Notifications are opt-in — your phone asks the first time, and you can change your mind any time in your phone's Settings.
Export your attendee list
From the ⋯ menu → Export Attendee List, export attendees (names, roles, contact info, and split status) — handy for seating charts, thank-you cards, or a mail merge.
Export your event data
From the ⋯ menu → Export Event Data, pull the whole event into a spreadsheet (CSV). You choose what to include:
- Expenses only — the full expense ledger: name, category, amount, who paid, date, vendor, and notes.
- Expenses + settle-up — the ledger plus a per-person summary (each person's share, what they've paid, and their net balance — who's owed vs. who owes) and the optimized settle-up transfers.
The file opens straight into Excel, Numbers, or Google Sheets — perfect for your own bookkeeping, splitting with an accountant, or keeping a record after the event wraps.
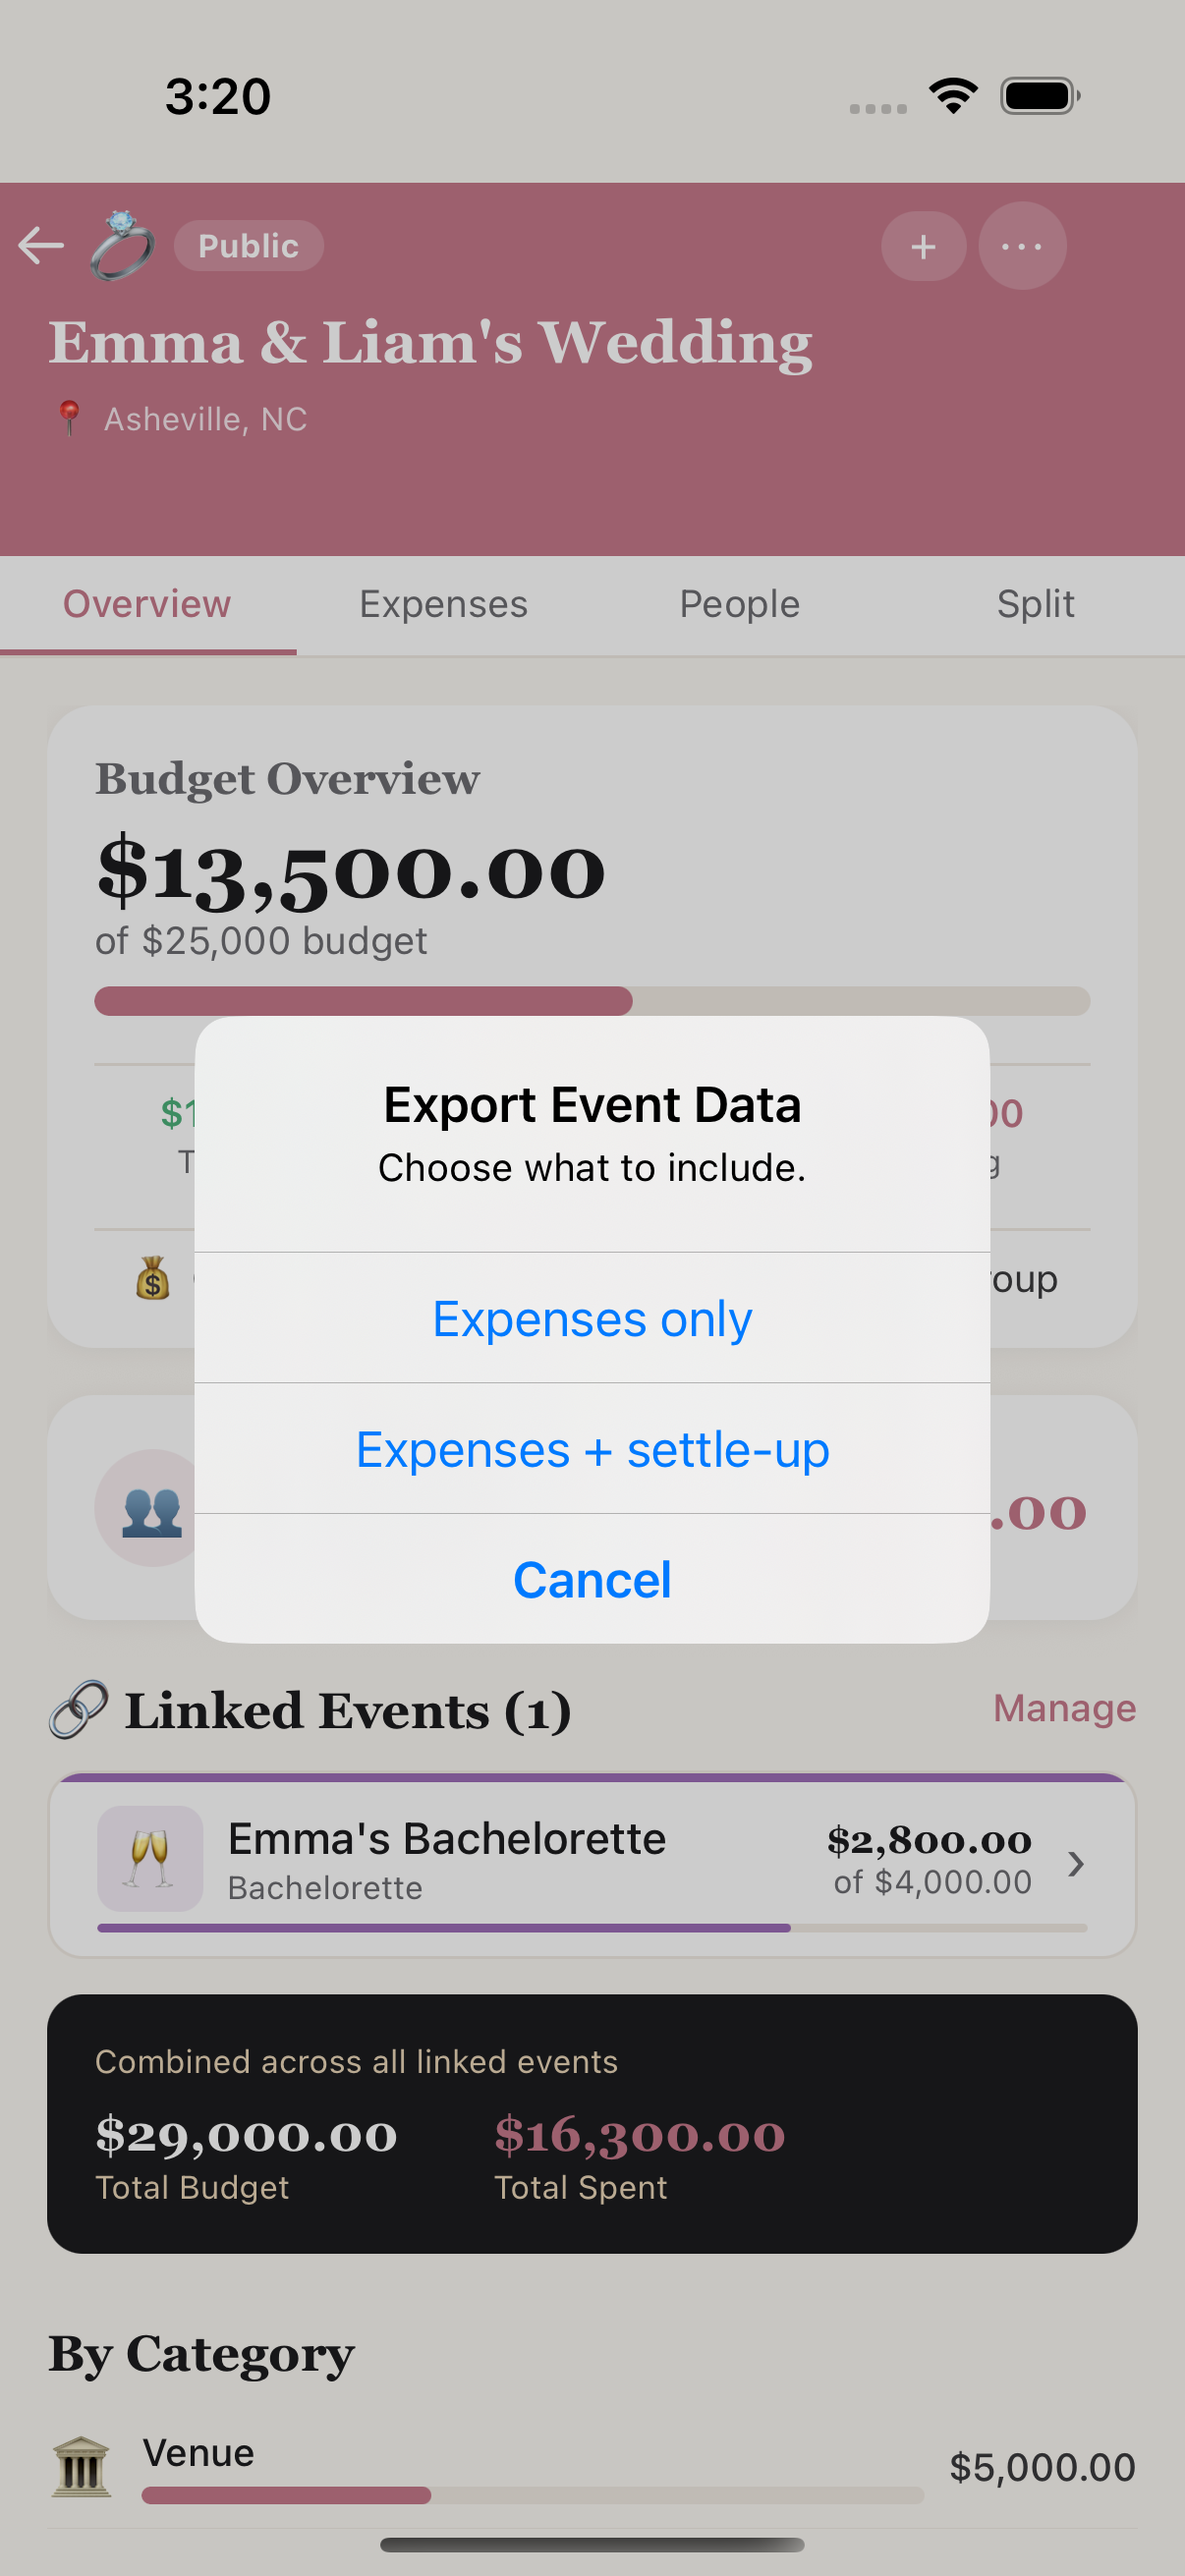
Export Event Data — pick expenses only, or expenses plus the settle-up
Export your whole account
Want everything in one file — not just a single event? Open your 👤 Profile → 📥 Export My Data. Revel Tally gathers your profile, every event you own (with its expenses, splits, attendees, and settle-up payments), your contacts, savings plans, and notifications into a single JSON file, then hands it to the share sheet so you can Save to Files, email it to yourself, or copy it. It's your data, portable any time — handy for a personal backup or a data-portability request.
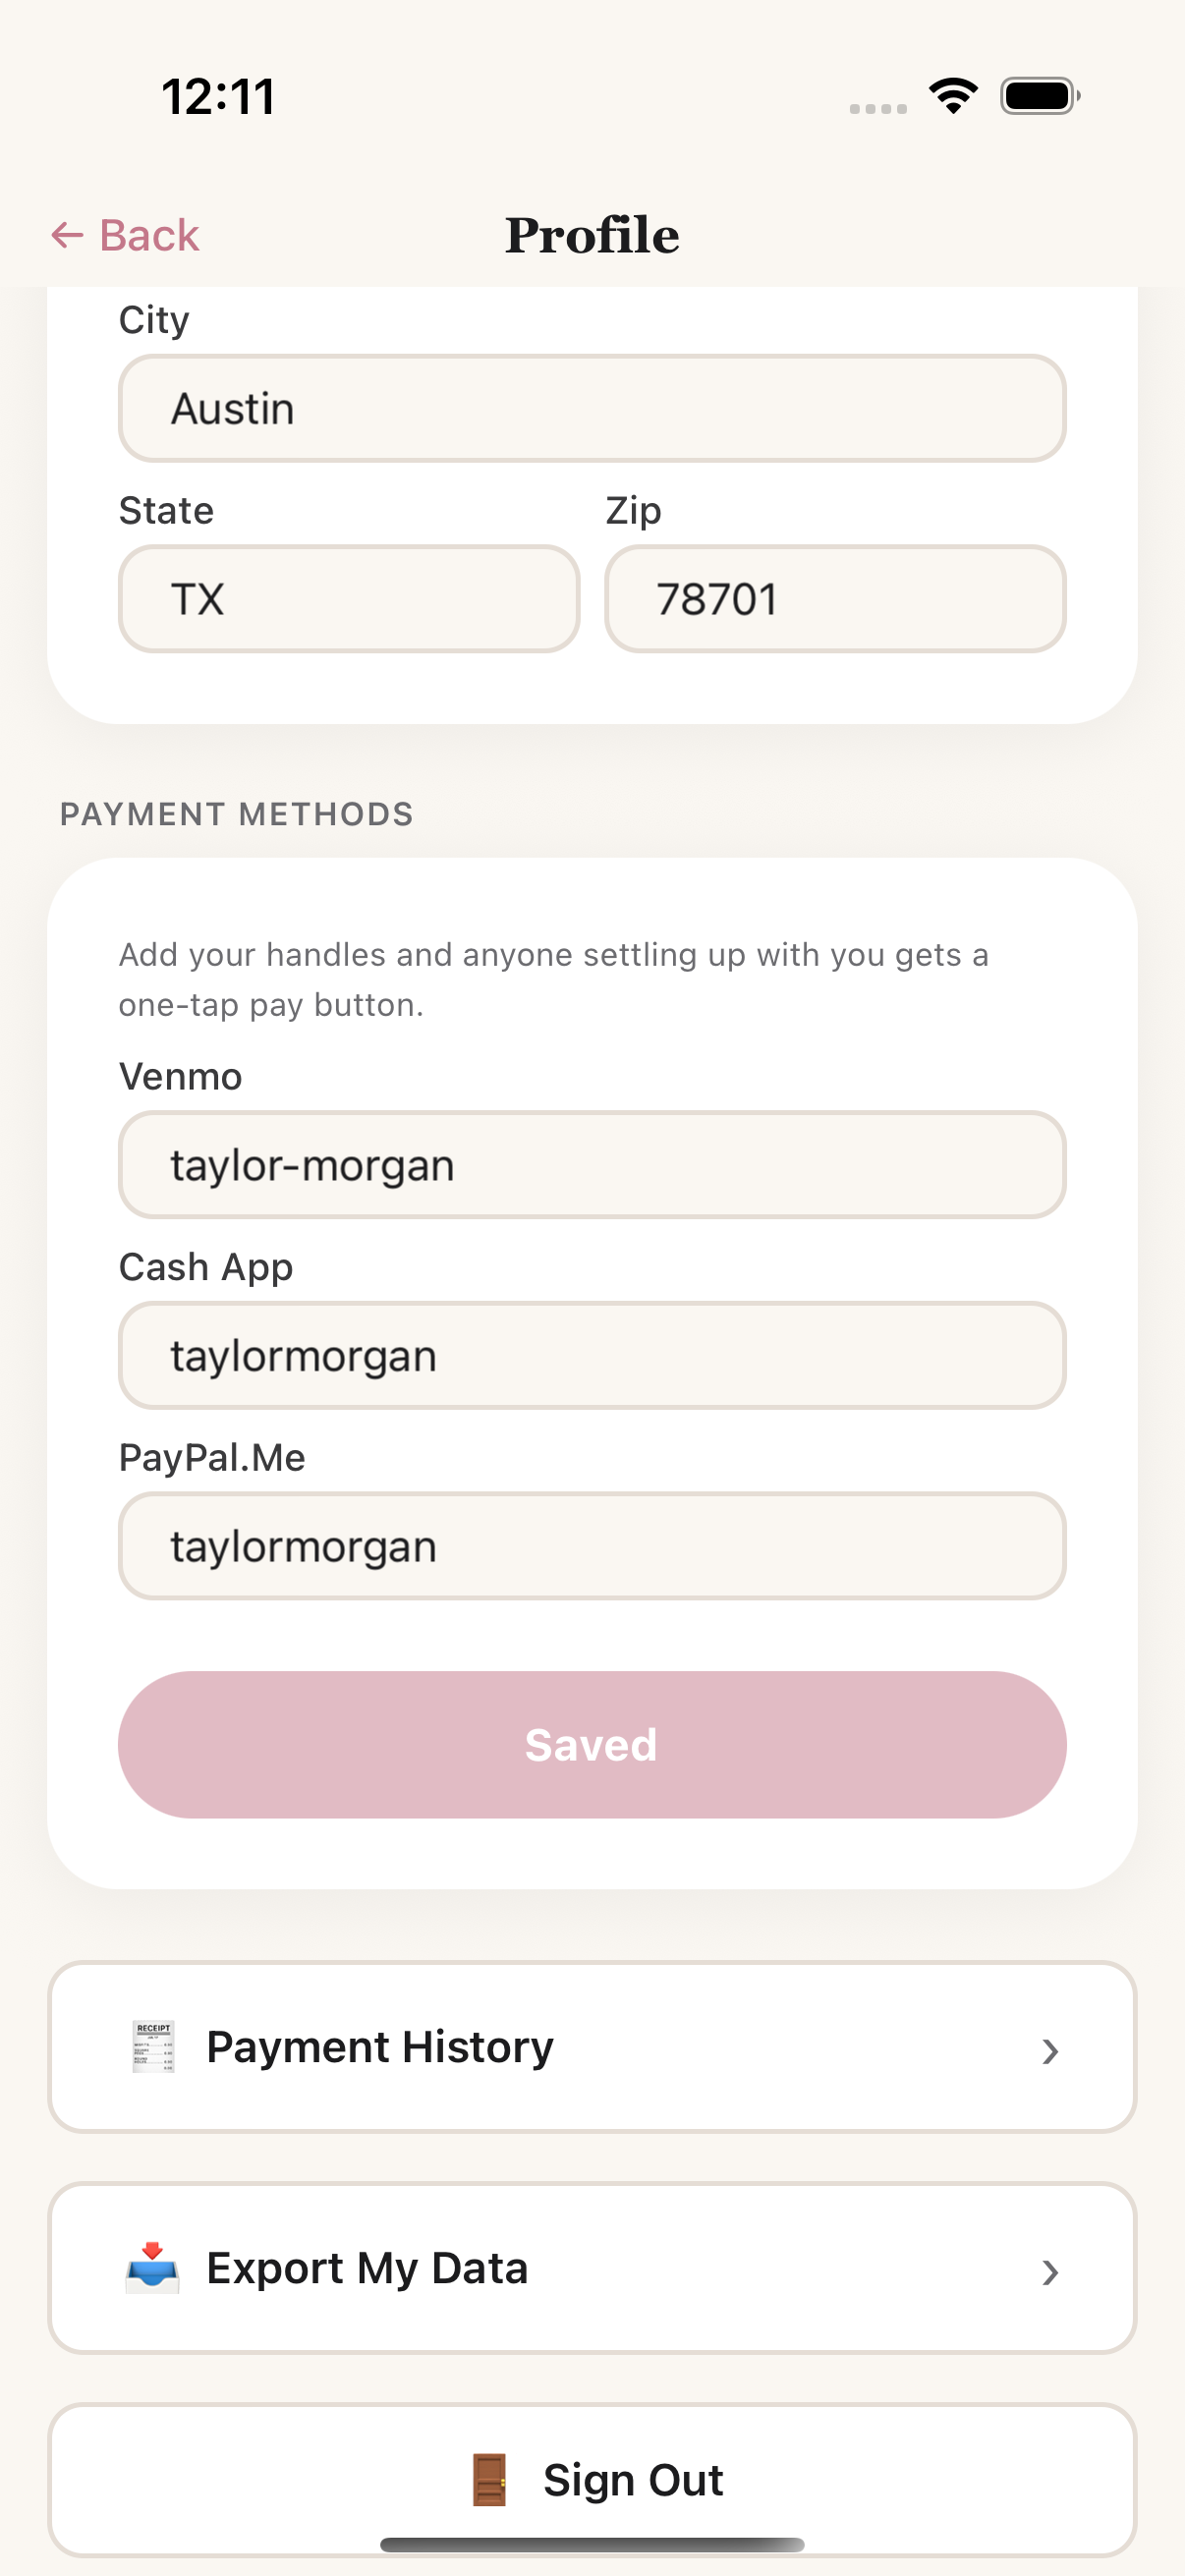
Profile → Export My Data — your entire account as one file
Mark an event complete
When it's all over, archive the event from the ⋯ menu. It dims on your home screen but keeps every record for reference.